Sunday, September 27, 2009

September 2009 Daring Bakers Challenge: Vols-au-Vent

The September 2009 Daring Bakers' challenge was hosted by Steph of A Whisk and a Spoon. She chose the French treat, Vols-au-Vent based on the Puff Pastry recipe by Michel Richard from the cookbook Baking With Julia by Dorie Greenspan. These are basically small puff pastry cups, filled with whatever your heart (or mine) desires.  Both the pastry and fillings were made by hand from scratch.

And oh my, what an experience! First, rolling out my own puff pastry was an  ordeal; because my food processor is so small, I had to halve the recipe and make two batches of dough that I would then combine.  After two failed attempts, I just decided to use my stand mixer with the whisk attachment, which worked perfectly.  Then, when rolling it out to get the flaky layers, I had to refrigerate after each turn because the house was too warm and the butter oozed.  It's not a big deal; it just added some additional time. My final (small) hurdle was that I didn't have cookie cutters; luckily, I have a smorgasbord of differently-sized  cups and glasses. 

I decided to do both savory and sweet Vols-au-vent. My savory ones are filled with the mushrooms with cream sauce I previously put atop steaks.  I also sauteed some asparagus in butter, then placed the uppermost spears in the vols-au-vent.  These were divine; even my sister who hates mushrooms thought they were delicious.


I had a few ideas for the sweet ones. An obvious idea would be strawberries with cream, drizzled with chocolate. Then, the first day of autumn hit. And autumn means apples. Apples and caramel. OMG caramel pastry cream topped with apples! YES. I then drizzled them with caramel sauce (you know, like for a sundae), and they were amazing. Sweet cream paired with the tart apples. Perfection. When I have a bakery, these will be sold. 


Now, the recipe is QUITE lengthy, as we first made the puff pastry and then formed and baked the vols-au-vents. Because of this, I'll link to the recipe provided by Steph.

Herb Marinated Pork Loin

About two weeks ago, hubby and I adopted two adorable kittens.  My sister really wanted to meet her 'neices,' and I'd been wanting to cook dinner for her and her husband, and my dad has been missing my nephew, so we had them over for dinner. I knew immediately that I wanted to make them the awesome macaroni and cheese we had not too long ago, and I wanted to make brussels sprouts for my brother-in-law.  I thought a pork loin roast would be great with those, so I searched TasteSpotting and found Ina Garten's recipe for herb-marinated pork loin at Food 4 Wibowo. 


Overall, this was great.  The herb marinade was well balanced and helped keep the meat moist.  I do take issue with the cook time; I am not okay with really pink pork.  It took so long that I ended up serving it still a little pink because my sister and her husband needed to get the baby home.  So double or triple the cooking time.

Herb-Marinated Pork Loin
(Ina Garten, Barefoot Contessa, "What Friends are For")


  • 3 lb boneless pork loin (or tenderloin)
  • 2 lemons, zest grated
  • 1/4 cup freshly squeezed lemon juice (from the 2 lemons)
  • 1/4 cup olive oil
  • 6 cloves garlic, minced
  • 1 1/2 tablespoons minced fresh rosemary leaves
  • 1 tablespoon chopped fresh thyme leaves
  • 2 teaspoons Dijon mustard
  • 2 teaspoons salt
  • 1 teaspoon ground black pepper
  • 1/2 teaspoon cayenne pepper

Combine zest, juice, olive oil, garlic, rosemary, thyme, mustard, salt, black pepper, and cayenne in a sturdy 1 gallon resealable plastic bag.

Add the pork loins and turn to coat with the marinade.  Squeeze out the air and seal the bag. Marinate the pork for at least 3 hours or overnight.

Preheat oven to 400F.  Remove the pork loin from the marinade and discard the marinade, but leave the herbs that cling to the meat.  Sprinkle the pork loins generously with salt and pepper.

Heat 2 tbsp of olive oil in a large oven-proof saute pan over medium high heat.  Sear the pork loins on all sides until golden brown (approximately 3 minutes on each side). Place the pan in the oven and roast the loins for approximately 15 minutes until the meat registers 137F at the thickest part. [I would cook much longer.]

Transfer the loin to a platter and cover tightly with foil. Allow to rest for 10 minutes.  Carve in 1/2 inch thick diagonal slices.  The thickest part will be quite pink and the thinnest park will be well down.

Season with salt and pepper and serve warm, or at room temperature with the juices that collect in the platter.

Wednesday, September 23, 2009

Custard, with Apple Chips

I'm the kind of person who frequently follows her whims, be they singing Christmas carols in September or blowing bubbles in the house. Tonight, I felt like making custard. I'd updated my blog and was doing some research for the Daring Bakers challenge (coming soon to food blogs near you), when I suddenly longed for custard. Unfortunately, I don't have much cream or sugar, but most fortunately, I came across this awesome recipe from some gal named Vicki's grandmother.  I'll admit I was a bit iffy at first, since it called for flour and whole eggs (as opposed to just the yolks), but what the hell. It's a good thing I tried it out because man, this is delicious. It's like crack. I'm furiously imagining all of the glorious things I could spoon it over warm while I wait for it to cool. I've got a fresh batch of apple chips, and I know exactly what I'm going to do with them... 


Oh look at that lonely chip floating in a sea of tasty..


Much better; now he's got some support.


Oh no! The evil lady is whisking one away! 
*Nom nom nom*


Sadly, these two little guys didn't make it. 
Official cause of death: drowning. Unofficial cause of death: devouring.

Okay, dorky picture time is over. Let me just say that the apple chips and custard go super well together; way better than I anticipated, and I expected them to be goshdarn good. 

Vicki's Grandma's Custard
6 tbsp flour
2/3 cup sugar
1/4 tsp salt
2 cups milk
2 eggs, beaten
1 tsp vanilla extract
2 tsp butter


In a large, heat resistant bowl, combine flour, sugar, and salt.  Whisk in milk and eggs.  Cook over a pot of boiling water, stirring constantly. CONSTANTLY. Stir constantly until it thickens, approximately 10-15 minutes.


When it has thickened, add the vanilla extract and butter.  Pour into dishes and cool. They don't need to be big dishes, trust me.


Baked Potato Salad

A long time ago, my dad brought home some potato salad made by a friend that was unlike any I had eaten before.  At first we puzzled over its smooth creaminess; what could it be? Finally it hit me, leaving me feeling like an absolute idiot. Sour cream. And green onions. It was like eating a cold yet delicious baked potato.  Since that day, I planned on making my own and just never got around to it. I almost did a few times, but something (perhaps my own laziness) got in the way.. Until yesterday, when I decided it would make a great accompaniment to some sausage poboys (which, amusingly, we had to do the sausage in the oven since it was raining all evening). 


This was a hit! Dad, hubby, and I all loved it; when I got home from an appointment today, hubby bragged that he'd eaten all the leftovers. The brat! It being the first time I tried this, there are a few things I'd do differently, of course.  I'd let my potatoes cool before mixing everything together in an attempt to keep them from mushing up so much.  Also, after mixing everything together, I'd refrigerate it for awhile so it would be cool. I'd mix in some bits of bacon too, but all of my bacon was frozen, and I forgot to deal with it. Oops. Oh well.

Baked Potato Salad
  • 2 lbs red potatoes, cut into quarters
  • 1 cup sour cream
  • 3-4 green onions, chopped 
  • salt and pepper to taste
  • 3 tbsp bacon bits (real bacon, please) 

Boil potatoes until they are cooked thoroughly; let cool to room temperature.  Mix in sour cream, onions, and bacon bits.  Season with salt and pepper to taste. Refrigerate until thoroughly chilled.

Smothered Squash

At the grocery store yesterday, they had the most gorgeous squash, so I bought some even though they weren't on my list and I was trying  to be a good little shopper by sticking to the list.. It didn't last long; the squash were just the first of multiple non-list items. But the squash was well worth it.  I don't think I've ever had any this sweet; I was genuinely taken by surprise when I took my first bite. I was ebullient when I saw I would have leftovers, meaning I could have the deliciousness again (and again).


Smothered anything is rather simple to make; squash is no exception.  It's something my family has always made (though maybe infrequently) and now that I live with a fellow gourd lover (unlike hubby), I can finally make it. 


Smothered Squash
  • 4-5 medium sized yellow squash, sliced into 1/4 inch rounds
  • 2 large onions, sliced
  • 4 tbsp butter
  • salt and pepper to taste

In a large skillet (one with a top), melt butter over medium heat.  Add the onions and saute for 5 minutes, or until they start to wilt. Add in the squash. Cover and, stirring occasionally, cook for about 20-30 minutes, until the squash becomes translucent and begins to fall apart.  Add salt and pepper to taste.

Serves 4 generously.

Sunday, September 20, 2009

Peach Jam Scones

I've been wanting to make rice pudding from The Pastry Queen for a few days, but I've been too lazy to spend an hour watching condensed milk boil by the time I feel ready to make dessert.  Flipping through the cookbook, I remembered I still had a bag of frozen peaches from when I made the crostata, so I checked out the peach recipes. I didn't want to make anything too time intensive, nor anything requiring a trip to the store; the peach jam scones recipe fit my requirements.  

Now tea and scones are a typical British fare, but these are a decidedly Southern spin on that classic.  To give it a bit more southern flare, I had my peach scone with sweet tea. So good!


Since my crostata debacle, I've wanted to try another recipe  from this book just to prove that my difficulties were a freak accident. This recipe mostly redeemed the cookbook; I'm just a bit annoyed when recipes  are so reliant on food processors. I realize a lot of people have them, and it makes sense in a way to write recipes for them.. but I haven't been able to purchase one yet.  Oh well. One day. I'll give you my no-food-processor adaptation.


 Peach Jam Scones
(Rebecca Rather, The Pastry Queen, pg 22)
  • 6 cups all purpose flour
  • 1 cup sugar
  • 1/4 cup baking powder
  • 1 1/2 cups chilled unsalted butter, cut into cubes
  • 1 1/2 - 2 cups buttermilk
  • 1/2 cup peach jam
  • 3 fresh peaches, peeled and sliced, or 1 (8 oz) package frozen peaches, defrosted and drained
  • 1/4 cup sugar for topping

Preheat oven to 425F.  Line two baking sheets with parchment paper. 

In a large mixing bowl (preferably one paired with a stand mixer), mix together flour, 1 cup sugar, baking powder and salt.  Add the butter cubes to the flour mixture and mix until crumbly. I found that using the whisk attachment, as opposed to the paddle, worked really well for this part. 

While the mixer is running, slowly pour in 1 1/2 cups of the buttermilk. Stop mixing as soon as the buttermilk has been incorporated.  If the dough begins to stick together, you're finished. If not, add more buttermilk, 1 tbsp at a time, until the dough begins to clump and form a ball. 

Remove dough to a lightly floured flat surface. Using your hands, pat the dough into a 1/4 inch thick 12x10 inch rectangle.  Spread the jam in a thin layer lengthwise over half the dough and arrange the peach slices in a single layer on top of the jam.  Fold the undressed dough over the peaches to make a 12x5 inch rectangle.  

Cut the dough into 8 triangles and sprinkled the top of the scones with the remaining 1/4 cup sugar. Place four each per baking sheet.


Bake 10-15 minutes, until the scones are light golden brown.  Serve warm or at room temperature.  

Chicken Kiev

Since moving in with my dad, I've gotten him hooked on cooking shows.  In particular, he's become fascinated, some may even say infatuated, with Alton Brown. Really, who can blame him? Alton's shows are fun and informative, like that awesome teacher you had in high school who had the perfect way of explaining things.  The other day, we watched an episode of Brown's Good Eats that focused on pounding meat into various thin slices. One featured dish was chicken kiev, which reminded me that 1) I love chicken kiev, 2) it's fun to make, and 3) it's been entirely too long since I've made it. 


Please notice that I said it's fun to make; it isn't particularly easy, though it isn't particularly difficult either.  It just takes a bit longer and some skill not required by your standard baked chicken dish. It's worth it though.  The delighted shock you'll receive upon diner's cutting into the meat to find delicious butter and herbs inside is priceless. 

Chicken Kiev
(Better Homes and Gardens New Cookbook, pg 464)
  • 1 tbsp chopped green onion
  • 1 tbsp snipped fresh parsley
  • 1 clove garlic, minced
  • 1/2 - 1/4 pound stick of butter, chilled [1 stick of butter will suffice]
  • 1 egg, beaten
  • 1 tbsp water
  • 1/4 cup all purpose flour
  • 1/2 cup fine dry bread  crumbs
  • 4 skinless, boneless chicken breast halves
  • salt and black pepper
  • 1 tbsp butter
  • 1 tbsp cooking oil

In a small bowl, combine the green onion, parsley, and garlic; set aside.  Cut chilled butter into four 2 1/2 x 1/2 inch sticks [I cut the stick of butter lengthwise, then cut those long, fat strips in half lengthwise, then cut the four resulting sticks  in half.]

In a shallow bowl, stir together egg and water. Place flour in a second shallow bowl.  Place bread crumbs in a third shallow bowl. Set all three bowls aside.

Place each chicken breast half between two pieces of plastic wrap. Using the flat side of a meat mallet, pound chicken lightly into rectangles about 1/8 inch thick. Remove plastic wrap and sprinkle with salt and pepper.

[At this point, it's good to set up an assembly line, laid out in this order: herbs, butter, flour, egg mixture, breadcrumbs, baking dish]. Place a quarter of  the onion mixture in the center of a breast; place a butter stick atop the herbs.  Fold in the side edges, then roll up from the bottom edge. Coat the chicken rolls with flour. Dip in egg mixture; coat with bread crumbs, coating the ends well to seal in the butter. Repeat for each breast.

Place coated chicken rolls in a rectangular baking dish. Cover and chill for 1 to 24 hours.

In a large skillet melt 1 tbsp butter over medium high heat; add oil.  Add chilled chicken rolls. Cook about 5 minutes or until golden brown, turning to brown all sides.  Return rolls to the baking dish, and bake, uncovered, in a 400F oven for 15-18 minutes or until the chicken is no longer pink.

Wednesday, September 16, 2009

Chocolate Ice Cream

We had my mother- and sister-in-law over for dinner last night, and I decided to make two desserts; first I made the pavlova again, then I also made chocolate ice cream, thinking my sister-in-law might not like the pavlova.  I grabbed a bunch of chocolate ice cream recipes off TasteSpotting, and amusingly, all of the recipes were from David Lebovitz's The Perfect Scoop. I guess it was in the stars that I try this recipe, huh?


This is a rich recipe and not for the faint-hearted. It's definitely a dark chocolate, so remember that. Serve it with some sweetness.. or raspberries. It was SO GOOD with raspberries.  I also mixed in some white chocolate chips to add some light sweetness to complement the heavy chocolate tones. 

Chocolate Ice Cream
(The Perfect Scoop by David Lebovitz)
  • 2 cups heavy cream
  • 3 tablespoons unsweetened Dutch-process cocoa powder
  • 5 ounces bittersweet or semisweet chocolate, chopped
  • 1 cup whole milk
  • ¾ cup granulated sugar
  • Pinch of salt
  • 5 large egg yolks
  • ½ teaspoon vanilla extract

Warm 1 cup of the cream with the cocoa powder in a medium saucepan, whisking to thoroughly blend the cocoa. Bring to a boil, then reduce the heat and simmer at a very low boil for 30 seconds, whisking constantly. Remove from the heat and add the chopped chocolate, stirring until smooth. Then stir in the remaining 1 cup cream. Pour the mixture into a large bowl, scraping the saucepan as thoroughly as possible, and set a mesh strainer on top of the bowl.

Warm the milk, sugar, and salt in the same saucepan. In a separate medium bowl, whisk together the egg yolk. Slowly pour the warm milk into the egg yolks, whisking constantly, then scrape the warmed egg yolks back into the saucepan.

Stir the mixture constantly over the medium heat with a heatproof spatula, scraping the bottom as you stir, until the mixture thickens and coats the spatula (170°F on an instant-read thermometer). Pour the custard through the strainer and stir it into the chocolate mixture until smooth, then stir in the vanilla. Stir until cool over an ice bath.

Chill the mixture thoroughly in the refrigerator, then freeze it in your ice cream maker according to the manufacturer’s instructions. (If the cold mixture is too thick to pour into your machine, whisk it vigorously to thin it out.)

Monday, September 14, 2009

September 2009 Daring Cooks Challenge : Indian Dosas

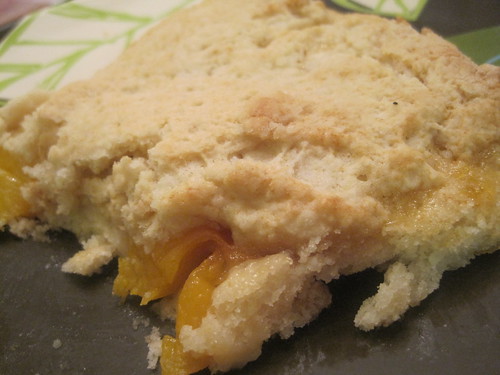
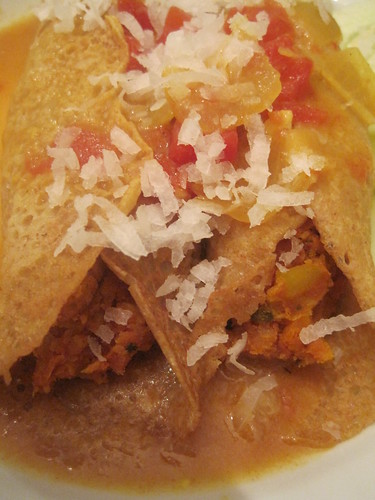
Yay! It's my first completed Daring Kitchen challenge!This month's Daring Cooks challenge was hosted by Debyi of the Healthy Vegan Kitchen. As the title of her blog implies, the recipe she chose was vegan - meaning free of all animal products. Yowza! She chose a delicious Indian Dosa recipe with a Curried Garbanzo filling and Coconut Curry Sauce.
I'll admit I was hesitant at first.  For my premier DC challenge, this was a bit daunting; my household is in no way vegan which meant I had to hunt down some ingredients in the far corners of my grocery store.  I was also unsure of how my tasters (hubby and dad) would respond. Wonderfully, my misgivings were unwarranted, as this dish was an absolute success! Hubby and Dad both want to see it on the table again, though hubby did request the addition of chicken (shame on him!).

 
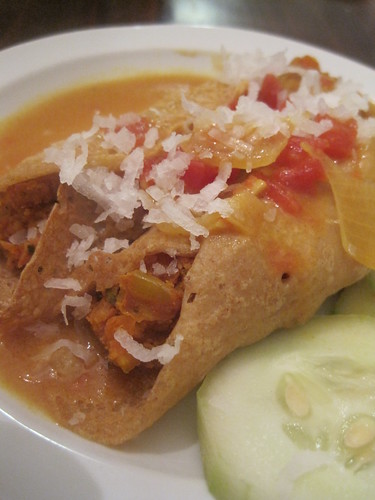
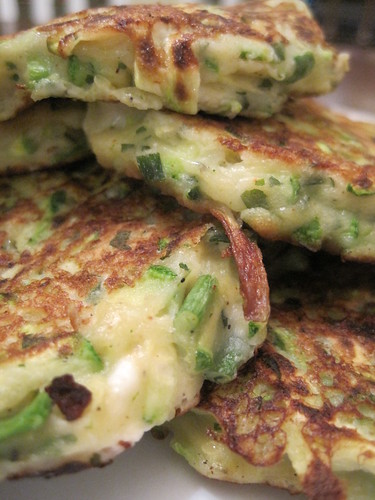
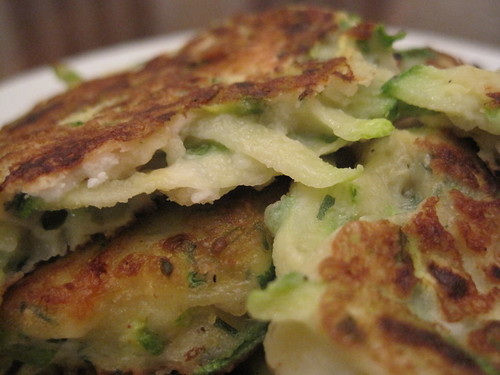
The recipe is fairly straightforward and simple; it's just a bit time consuming.  I also had difficulty making the dosas themselves; I ended up adding in more almond milk to thin the batter out, which made for larger, thinner dosas more similar to Debyi's pictures. I know some people went the opposite direction, so dosas must be a personal preference sort of thing.  
Indian Dosas
This recipe comes in 3 parts, the dosas, the filling and the sauce. It does take awhile to make, but the filling and sauce can be made ahead and frozen if need be. You can serve them as a main course with rice and veggies, or as an appetizer. This does take a little planning ahead, so make sure you read the recipe through before starting (I forgot & didn't start making the rice until everything was ready, oops).
Serves 4
Equipment needed:
large bowl
whisk
griddle or skillet
ladle (or large spoon)
spatula
vegetable peeler &/or knife
large saucepan
food processor or bean masher
Dosa Pancakes
1 cup (120gm/8oz) spelt flour (or all-purpose, gluten free flour)
½ tsp (2½ gm) salt
½ tsp (2½ gm) baking powder
½ tsp (2½ gm) curry powder
½ cup (125ml/4oz) almond milk (or soy, or rice, etc.)
¾ cup (175ml/6oz) water
cooking spray, if needed
Dosa Filling
1 batch Curried Garbanzo Filling (see below), heated
Dosa Toppings
1 batch Coconut Curry Sauce (see below), heated
¼ cup (125gm) grated coconut
¼ cucumber, sliced
Dosa Pancakes
1.Combine the dry ingredients in a bowl, slowly adding the almond milk and water, whisking until smooth.
2.Heat a nonstick skillet over medium heat. Spray your pan with a thin layer of cooking spray, if needed.
3.Ladle 2 tablespoons of batter into the center of your pan in a circular motion until it is a thin, round pancake. When bubbles appear on the surface and it no longer looks wet, flip it over and cook for a few seconds. Remove from heat and repeat with remaining batter. Makes 8 pancakes.
Curried Garbanzo Filling
This filling works great as a rice bowl topping or as a wrap too, so don't be afraid to make a full batch.
5 cloves garlic
1 onion, peeled and finely diced
1 carrot, peeled and finely diced
1 green pepper, finely diced (red, yellow or orange are fine too)
2 medium hot banana chilies, minced
2 TBSP (16gm) cumin, ground
1 TBSP (8gm) oregano
1 TBSP (8gm) sea salt (coarse)
1 TBSP (8gm) turmeric
4 cups (850gm/30oz) cooked or canned chick peas (about 2 cans)
½ cup (125gm/4oz) tomato paste
1.Heat a large saucepan over medium to low heat. Add the garlic, veggies, and spices, cooking until soft, stirring occasionally.
2.Mash the chickpeas by hand, or in a food processor. Add the chickpeas and tomato paste to the saucepan, stirring until heated through.
Coconut Curry Sauce
This makes a great sauce to just pour over rice as well. This does freeze well, but the texture will be a little different. The flavor is still the same though. My picture of this sauce is one that I had made, had to freeze, then thaw to use. It tastes great, but the texture is a little runnier, not quite as thick as it was before freezing.
1 onion, peeled and chopped
2 cloves garlic
½ (2½ gm) tsp cumin, ground
¾ (3¾ gm) tsp sea salt (coarse)
3 TBSP (30gm) curry powder
3 TBSP (30gm) spelt flour (or all-purpose GF flour)
3 cups (750ml/24oz) vegetable broth
2 cups (500ml/24oz) coconut milk
3 large tomatoes, diced
1.Heat a saucepan over medium heat, add the onion and garlic, cooking for 5 minutes, or until soft.
2.Add the spices, cooking for 1 minutes more. Add the flour and cook for 1 additional minute.
3.Gradually stir in the vegetable broth to prevent lumps. Once the flour has been incorporated, add the coconut milk and tomatoes, stirring occasionally.
4.Let it simmer for half an hour.
Happy eating!

Sunday, September 13, 2009

Zucchini Bread

After making zucchini fritters some time ago, I still had oodles of zucchini left over. I didn't just want to steam some for dinner, so I got online and looked for zucchini bread recipes. I found one I really wanted to try at Our Best Bites for a chocolate zucchini bread, but hubby and my dad did not like that idea at all (thought hubby doesn't really like the idea of zucchini bread). Luckily for me, the same site had an alternate, chocolate free version of the zucchini bread that I used.


Unfortunately, my bread was a bit bitter. I'm not sure if it was my baking soda or zucchini, but it definitely left the bread a bit unpleasant. Well, I thought so; my dad really enjoyed it. Hubby wouldn't try it.

Zucchini Bread
(original recipe by Our Best Bites)

bread

  • 2 1/4 cups flour
  • 2 tsp cinnamon
  • 1/8 tsp ground cloves
  • 1/2 tsp salt
  • 1 1/2 tsp baking soda
  • 1/2 cup canola oil
  • 3/4 cup granulated sugar
  • 1/2 cup brown sugar
  • 3 eggs
  • 2 tsp vanilla
  • zest from one large orange
  • 1/2 cup sour cream
  • 3 cups grated zucchini
  • optional: 2/3 cups chopped pecans, toasted (I omitted)
Topping:
  • 2 tbsp white sugar
  • 2 tbsp brown sugar
  • 1/2 tsp cinnamon
Preheat oven to 350F. Grease and flour 2 loaf pans and set aside.

Combine flour, cinnamon, cloves, salt, and baking soda in a bowl and whisk to combine. Set aside.

Beat eggs, oil, sugars, and vanilla for about 30 seconds. Add sour cream and orange zest and beat to combine. Mix in zucchini.

Add dry ingredients and mix just until combined. Divide batter between 2 pans. Bake for 50-60 minutes or until a knife comes out clean.

Make sure to let your loaf rest on a cooling rack for at least 10 minutes before you try to remove it from the pan or it will come out in chunks!

Macaroni and Cheese

I think about homemade mac 'n' cheese quite frequently. Hubby's grandmother makes the absolute best homemade macaroni and cheese. It's absolutely divine. And while one day I might have that recipe myself, for now I feel I should have my own macaroni and cheese. I made an attempt awhile ago, which was alright, but it wasn't the one. For some reason, I haven't tried another recipe since. I can't really explain it, as I've come across many and saved them.. Today, I finally decided to make some. I've been craving good macaroni and cheese, and the best way to satisfy a craving is to make whatever it is you want.

This recipe is almost perfect. The sauce's texture is fabulous; it's thick, creamy, and smooth. The dish has an excellent level of cheesiness. My one qualm is that it might be a bit too sweet, but I only thought that after eating more than my fair share of it. The recipe comes from Cook's Illustrated American Classics issue (which a friend told me I had to have). Awesomely, this magazine is associated with one of my favorite shows, America's Test Kitchen. It comes on public television and you should totally check it out. The magazine is perhaps more awesome than the show, as it details the process by which the recipe came to be (eg, what type of cheeses were tried, cook times, methods, etc).

Something to note. The recipe calls for a bread crumb topping, like many recipes do. For some reason, I hate the idea of breadcrumbs or cracker crumbs or bread chunks atop my mac 'n' cheese. It's a personal preference. I'll include the full recipe for you though, in case it's your sort of thing.

Macaroni and Cheese
(Cooks Illustrated, "American Classics," 2009, pg 19)

Bread Crumb Topping
  • 3 slices hearty white sandwich bread, torn into large pieces
  • 4 tbsp unsalted butter, melted
  • 1/4 cup Parmesan cheese
Macaroni and Cheese
  • 1 lb elbow macaroni
  • 1 tbsp salt
  • 4 tbsp unsalted butter
  • 5 tbsp all purpose flour
  • 3 - 12 oz cans evaporated milk
  • 2 tsp salt
  • 2 tsp hot pepper sauce
  • 1/8 tsp ground nutmeg
  • 1 tsp dry mustard
  • 8 oz (2 cups) extra sharp cheddar cheese, shredded
  • 5 oz (1 1/4 cups) American cheese shredded (it's best to get a block of it from the deli)
  • 2 oz (3/4 cup) Monterey Jack cheese, shredded
Adjust oven rack to middle position and heat oven to 350F.

For the topping: Pulse the bread, melted butter, and Parmesan in a food processor until ground into coarse crumbs. transfer to a bowl and set aside.

For the macaroni and cheese: Bring 4 quarts (16 cups) water to boil in a large pot. Add 1 tbsp salt and macaroni to boiling water and cook until al dente, about 6 minutes. Reserve 1/2 cup of the macaroni cooking water, then drain and rinse the macaroni in a colander until cold running water. Set aside.

Melt the remaining 4 tbsp butter in the now-empty pot over medium high heat until it's foaming. Stir in the flour and cook, stirring constantly, until the mixture turns a light brown, about 1 minute.

Slowly whisk in the evaporated milk, hot sauce, nutmeg, mustard, and salt. Cook until mixture begins to simmer and is slightly thickened, about 4 minutes.

Remove from the heat and whisk in the cheeses and reserved water until the cheese melts. Stir in the macaroni and until completely coated.

Transfer macaroni to a 13x9 inch baking dish and top evenly with bread crumbs. Bake until cheese is bubbling around the edges and the top is golden brown, about 20 to 25 minutes. Let sit for 5 to 10 minutes before serving.

Stroganoff Meatballs

When I asked hubby wanted he wanted for dinner today, he requested meatballs "with delicious sauce." At first, I had no idea what he was talking about, then I remembered something I've made a few times in the past. Really, they were my first foray into the meatball world. They're pretty simple, and they're served with a decent stroganoff sauce (though, it's the only one I've had so it might not be too authentic).


I'm not entirely sure where I first found this recipe; I believe it came from one of my mother's cookbooks. Perhaps A Taste of Home? I don't really know, but I'll try to find out.

Stroganoff Meatballs
Meatballs
  • 1 egg
  • 1/2 cup dry, plain bread crumbs
  • 1/4 cup milk
  • 1 tbsp dried minced onion (or you can use fresh, just mince it well)
  • 1 tbsp dried parsley
  • 1/4 tsp garlic salt
  • 1/4 tsp pepper
  • 1 lb ground beef (I always use the leanest beef)
Sauce
  • 1 can condensed cream of mushroom soup
  • 1/2 cup sour cream
  • 2 tsp chili sauce (I use a tsp or two of chili powder)
  • 1/4 tsp dried oregano
  • 1/4 tsp pepper
  • 1/8 tsp garlic salt

Preheat oven to 450F.

In a large bowl, beat the egg. Add the crumbs, milk, onions, parsley, garlic salt, and pepper, and mix well. Add the beef and mix until well combined. Using approximately 1 tbsp of the meat mixture, roll it into 1 inch balls. Place on an ungreased baking sheet.

While the meatballs are baking, prepare the sauce by combining all ingredients in a medium saucepan. Cook over medium heat until well combined and thoroughly heated. If you like, you may thin out the thick sauce with a few tablespoons of milk.

Bake for 10-15 minutes or until no longer pink. Drain on paper towels.

Wednesday, September 9, 2009

Finger Pies, or as others know them, Hand Pies

A while ago, my brother-in-law mentioned in passing the finger pies his grandmother makes and that I should make some. My sister, remembering his comment, enlisted in my help in making some for him as a surprise. We got the recipe from his mom, who copied it down while his grandmother made some of the pies. So today I present some
good ol' Cajun finger pies.


Now, if you're not familiar with these, let me explain. They aren't exactly pies; the dough is more fluffy, moist, and sweet than a standard pie crust. They can be filled with a variety of things: preserves, whole fruit, pudding, etc. We decided to use three different fillings: pumpkin, blackberry preserves, and fig preserves. I think peaches would be absolutely fabulous as a filling, as well as baked apples. Whatever floats your boat. Though, it shouldn't be too moist or you might end up with soggy pies. (After a couple days, our pumpkin pies became soggy in the center.)


Finger Pies
(recipe from Ethel Mire)
  • 2 cups sugar
  • 2 eggs
  • 1 cup shortening
  • 1 cup milk
  • 1 tsp vanilla extract
  • 1 tsp baking powder
  • 1 tsp baking soda
  • 1 tsp salt
  • 1 tbsp vinegar
  • 6 3/4 cups all purpose flour
  • approximately 2 cups of preferred filling

Preheat oven to 350F and line a baking sheet or two with parchment paper. (If you use two pans, the process goes by a little faster.)

Cream together the sugar, eggs, and shortening. Mix in milk, vinegar, and vanilla extract.

Whisk together the baking powder, baking soda, salt, and 1 cup of the flour. Mix into the wet ingredients. Add the remaining (5 3/4 cup) flour a half cup at a time, mixing thoroughly after each addition. Add additional flour if necessary to ensure the dough is not sticky.

Roll approximately 1/4 cup of the dough into a ball. On a lightly floured surface, flatten the ball into a 1/8 inch disc, approximately 6 inches in diameter. Drop a tablespoon of filling on the bottom half of the disc, spreading it out but leaving a 1/4 inch margin clear. Fold the other half of the disc over the filling. Using either your fingers or a fork, press the edges (that 1/4 inch margin) to seal.

Place 4 to a baking sheet and bake for approximately 15 minutes, until the edges are golden brown. Remove to a cooling rack to cool.

This makes approximately 28 finger pies.

Sunday, September 6, 2009

Cheesecake Brownies

It's always fun to make dessert for people, and so gratifying as well. My general plan when invited to someone's home for dinner is to bring dessert. I love the challenge of deciding what treats people will enjoy, what their tastes are. The past few times we've had dinner at hubby's mother's house, I've received mixed results. MiL usually enjoys it, while I don't think my sister-in-law does. Luckily, these cheesecake brownies went over well with everyone (even hubby). I had originally planned to make the Cinnamon Cheesecake Blondies I made oh so long ago, but when hubby plaintively requested them with no cinnamon, I decided to change direction a bit. A cheesecake blondie doesn't sound nearly as good as a cheesecake brownie. I've made Cookies & Cream Brownies before, which are nearly the same (plus the addition of smashed up oreos) but I thought I'd go for something simpler. And I didn't have any oreos. Being lazy, I found a recipe online that had ingredients in my pantry. It was a bit of a challenge as I'm out of bakers' chocolate, but I found this one that only calls for cocoa powder. Yay!


Cheesecake Brownies
(original recipe)
brownie
  • 1 cup butter
  • 2 cups sugar
  • 4 eggs
  • 2 tsp vanilla extract
  • 1 cup all purpose flour
  • ½ cup cocoa
  • ½ tsp salt
cheesecake
  • 8 oz (1 package) cream cheese, softened
  • between 1/4 and 1/3 cup sugar, depending on how sweet you'd like it
  • 1 egg

Preheat oven to 350F and grease an 8x8 baking pan.

In a small saucepan, melt the butter over low heat. Once the butter is fully melted, remove from the heat and add the sugar, vanilla, and eggs. It helps if you've combined these ingredients already and pour the butter into them. Blend together.

In a separate bowl, combine the flour, cocoa, and salt. Add the dry ingredients to the wet and mix well. Pour into the prepared pan.

Next, prepare the cheesecake layer. Beat the cream cheese and sugar together, then add the egg and beat until creamy. Drop dollops on top of the brownie batter, then swirl using a knife.

Bake 50-65 minutes or until toothpick inserted in the center comes out clean.

Garlic Cheddar Biscuits

The other night, we had a *slight* cool front move in, so hubby's mom invited us over for chili. I usually bring a dessert when we go over for dinner, but I also had the idea to bring along some cheddar biscuits. Everyone seems to love them. When people talk about Red Lobster, they discuss how great the biscuits are (not the seafood). Biscuits, cheese, garlic.. how could anyone not like that? Who doesn't like biscuits?? I've never... oh wait, I've met one person who doesn't like biscuits: my sister-in-law. It's a shame. But anyhoo. There are recipes everywhere of all varieties for cheddar biscuits; I went with this one over at folkmann.ca. I was looking for something easy since I was also baking cheesecake brownies. This recipe fit the bill, and was delicious to boot.


Garlic Cheddar Biscuits
(adapted from Better Homes and Gardens at folkmann.ca)
[I halved the recipe as I was running low on flour, but I'll post the original)

  • 3 cups all-purpose flour
  • 1 tbsp baking powder
  • 1 tbsp sugar
  • 1 tsp salt
  • 3/4 tsp cream of tartar
  • 3/4 cup butter, cut into small squares
  • 1 1/4 cups milk
  • 1 clove garlic, diced
  • 1/2 cup shredded cheddar

Preheat the oven to 450F. In a large bowl, combine the flour, baking powder, sugar, salt and cream of tartar. Using a pastry cutter, cut in the butter until the mixture resembles coarse crumbs.

Make a well in the center of the flour mixture, and add the milk all at once. Using a fork, stir just until the mixture is moistened. Fold in the garlic and cheese, taking care not to work it too much or you'll make the biscuits less fluffy.

Using a large spoon, drop dough into 12 mounds on to a greased baking sheet.

Bake for 10-14 minutes or until golden. Remove biscuits from baking sheet and serve warm.

* Next time, I think I'll brush the tops of the biscuits with melted butter a few minutes before the baking time is.

Wednesday, September 2, 2009

Blasted Broccoli

Who doesn't love broccoli? Ok. Lots of people don't, and I understand why to a certain degree. But I still love it, as does hubby.. and really most people I know. Sadly, I don't know many ways to prepare it, so any new recipe is great. Luckily, I found this recipe. Woohoo!


Generally, this dish is a great, flavorful side dish that gets you away from the usual steamed broccoli. Our only issue was that it was a bit dry; perhaps I didn't use enough olive oil.

Blasted Broccoli
(originally from Bon Appetit)
  • 1 1/4 lbs (approximately 8 cups) broccoli crowns, cut into florets
  • 3 1/2 tbsp olive oil, divided
  • 2 garlic cloves, minced
  • large pinch of dried crushed red pepper

Preheat the oven to 450F.

Toss broccoli and 3 tbsp olive oil in a large bowl to coat. Sprinkle with salt and pepper. Transfer to a rimmed baking dish. [I lined mine with foil.] Roast for 15 minutes.

In a small bowl, stir together remaining 1/2 tbsp oil, garlic, and red pepper. Drizzle over broccoli and toss to coat. Roast until broccoli is beginning to brown, approximately 8 minutes longer. Season to taste with salt and pepper, and serve immediately.

Mmm, tasty!

Vietnamese Caramel Shrimp

Oh, to be in Louisiana during shrimp season is one of my greatest joys in life. There are few things as satisfying as going to the store and picking up large, local gulf shrimp. Yum yum. Now I finally get to try out the shrimp recipes I accumulated while in Iowa, like the one I found years ago for Vietnamese Caramel Shrimp. This dish is a perfect marriage of sweet, savory, and heat. And while it's easy to make, this will most certainly impress anyone it's served to with its complexity.


Vietnamese Caramel Shrimp
  • 2 tbsp sugar
  • 1/2 cup water, divided in half
  • 1 tbsp olive oil
  • 1 shallot, chopped
  • 2 cloves garlic, chopped
  • 1 tsp ginger, grated
  • 1 small chili, seeded and chopped
  • 1 lb shrimp, peeled and deveined
  • 2 tbsp fish sauce
  • pepper to taste
  • 1 tsp sesame oil
  • 1 tbsp cilantro, chopped

In a small sauce pan, heat sugar and 1/4 cup water over medium high heat. Stir constantly until it caramelizes and turns dark brown. Add the other 1/4 cup water and heat until caramel dissolves. [Be careful as you pour the water in; otherwise, you will steam the bejeebs out of your hand.] Remove from heat and set aside.

In a large skillet, heat the olive oil. Add shallot, garlic, ginger, and chili; saute for 3-5 minutes. Add in the shrimp, 2 tbsps of the caramel sauce you made, fish sauce, and pepper. Simmer until the shrimp is pink all over, about 2-4 minutes. [I flipped the shrimp half-way through the cooking process so sauce would be on both sides. You know the shrimp are done when they are stiff.]

Remove from the heat and stir in sesame oil and cilantro.


Not surprisingly, I served this dish over rice, which was great as the rice mixed with the sauce made a tasty dish on its own.

Zucchini Fritters

I'm a big fan of squash and zucchini. Sadly, hubby is not; he once told me disdainfully that he is not eat things from the gourd family. He makes a few exceptions (like my mom's very cheesy squash casserole) but we've rarely eaten any since moving in together. Now that we're living with my dad, the tables have turned. It's 2 to 1, so zucchini and squash are in.
Recipes for zucchini fritters seem to be popping up quite a bit right now, which makes sense with it being in season and so tasty. I've decided I need a better balance between recipes from the internet and my cookbook collection, so I used another recipe from Nigella Lawson's Forever Summer. I modified the recipe a bit by halving it, substituting chevre for feta, and cutting out some of the herbs.


Zucchini Fritters
(Nigella Lawson, Forever Summer, p 156)
[my adaptations in brackets]
  • 4 zucchini (approximately 1 1/2 lbs) [I used 3]
  • 5-6 scallions, finely chopped [I used 3]
  • 9 oz feta cheese [4 oz chevre]
  • small bunch fresh parsley, chopped [1 tbsp chopped frozen parsley]
  • small bunch of fresh mint, plus extra to sprinkle over [omitted]
  • 1 tbsp dried mint [omitted]
  • 1 tsp paprika [1/2 tsp paprika]
  • scant 1 cup all purpose flour [1/2 cup flour]
  • salt and pepper
  • 3 eggs, beaten [1 1/2 eggs beaten. I beat the first egg and added it in, then beat the second egg and added half of it]
  • olive oil for frying
  • 3-4 limes [omitted]

Coarsely grate the zucchini. Spread the little shards out on a tea towel and leave for about 20 minutes to remove excess moisture. [I laid paper towels atop the tea towel]

Put the chopped scallions in a bowl and crumble in the cheese. Stir in the parsley, mints, and paprika. Add the flour and season well with salt and pepper. [Please take into account the saltiness of the cheese.] Gradually add in the beaten egg and mix thoroughly before stirring in the drained, grated zucchini. It will be lumpy.

Heat the olive oil in a large frying pan and drop heaping tablespoons of zucchini mixture into the hot oil, flattening the fritters as you go. Cook approximately 2 minutes on each side until golden, then transfer to a plate lined with paper towels.

Serve on a dish with the chopped limes and mint. [I did not do this.]

I served mine with sour cream, which helped alleviate the fact that I over-salted.