Monday, February 23, 2009

King Cake

Mardi Gras is nearly here!! This, my fourth Mardi Gras away from home, has found me quite homesick. I finally miss the parades, music, cheap plastic beads.. the boyuant, celebratory feeling that pervades the city. Most of all, I miss the king cakes. Now, there a few varieties of king cake: they range from the brioche-style bread decorated tastefully with purple, green, and gold icing to the sugar-drenched, filled to oblivion donut ring. I'll admit, being a Lafayette girl, I am a fan of the over-the-top Meche's Donuts king cake. SO good. But perhaps as my tastes mature, I'll move toward the more tame New Orleans brioche style.

For the past few years, my family has shipped hubby and I a king cake as we suffer through the Mardi Gras-less exile my college education has inflicted upon us. But this year, I decided the expense of shipping a king cake was too high. Instead, I determined to try my hand at creating one. I went a step further and flaunted the joys of Mardi Gras and king cake to all of my coworkers, and thus my king cake experiment became a public adventure. Pressure was on! I searched and searched the web, sifting through recipe after recipe.

The recipe I used is a hodpodge compilation of an Emeril Lagasse and a Food Network recipe.


King Cake
Dough
  • 2 envelopes active dry yeast
  • 1/2 cup sugar
  • 1 1/2 sticks butter, melted
  • 2/3 cup warm milk (110-115F)
  • 1/3 cup warm water (110-115F)
  • 5 egg yolks, at room temp
  • 4 1/2 cups flour
  • 2 tsp salt
  • 1 tsp nutmeg
Filling
  • 4 tbsp butter, melted
  • 2/3 cup light brown sugar
  • 2 tbsp cinnamon
Icing
  • 3 cups powdered sugar
  • 5 tbsp milk
  • 3 tbsp lemon juice
  • purple, green, and gold sprinkles

(Please note, I used my kitchenaid mixer for this recipe.)

Attach the dough hook to the mixer. Combine the yeast and sugar in the bowl, then add the melted butter, milk, and water. Mix on low for 1 minute. Beat in the egg yolks, mixing on medium for 1 minute.

In a separate bowl,, wisk together flour, salt, and nutmeg. Add to the wet ingredients and mix until a dough ball forms and the begins to move up the hook. (I'm always intrigued by this motion.)

Lightly grease a bowl with vegetable oil.

Remove the dough from the mixer and form it into a smooth ball. Place in greased bowl, turning it so that all sides are coated. Cover with clingwrap and let sit in a warm, dark place until doubled (approximately 2 hours).

Meanwhile, combine the filling ingredients. Set aside.

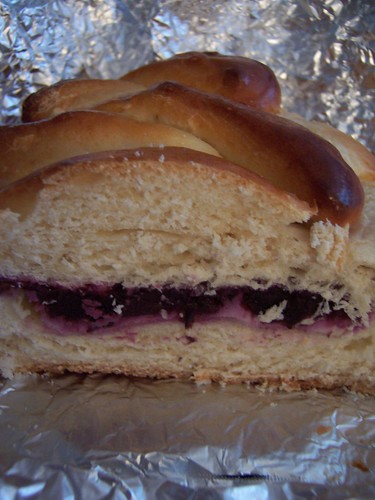
Turn dough onto lightly floured surface. Roll out to a rectangle about 24x10 inches. (These are very rough approximations). Separate dough into the thirds, lengthwise.

Spread a thin layer of the filling mixture down the length of each third, leaving a 1/2 inch margin clear. Roll the dough lengthwise (as if making pinwheels or cinnamon rolls). Since the dough is so long, this is a bit difficult, but I have faith in you. Pinch the edges to seal.

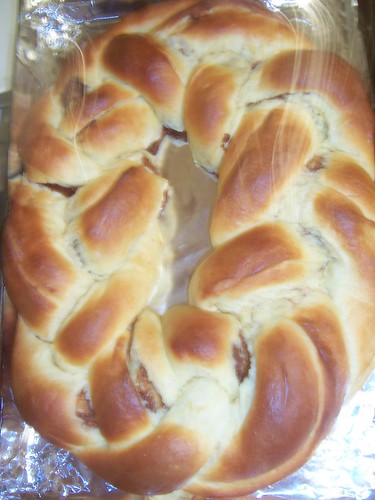
Time to braid the dough. Start in the middle and braid one side as you would normally braid anything. Loosely tuck the ends together. Go back to the middle. This time, braid underneath so that it looks like one continuous braid.

Now that you've got that nice braid, bring the two ends together to form a ring. To get a continuous appearance, figure out which ends would logically be connected if it were one connected piece and join them together. You can do this by either pinching them together or placing one end under the other and smoothing it out.

Being very careful, place the ring on a baking sheet lined with parchment paper. Cover with a towel and let sit in a dark, warm place until doubled, about 45 minutes.

Preheat oven to 350F.

Brush the top of the ring with 2 tbsp milk. Bake for 25-30 minutes. (I believe mine took about 25).

Place on a cooling rack and cool completely.


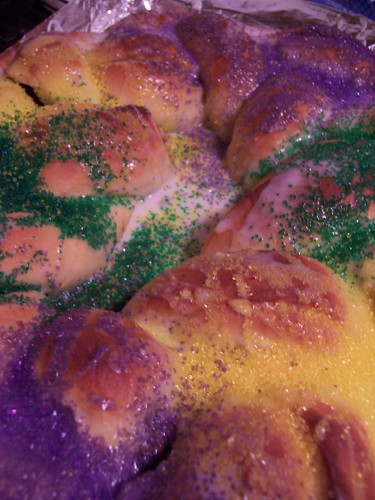
It's pretty isn't it? Well, it's not quite finished yet!

For the icing, wisk the milk into the powdered sugar. Mix in lemon juice. Spread/pour over cool cake. Sprinkle in alternating blocks of purple green and gold.

Nigella's Perfect RoastPotatoes

We've established my love for Nigella Lawson, right? Over the holidays, she had a great Christmas special in which she prepared a Christmas dinner. Included in the menu were her perfect roasted potatoes, which she swears by. With my love of potatoes, how could I not love these?

These potatoes are the perfect balance between crunchy and soft potatoey goodness. If you're looking for something relatively healthy, don't go for these. If you want delicious potato goodness, try this recipe!


(aren't they pretty??)

Nigella's Perfect Roast Potatoes
  • 6 lbs potatoes (I used 6ish medium sized potatoes)
  • 2 tbsp semolina (I used 1 tbspish semolina)
  • 2 cups goose fat (I used 1 tbspish duck fat)

Heat the oven to about 400-425F. Place the fat in a baking dish (size depending on the amount you're making) and let heat up in the even as it preheats.

Cut the potatoes in half lengthwise, then widthwise. Make your final cut (so we can get longish quarters) on a diagonal, creating a bit of a triangle and thus giving more surface area.

Fill a pot with water and add potatoes; bring to a boil over high heat. Boil for approximately 4 minutes (this is called parboiling, if you didn't know).

Drain the potatoes and place them back in the pot. Sprinkle semolina over the potatoes; cover the pot and shake shake shake it up. You want to mush the potatoes a bit and get the semolina nicely distributed. This all creates a better crunch later on.

Now, remove the baking dish from the oven. Carefully spoon the potatoes into the fat, trying not to splatter too much hot fat on yourself. Sprinkle with salt.

Bake for 20 minutes, then flip the potatoes. Bake an additional 20ish minutes, until the potatoes are golden brown and cooked through.

Remove from the potatoes from the pan and place on a papertowel lined plate to absorb some of the fat.

(Ok, these potatoes aren't really roasted; they roasted/fried. But they're delicious!)

Sunday, February 22, 2009

Honey Rosemary Lamb

Know what's good when your heart is aching, perhaps verging on breaking? Going into Mama Sarah's Kitchen, because good food does make everything better (at least for a little while). Whether on the cooking or consuming end, food is therapeutic. I believe this wholeheartedly.

Moving on.. somewhat. I've been going crazy with not cooking and baking as much as I used to. I started to feel quite down. So I've decided to cook at least one fabulous meal on the weekend, in addition to the Sunday baking.

I've been obsessing over lamb for the past few years. I've had a great experience and a mediocre one. That's it. So I've been wanting to try preparing it. Unfortunately, my usual grocery store doesn't carry lamb. BUT the grocery store near work DOES. So by Wednesday, I was determined to prepare lamb this Saturday. Meal plans in the middle of the day? I ate light.

I didn't follow any recipe really. I am basically unfamiliar with lamb and it's nuances, so I decided to mimic (in a way) a steak at Granite City that I really enjoy. It's a honey rosemary filet mignon, and I love the combination of flavors. Thus, we have Honey Rosemary Lamb. I want to use chops, but the store didn't have any, so I ended up with this .. leg steak? It's basically a cross-section of the leg; hubby removed the bone portion.


Honey Rosemary Lamb
  • 1 lb lamb
  • 2-3 tbsp honey
  • 2-3 tbsp olive oil
  • 4 sprigs of rosemary, coarsely chopped
  • salt and pepper

I basically combined the honey, olive oil, and chopped rosemary to create a marinade. I rubbed the lamb in the marinade, flipped it up, then sealed it up and let it sit in the fridge for a couple hours.


Marinadey! I'm sorry I can't give you exact amounts. I thought I had them figured out, then realized I didn't have enough marinade so I just started adding more a bit at a time.

When you're ready to cook the lamb, heat some olive oil on medium-high heat in a skillet. Salt and pepper, then sear each side (a few minutes each) to create a nice dark outside. Turn the heat down to a medium-low and cover. It takes about 10 minutes, but you definitely want your meat to be at least 160F. They recommend lamb be served medium-rare. I *overcooked* mine.

The meat was a bit sweet, so I should have countered the sweetness a little better. I still enjoyed it, but hubby did not (he likes his meat spicy, damn Cajun that he is). I think this is a good base to start my lamb adventures from. Maybe I'll do a roast for Christmas!

I served this with Nigella Lawson's perfect oven roasted potatoes (DELISH), some store bought garlic bread, and a salad of greens and thinly sliced gouda. Though the greens were a bit bitter (it was a baby arugula mix) the gouda paired with it was great. Definitely something I will serve again, perhaps even at a dinner party. It is simple, yet elegant, which means big points, right?

Expect the Nigella recipe in a few hours.

Also, I have not forgotten Sweet Sundays (not a creative name, I know. Sue me). I am in the process of making a King Cake. That's right my friends; Mardi Gras is this coming Tuesday. I'll finish up the cake tomorrow and post it then. Get excited!!

Tuesday, February 17, 2009

Sugar Cookie Bars

Alright, I know I said every Sunday... but the Sunday before last, I secretly flew home to surprise my sister for her baby shower! It was great fun and I had great food while I was there. Unfortunately, on my way back, I picked up a stomach bug. So, this past Sunday, I kept the baking fairly simple until I decided to do homemade strawberry icing and had to get some ingredients at the store. So I didn't finish up until Monday. And instead of posting, I went to sleep. Shame on me, but I was a tired girl.

Anyhoo. Who doesn't love sugar cookies?? They are my favorite, except they harden too quickly. Sadness. BUT the issue has been solved with these tasty Sugar Cookie Bars I found over at Real Mom Kitchen. These stay soft and could actually be quite versatile; my supervisor (and fellow baking buddy and Nigella fan) thinks it would make a great dessert pizza crust.

Earlier, I mentioned that I decided to do a homemade icing, but to clarify, the recipe includes icing. I just wanted strawberry icing, and thus had to find strawberry extract.

This is a VERY sweet dessert. I, with my insane sweet tooth, enjoy it immensely, but some of my coworkers find it a little overwhelming. So, if you're cooking for a more reserved crowd, just watch how much icing you apply.


Sugar Cookie Bars
  • 1 cup butter at room temp
  • 2 cups sugar
  • 4 eggs
  • 2 tsp vanilla
  • 5 cups flour
  • 1 tsp salt
  • 1/2 tsp baking soda
Preheat oven to 375F.

Cream butter and sugar until light and fluffy (a few minutes). Beat in eggs, one at a time. Add vanilla and mix until everything is fully incorporated.

In a separate bowl, whisk together flour, salt, and baking powder. Add to the butter mixture and mix until just combined. It will not be a cohesive dough, so don't worry if it's clumpy.

Spread on a greased (or foil-lined then greased) baking sheet. Since my dough was so clumpy, I used a drinking glass to roll the dough smooth in the pan.

Bake 10-15 minutes or until edges are lightly browned and an inserted toothpick comes out clean.

Cool completely. Frost.

Frosting
  • 1/2 cup butter at room temp
  • 1/2 cup shortening
  • 1 tsp vanilla (or strawberry or any other flavor) extract
  • pinch of salt
  • 4 cups powdered sugar
  • 1/3 cup milk
  • food coloring, optional

Beat or whisk butter and shortening together until smooth and creamy. It may take a few minutes. Add flavor extract and salt, mix well. Add the powdered sugar 1 cup at a time, mixing until smooth. Add milk and beat/whisk until smooth and creamy.

I decorated mine wiith pink and red colored sugar. I tried to be cutesy and make little hearts, but I was tired and failed. I probably could have fixed it, but I wanted to sleep. Shame on me.

Friday, February 6, 2009

Ropa Vieja

Back home, there was this great Cuban place near my house. One of my Spanish teachers in high school was from Cuba, so he encouraged us to all visit the restaurant. Once I went, I was hooked, and by far my favorite dish was ropa vieja. A dish of seasoned shredded beef, it is tasty by itself or over rice or with potatoes or on tortillas or .... in anything ever. So when I came across this recipe, I was ecstatic. But since it takes a good time investment, I put the recipe off for quite awhile. I won't be doing THAT again. As this dish freezes well, I plan to start making it in batches and freezing it so we can have ropa vieja goodness whenever I want.

Fun fact, ropa vieja means old clothes in Spanish.


Ropa Vieja
  • 3-4 lbs flank steak, with the visible fat removed
  • dozen peppercorns
  • 6-8 oz favorite salsa - I used a salsa verde, VERY tasty
  • 8 oz tomato sauce
  • 2 tbsp tomato paste
  • 1 tsp ground cumin
  • 1 tsp mild chili powder
  • 2 cups water

Place the steak in slow cooker and sprinkle in the peppercorns. Add water until the meat is almost covered. Cook on low for 9 hours. Let the meat cool. (At this point, I just let the meat cool then put it in the fridge so I could complete the dish a day or two later. You could also freeze the meat.)

Once you're ready to finish the dish, cut the meat into 3 inch strips. Make sure to cut AGAINST the grain, because next you're going to shred the meat and you want 3 inch shreds.

Place the meat in a LARGE, nonstick flying pan. Add the remaining ingredients and stir well. If your pan isn't large enough - like mine - this will be plenty tricky as you try not to spill your precious ingredients.

Bring to a simmer over medium heat. Reduce to low and cook for about 20 minutes or until liquid is absorbed and the meat is all turned to rags.

Now, be careful while you're simmering the dish. You might be tempted to pull little bits of meat out of the pan, which might burn your fingers. Not like I know from experience or anything, though....

Thursday, February 5, 2009

Blueberry Cream Cheese Danish

The recipe is late, I know. I'm not going to make any excuses, because by now you should understand how it goes.

This recipe is pretty tasty, though I'd tweak it some if I made it again. The recipe makes 2 loaves; I brought one to work and it disappeared very fast.


Please note: not only does this recipe make 2 loaves, it also needs 2 days. So, prepare yourself for that.

Blueberry Cream Cheese Danish

Sponge
  • 1 tbsp instant (rapid rise) yeast
  • 1 tbsp sugar
  • 1 1/2 cup warm milk
  • 2 cups all-purpose flour

Dough
  • 2 eggs
  • 1 1/2 tsp salt
  • 1/3 cup sugar
  • 2 1/2 - 3 cups all-purpose flour
  • 1/2 cup butter, at room temp

Blueberry Filling
  • 2 cups blueberries
  • 1/4 cup sugar
  • 1/4 cup cornstarch
  • 2 tbsp lemon juice

Egg Glaze
  • 1 egg
  • 1 tbsp milk

Cream Cheese Filling
  • 3/4 cup cream cheese, softened
  • 2 tbsp sugar
  • 1/2 tsp vanilla extract
  • 1 tbsp of the egg glaze

Day 1

For the sponge, mix together the sugar, yeast and flour in a nicely sized bowl. (I did this in my kitchenaid mixer bowl). Pour in the warm milk (110-115F) and beat until smooth. Cover and let sit for 30 minutes.

Now, to make the dough, add the eggs, salt, sugar, and 1 cup of flour to the sponge and beat until smooth. Add the butter 1 small chunk at a time and beat well after each addition. Then add the remaining flour, a bit at a time. Mix until a soft, kneadable dough forms.

Knead the dough for about 5-8 minutes. (I cheated and used my mixer!). You'll want the dough to be smooth. Place the dough into a greased bowl and cover it. Let rise until doubled, about 1 1/2 to 2 hours. Punch the dough down, cover with plastic wrap, and refrigerate overnight.

Day 2

Time to make the blueberry goop! In a medium saucepan, combine all of the blueberry filling ingredients. Stirring constantly, bring to a boil over medium heat. Reduce heat and simmer for 5 minutes. Remove from heat to cool.

For the egg glaze, gently beat the egg and milk together in a small bowl.

In yet another bowl, combine the ingredients for the cream cheese filling, making sure all ingredients are fully incorporated.

Pull your dough out of the fridge and gently deflate it. Divide it in half (I do this by not-so-gently using a bread knife to cut down the center of the bread while it's still in the bowl. That's just me though).

Take half of the dough and roll it out into a rectangle until it is only 1/4-1/3 inch thick. Slather half of the cream cheese mixture into the middle third of the loaf. Then, spread half of the blueberry mixture on top of that.

As this is a braid, you'll need to cut slits up the sides of the dough. Cut diagonally away from the fillings. It works well to cut the slits about 1 1/2 to 2 inches apart. Now, alternatingly fold each strip over the filling, making a braided appearance. (the recipe I linked has good pictures of this.)

Repeat the whole process with the other half of the dough.

Brush both loaves with the egg glaze. Cover with plastic wrap and let rise about 45 minutes. Preheat the oven to 350.

Before placing the bread in the oven, brush again with the glaze. Bake for 30-40 minutes.

Now, we all know my oven is finicky. So, here's how I did it: I put each loaf on its own rack (they couldn't fit side by side). I baked them in 10 minute increments, then switched their positions. After 20 minutes, I lowered the temp to about 275 because they were browning a good deal. I checked for doneness by looking at the point where the strips connect on top of the loaf.

The end. Enjoy!

Sunday, February 1, 2009

Blueberry Cream Cheese Danish

So you've noticed there's not a real post. That's because the blueberry cream cheese danish requires 2 days of work, and with my schedule, it made sense to start it today and finish tomorrow. So there will be a post tomorrow, have no fear!