I've discovered in this month of being unemployed that I have motivation issues when my life is so unstructured. From now on, I will attempt to blog a new recipe on Wednesday and Sundays, hopefully one sweet (baking) and one savory (cooking). I've also joined The Daring Kitchen for both baking and cooking so I'll have two monthly challenges. I'm excited! The new schedule will go into effect next week. Now onto the strawberry muffins.
Living in south Louisiana means dealing with sweltering summers. The oppressive heat/humidity double-combo frequently makes certain foods unpleasant. When you've been in and out all day, you do not want to eat something heavy. Now that's all fine and good until we reach dessert; so many treats are heavy and decadent. Luckily, there are a few light treats that satisfy the sweet tooth without overwhelming you. One such treat is strawberry shortcake.
Hubby and I seem to be developing the habit of eating dinner at his mother's every other week or so. Since she cooks dinner, I feel it's only fair to contribute a dessert. The time before last, I brought Strawberry Cheesecake Cookies, which were a hit. I thought another strawberry dessert would be a crowd-pleaser, as well as light. I had a recipe for what I thought was a strawberry shortcake-esque cupcake. Turns out, not so much. I'm not saying they weren't tasty; they just weren't what I expected. Firstly, for some reson mine fell ALOT. They were concave on top, not convex. They were also more akin to a muffin than a cupcake in my opinion, so I didn't ice them. As muffins, they're great. As strawberry cupcakes, they leave much to be desired. If you'd like to try them out, you can follow the link. You might love them. My audience was split.
Wednesday, August 12, 2009

Sunday, August 2, 2009
Milano Cookies
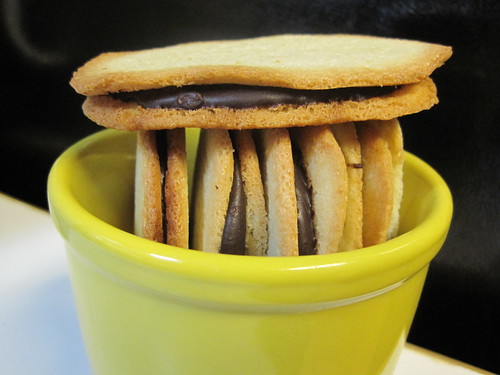
This past week, TasteSpotting.com has been flooded with Daring Bakers adventures with Milan cookies. You know the ones I'm talking about; those Pepperidge Farm cookies with the crisp buttery ovals sandwiched together with rich chocolate ganache? If you don't know the bliss of which I speak, you must follow my next instructions. Get up. Grab your keys. Head to the nearest market. Walk down the cookie aisle. Grab a package of Pepperidge Farm Milano Cookies and purchase them. Once you're in the parking lot, open the package and let the sweet cookie take your tastebuds on a ride to Delicioustown. Try not to wreck your car while stuffing your face as you drive home...
Okay. Moving on. Milan(o) cookies are some of my absolute favorite cookies. The crisp, crumbly, yet airy texture of the cookie combined with the rich chocolate ganache is just divine. They're a cookie I rarely treat myself to (mostly due to the price), so imagine my absolute delight at the idea that I could make them myself! The ingredients are simple; generally, I have them all in the kitchen (minus the cream). Really, this recipe and I are a pairing made in heaven.

Milan Cookies
(Gale Gand of the Food Network)
Cookie Batter
Preheat oven to 350F and line a baking sheet with parchment paper.
In a large mixing bowl, cream together butter and sugar. Gradually mix in egg whites (I added approximately 2 egg whites at a time), then mix in the extracts. Add flour and mix just until fully incorporated.
Pipe the batter onto the prepared sheet using a 1/4 inch plain piping tip. (Don't have piping tips and bags? Just put the batter in a gallon ziplock back and snip the corner off one end). Pipe 1 inch long strips of batter, making sure they are 2 inches apart from each other and the edges of the pan. The batter WILL spread quite a deal.
Bake 10 minutes or (more importantly) the edges are a light golden brown. Remove to a cooling rack and cool completely.
While the cookies cool, scald the heavy cream; in a heavy-bottomed pan over medium heat, heat the cream until it is steaming and the edges begin to bubble. Make sure to stir frequently; you do not want a skin developing atop the cream.
Place the chocolate in a glass bowl; pour the scalded cream over top. Stir constantly until all the chocolate has melted. Let it cool and thicken a bit.
While your chocolate is cooling, it's a good idea to go through your cookies and pair them up so you have similarly sized and shaped cookies.
Of each pair, spread a thin layer of chocolate across the flat side of a cookie. Gently press the flat side of the second cookie on top.
A Few Notes:
My cookies were not perfect replicas of the P.F. ones. For starters, my cookies are very soft and chewy. Perhaps (as I didn't use a piping tip) my batter was too thick and couldn't crisp up. I'm a bit skeptical of this theory though. I might fiddle with the recipe the next time I make these.
Also, hubby and I both agree that the lemon is too heavy; next time, I'd either cut the amount by half or even just omit it completely.
Thirdly, it is hella hard to make nicely shaped ovals. So don't get discouraged. I had to sift through mine to get nice ones to photograph.
Even though these aren't exactly like the P.F. ones I love, they're still pretty tasty. You should try them out; people will be impressed by their delicate nature.
Okay. Moving on. Milan(o) cookies are some of my absolute favorite cookies. The crisp, crumbly, yet airy texture of the cookie combined with the rich chocolate ganache is just divine. They're a cookie I rarely treat myself to (mostly due to the price), so imagine my absolute delight at the idea that I could make them myself! The ingredients are simple; generally, I have them all in the kitchen (minus the cream). Really, this recipe and I are a pairing made in heaven.
Milan Cookies
(Gale Gand of the Food Network)
Cookie Batter
- 12 tbsp unsalted butter, softened
- 2 1/2 cups powdered sugar
- 7/8 cup egg whites (approximately 6 eggs)
- 2 tbsp vanilla extract
- 2 tbsp lemon extract
- 1/2 cup heavy cream
- 8 oz semisweet chocolate, coarsely chopped
- 1 orange, zested (I omitted this)
Preheat oven to 350F and line a baking sheet with parchment paper.
In a large mixing bowl, cream together butter and sugar. Gradually mix in egg whites (I added approximately 2 egg whites at a time), then mix in the extracts. Add flour and mix just until fully incorporated.
Pipe the batter onto the prepared sheet using a 1/4 inch plain piping tip. (Don't have piping tips and bags? Just put the batter in a gallon ziplock back and snip the corner off one end). Pipe 1 inch long strips of batter, making sure they are 2 inches apart from each other and the edges of the pan. The batter WILL spread quite a deal.
Bake 10 minutes or (more importantly) the edges are a light golden brown. Remove to a cooling rack and cool completely.
While the cookies cool, scald the heavy cream; in a heavy-bottomed pan over medium heat, heat the cream until it is steaming and the edges begin to bubble. Make sure to stir frequently; you do not want a skin developing atop the cream.
Place the chocolate in a glass bowl; pour the scalded cream over top. Stir constantly until all the chocolate has melted. Let it cool and thicken a bit.
While your chocolate is cooling, it's a good idea to go through your cookies and pair them up so you have similarly sized and shaped cookies.
Of each pair, spread a thin layer of chocolate across the flat side of a cookie. Gently press the flat side of the second cookie on top.
A Few Notes:
My cookies were not perfect replicas of the P.F. ones. For starters, my cookies are very soft and chewy. Perhaps (as I didn't use a piping tip) my batter was too thick and couldn't crisp up. I'm a bit skeptical of this theory though. I might fiddle with the recipe the next time I make these.
Also, hubby and I both agree that the lemon is too heavy; next time, I'd either cut the amount by half or even just omit it completely.
Thirdly, it is hella hard to make nicely shaped ovals. So don't get discouraged. I had to sift through mine to get nice ones to photograph.
Even though these aren't exactly like the P.F. ones I love, they're still pretty tasty. You should try them out; people will be impressed by their delicate nature.
Saturday, August 1, 2009
Roasted Brussels Sprouts
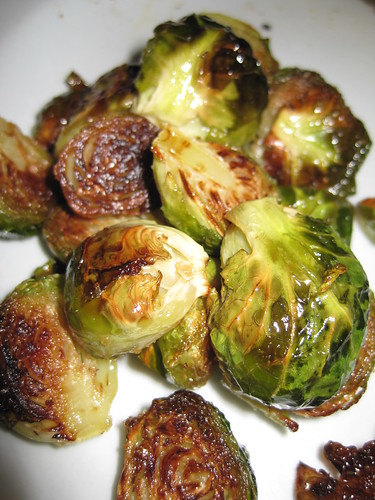
Oh brussels sprouts, how I love thee! So simple and delicious; three mere ingredients inspire my tastebuds to sing. I especially love the little leaves (correct word) that fall off and crisp up. Mmmmmm.

Roasted Brussels Sprouts
Clean brussels sprouts, removing any wilted or damaged leaves. Cut off the stubby end, then cut them in half, lengthwise.
Place sprouts cut side down on the baking sheet and drizzle with olive oil. Salt generously.
Bake 15 minutes. Flip brussels sprouts over, drizzle with a bit more olive oil, then bake an additional 5 minutes.
Devour. Possibly share with fellow diners; I try to.
Roasted Brussels Sprouts
- 1 lb brussels sprouts
- olive oil
- salt
Clean brussels sprouts, removing any wilted or damaged leaves. Cut off the stubby end, then cut them in half, lengthwise.
Place sprouts cut side down on the baking sheet and drizzle with olive oil. Salt generously.
Bake 15 minutes. Flip brussels sprouts over, drizzle with a bit more olive oil, then bake an additional 5 minutes.
Devour. Possibly share with fellow diners; I try to.
Onion Garlic Parmesan Breadsticks/Dinner Rolls
Sometimes, I just want to impress people too much. This results in my taking on too much at once for one meal and dirtying waaay too many dishes. But I can't help myself! Case in point: the same night I made my sister chocolate angel food cake, I was also making pseudo-manicotti and decided we should have homemade breadsticks. Why homemade? Because I'm insane. But how awesome are breadsticks? Totally awesome. And how much more awesome does something become when it's homemade? Awesomeness squared. So homemade breadsticks were made.

But in addition to being insane, I'm also pretty lazy. So after dividing up the dough and making approximately a dozen breadsticks, I decided dividing and rolling out the dough was too time consuming; plus, my sister really needed to eat and then leave so she could get the cutest baby ever ready for bed. So I decided to make rolls out of the remaining dough.

And honestly, I liked them in roll form better. They were fluffy and seemed more flavorful, though I know they weren't more flavorful; there was just more fluffy bread per bite... Yeah.
Onion Garlic Parmesan Breadsticks or Dinner Rolls
(Maryellen Hays, The Taste of Home Cookboook, pg 463)
In a skillet, saute onion in oil until tender; cool. In a large mixing bowl, dissolve yeast in warm water. Add milk, 1 egg, butter, sugar, salt, 1 egg, and 1 cup flour. Beat on medium speed for 2 minutes. (Note, I'm not sure why it says to add the eggs separately if not beating in between additions.)
Stir in onion and enough of the remaining flour to form a soft dough. Turn onto a floured surface, knead until smooth and elastic, 6-8 minutes.
Place in a greased bowl, turning once to grease the top. Cover and let rise in a warm place until doubled, about an hour.
Punch dough down, and let stand for 10 minutes. Turn onto a lightly floured surface; divide into 32 pieces. Shape each piece into an 8 inch rope. Place 2 inches apart on greased baking sheets. Cover and let rise for 15 minutes. Alternatively, you can separate the dough into larger pieces, form into balls, and then place in a round cake pan or pie pan.
Brush with melted butter and sprinkle with garlic salt and grated Parmesan cheese.
Bake at 350F for 16-22 minutes or unti lgolden brown.
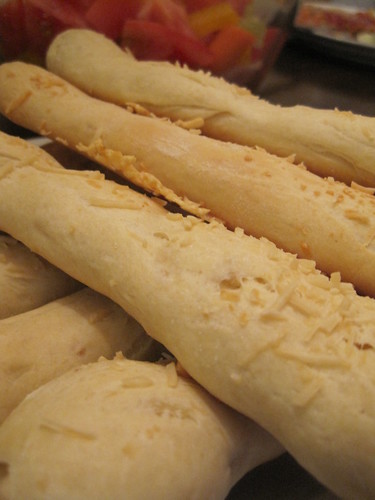
But in addition to being insane, I'm also pretty lazy. So after dividing up the dough and making approximately a dozen breadsticks, I decided dividing and rolling out the dough was too time consuming; plus, my sister really needed to eat and then leave so she could get the cutest baby ever ready for bed. So I decided to make rolls out of the remaining dough.
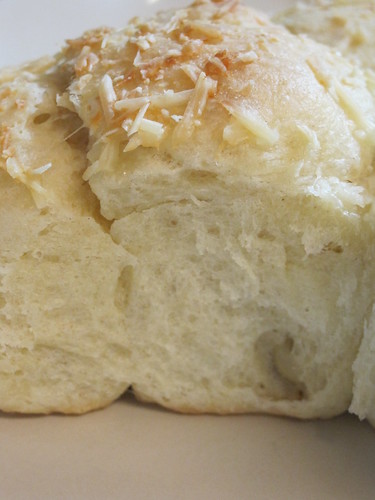
And honestly, I liked them in roll form better. They were fluffy and seemed more flavorful, though I know they weren't more flavorful; there was just more fluffy bread per bite... Yeah.
Onion Garlic Parmesan Breadsticks or Dinner Rolls
(Maryellen Hays, The Taste of Home Cookboook, pg 463)
- 3/4 cup diced onion
- 1 tbsp vegetable oil
- 2 1/4 tsp active dry yeast
- 1/2 cup warm water (110F to 115F)
- 1/2 cup warm milk (110F to 115F)
- 1/4 cup butter, softened
- 1 tbsp sugar
- 1 1/2 tsp salt
- 2 eggs
- 3 1/2 - 4 cups flour
- 1/4 cup butter, melted
- garlic salt
- grated Parmesan cheese
In a skillet, saute onion in oil until tender; cool. In a large mixing bowl, dissolve yeast in warm water. Add milk, 1 egg, butter, sugar, salt, 1 egg, and 1 cup flour. Beat on medium speed for 2 minutes. (Note, I'm not sure why it says to add the eggs separately if not beating in between additions.)
Stir in onion and enough of the remaining flour to form a soft dough. Turn onto a floured surface, knead until smooth and elastic, 6-8 minutes.
Place in a greased bowl, turning once to grease the top. Cover and let rise in a warm place until doubled, about an hour.
Punch dough down, and let stand for 10 minutes. Turn onto a lightly floured surface; divide into 32 pieces. Shape each piece into an 8 inch rope. Place 2 inches apart on greased baking sheets. Cover and let rise for 15 minutes. Alternatively, you can separate the dough into larger pieces, form into balls, and then place in a round cake pan or pie pan.
Brush with melted butter and sprinkle with garlic salt and grated Parmesan cheese.
Bake at 350F for 16-22 minutes or unti lgolden brown.
Chocolate Angel Food Cake
A couple weeks ago, my sister texted me that she was craving something sweet. A few days later, she came over for dinner, still with that craving. Texting back and forth (like we always do) before she came over, I discovered she likes chocolate cake and decided to make her a chocolate angel food cake. Partly because I simply love angel food cake. Partly because angel food cake is one of the healthier cakes out there. Mostly because I love angel food cake.
After preparing the batter, I didn't expect it to be all that chocolatey; I anticipated a hint of chocolate. Oh, but I was so deliciously incorrect. Especially for being an angel food cake, this has a robust chocolatiness perfectly complemented by the sweetness and stickiness of angel food. SO. FREAKIN'. DELICIOUS. The cake did not lost long. I sent my sister home with a chunk of it, which she then ate the next morning for breakfast. But then again, I had some for breakfast that morning too.

I served this cake with homemade whipped cream and sliced strawberries, because what goes together better than chocolate, strawberries, and cream?
Chocolate Angel Food Cake
(Better Homes and Gardens New Cook Book, pg 182)
In a large bowl, allow the egg whites to sit at room temperature for 30 minutes. Meanwhile, sift together powdered sugar, flour, and cocoa three times; set aside.
Place baking rack in lowest position in the oven. Preheat to 350F.
Add cream of tartar and vanilla to egg whiles. Beat (with electric mixer) on medium until soft peaks form. Gradually add granulated sugar 2 tbsps at a time, beating until stiff peaks form.
Sift 1/4 of the flour mixture over the egg whites and fold in gently. (You may need to transfer to a larger bowl.) Repeat, folding in the remaining flour mixture by fourths.
Pour into an ungreased 10 inch tube pan. Gently cut through the batter with a butter knife or small spatule to remove any large air pockets.
Bake on the lowest rack for 40-45 mintues, or until the top springs back when lightly touched. Immediately invert the cake; cool thoroughly in the inverted pan. Using a small spatula or knife (a clean one!), loosen the sides of the cake from the pan; remove it from the pan.
To make whipped cream, simply beat heavy cream in a bowl until it thickens and stiffens. If you'd like it sweetened, add powdered sugar to taste. You may also add cocoa powder or vanilla extract or any other flavorings you'd like.
After preparing the batter, I didn't expect it to be all that chocolatey; I anticipated a hint of chocolate. Oh, but I was so deliciously incorrect. Especially for being an angel food cake, this has a robust chocolatiness perfectly complemented by the sweetness and stickiness of angel food. SO. FREAKIN'. DELICIOUS. The cake did not lost long. I sent my sister home with a chunk of it, which she then ate the next morning for breakfast. But then again, I had some for breakfast that morning too.
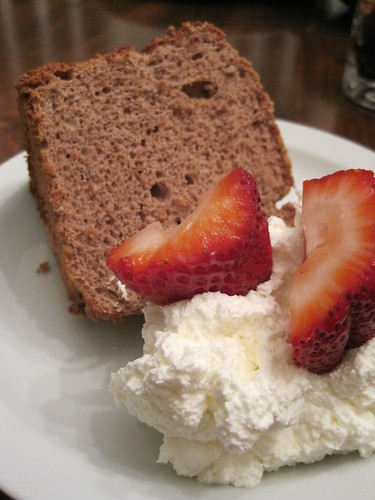
I served this cake with homemade whipped cream and sliced strawberries, because what goes together better than chocolate, strawberries, and cream?
Chocolate Angel Food Cake
(Better Homes and Gardens New Cook Book, pg 182)
- 1 1/2 cups egg whites (10-12 large eggs)
- 1 1/2 cup sifted powdered sugar
- 1 cup sifted flour
- 1/4 cup unsweetened coca powder
- 1 1/2 tsp cream of tartar
- 1 tsp vanilla extract
- 1 cup granulated sugar
In a large bowl, allow the egg whites to sit at room temperature for 30 minutes. Meanwhile, sift together powdered sugar, flour, and cocoa three times; set aside.
Place baking rack in lowest position in the oven. Preheat to 350F.
Add cream of tartar and vanilla to egg whiles. Beat (with electric mixer) on medium until soft peaks form. Gradually add granulated sugar 2 tbsps at a time, beating until stiff peaks form.
Sift 1/4 of the flour mixture over the egg whites and fold in gently. (You may need to transfer to a larger bowl.) Repeat, folding in the remaining flour mixture by fourths.
Pour into an ungreased 10 inch tube pan. Gently cut through the batter with a butter knife or small spatule to remove any large air pockets.
Bake on the lowest rack for 40-45 mintues, or until the top springs back when lightly touched. Immediately invert the cake; cool thoroughly in the inverted pan. Using a small spatula or knife (a clean one!), loosen the sides of the cake from the pan; remove it from the pan.
To make whipped cream, simply beat heavy cream in a bowl until it thickens and stiffens. If you'd like it sweetened, add powdered sugar to taste. You may also add cocoa powder or vanilla extract or any other flavorings you'd like.
Tuesday, July 28, 2009
Smothered Okra
I love okra just about every way I've had it. The only style I don't appreciate is pickled okra, and that's because I don't do pickled. Blegh. But otherwise, I love the stuff! That being said, I recognize that others might not like it. It has a special consistency and texture that might put someone off, but I feel that if given a chance, the flavor of the okra overcomes any qualms over its consistency.
Smothered okra is most likely not the best way to win people over to Team Okra. It's a bit.. moist (some might say slimy, but I wouldn't). But it's such a stereotypical Cajun dish and I'm just diggin' all the food I've been missing, so I have to post it.

Smothered Okra
You can serve this as a side to a variety of dishes. Its juices are delicious with rice.
Smothered okra is most likely not the best way to win people over to Team Okra. It's a bit.. moist (some might say slimy, but I wouldn't). But it's such a stereotypical Cajun dish and I'm just diggin' all the food I've been missing, so I have to post it.

Smothered Okra
- 1 lb okra, cut into 1/2 inch slices, or 1 pkg (1 lb) frozen cut okra
- 4-5 medium tomatoes, chopped (you want a pretty even okra to tomato ratio)
- 2 medium onions, chopped
- 1 bell pepper, chopped
- 4 tbsp butter
- 1/2 tsp salt
- 1/2 tsp pepper
- 1/4 tsp cayenne
You can serve this as a side to a variety of dishes. Its juices are delicious with rice.
Small-scale Seafood Boil
One of the great things about being back in Louisiana is that when hubby and I crave seafood, we can just hop in the car, drive to any grocery store or local market and have our pick of delicious, fresh seafood. Four years without fresh shrimp was devastating, so I feel the need to eat it all the time now that I can.

Now, there isn't any recipe to go along with this post; just a bit of food-worship. The kitchen is my cathedral after all. I suppose that makes southern Louisiana my parish? Which is apt, as southern Louisiana is a heavily Catholic area, so much so that instead of counties, we have parishes. But anyhoo. Seafood rules here, so much that instead of BBQs, we do seafood boils. Crawfish, shrimp, crab. Whatever seafood you want. And if you're boiling seafood, you HAVE to throw some potatoes, corn on the cob, and onions into the pot! It would be heresy not to.

Now, waking up with a craving for seafood and only having 3 people in the house, there's no reason to do a full scale boil outside with the turkey fryer/crawfish boilin' pot. You can do it on the stove top in a big pot. Well, a couple big pots. All you need is some Shrimp Boil and you're set. An easy, SCRUMPTIOUS meal in surprisingly little time.
And yes, there are scallops in that photo. No, we didn't boil them. I pan-seared them; they're hubby's favorite plus my dad loves them and the market nearby had rather large ones. We splurged. Such a tasty, tasty decision.
My yankee friends, please visit south Louisiana. Cajun country will not disappoint you. It's gorgeous, has amazing food, and the friendliest people you will ever meet! C'est bon, mes amis.

Now, there isn't any recipe to go along with this post; just a bit of food-worship. The kitchen is my cathedral after all. I suppose that makes southern Louisiana my parish? Which is apt, as southern Louisiana is a heavily Catholic area, so much so that instead of counties, we have parishes. But anyhoo. Seafood rules here, so much that instead of BBQs, we do seafood boils. Crawfish, shrimp, crab. Whatever seafood you want. And if you're boiling seafood, you HAVE to throw some potatoes, corn on the cob, and onions into the pot! It would be heresy not to.

Now, waking up with a craving for seafood and only having 3 people in the house, there's no reason to do a full scale boil outside with the turkey fryer/crawfish boilin' pot. You can do it on the stove top in a big pot. Well, a couple big pots. All you need is some Shrimp Boil and you're set. An easy, SCRUMPTIOUS meal in surprisingly little time.
And yes, there are scallops in that photo. No, we didn't boil them. I pan-seared them; they're hubby's favorite plus my dad loves them and the market nearby had rather large ones. We splurged. Such a tasty, tasty decision.
My yankee friends, please visit south Louisiana. Cajun country will not disappoint you. It's gorgeous, has amazing food, and the friendliest people you will ever meet! C'est bon, mes amis.
Cookie Cake
Well now. Sorry for the absence; last week, my sister's baby had to return to the hospital (quite suddenly) for his second heart surgery. So I've spent the last week and a half going back and forth between home and New Orleans, where he's hospitalized. He is doing amazingly well and should be home soon. I can't wait!!
My latest trip to New Orleans was to celebrate my sister's birthday. She really wanted a cookie cake (she had been scheduled to get one at work before we knew about the surgery) so a cookie cake she would have!! First, I thought I would use my white and milk chocolate chip cookie recipe, but I was worried about it baking correctly. I googled cookie cake recipes and came across this one from Emeril. What better recipe to use while my sister is holed in up New Orleans? In fact, the hospital isn't very far from one of his restaurants. Anyhoo. The recipe called for bittersweet chocolate chips, white chocolate chips, walnuts, and macadamia nuts. I generally try to avoid baking with nuts, since so many people have allergies or just don't like them. Now, my sister LOVES these new Hershey nuggets that are milk chocolate with toffee and almonds. When I say she loves them, I mean it. And they deserve the love. They are amazingly delicious. Sadly they are difficult to find. No worries though; Mama Sarah is dedicated to her baking! Once I found a bag (and then bought two), I chopped those up and used those instead of all the mix-ins Emeril used.

Since this cookie cake was for a birthday, it had to be decorated, right? Right. Unfortunately, I have horrible handwriting (which I *unfairly* blame completely on being a lefty) so I just used icing tips to decorate the edge and then create a heart in the center. Not too bad for a first time.

Everyone LOVED the cake. It was a great recipe, but the chocolate with bits of toffee seemed to make it. Everyone ate twice as much as they initially planned. Which, after gorging ourselves at the casino lunch buffet, means a lot. You should definitely make this recipe; cake form or cookie form doesn't matter.
Cookie Cake
Preheat oven to 375F. Line a baking stone or pizza pan with parchment paper, then grease the paper. Alternatively, you can use a disposable tin pizza pan (that's what I did).
In a large bowl, cream together the butter and sugars. Add the eggs one at time, beating thoroughly after each addition.
In a separate bowl, whisk together the flour, baking soda, and salt. Add to the wet ingredients and mix until thoroughly incorporated. Mix in the vanilla. Stir or fold in the chocolate pieces.
Spoon on to/ into prepared surface/pan. Evenly distribute the batter and smooth the surface. Don't forget the cookie dough will rise; mine filled up a 13 inch pizza pan and hung a tiny bit over the side.
Bake approximately 20-25 minutes, until the edges are golden and the cookie is set, but soft. Let cool ten minutes before removing from the pan and placing on a cooling rack. If using a disposable pan, you can leave it in the pan and just place it on the rack.
Cool completely before decorating.
Icing
My latest trip to New Orleans was to celebrate my sister's birthday. She really wanted a cookie cake (she had been scheduled to get one at work before we knew about the surgery) so a cookie cake she would have!! First, I thought I would use my white and milk chocolate chip cookie recipe, but I was worried about it baking correctly. I googled cookie cake recipes and came across this one from Emeril. What better recipe to use while my sister is holed in up New Orleans? In fact, the hospital isn't very far from one of his restaurants. Anyhoo. The recipe called for bittersweet chocolate chips, white chocolate chips, walnuts, and macadamia nuts. I generally try to avoid baking with nuts, since so many people have allergies or just don't like them. Now, my sister LOVES these new Hershey nuggets that are milk chocolate with toffee and almonds. When I say she loves them, I mean it. And they deserve the love. They are amazingly delicious. Sadly they are difficult to find. No worries though; Mama Sarah is dedicated to her baking! Once I found a bag (and then bought two), I chopped those up and used those instead of all the mix-ins Emeril used.

Since this cookie cake was for a birthday, it had to be decorated, right? Right. Unfortunately, I have horrible handwriting (which I *unfairly* blame completely on being a lefty) so I just used icing tips to decorate the edge and then create a heart in the center. Not too bad for a first time.

Everyone LOVED the cake. It was a great recipe, but the chocolate with bits of toffee seemed to make it. Everyone ate twice as much as they initially planned. Which, after gorging ourselves at the casino lunch buffet, means a lot. You should definitely make this recipe; cake form or cookie form doesn't matter.
Cookie Cake
- 1 cup unsalted butter, softened
- 1 cup light brown sugar, packed
- 1/2 cup granulated sugar
- 2 large eggs
- 2 cups + 2 tbsp flour
- 1 tsp baking soda
- 1/2 tsp salt
- 1 1/2 tsp vanilla extract
- 1 package Hershey's Creamy Milk Chocolate with Toffee and Almonds Nuggets, chopped into chips
Preheat oven to 375F. Line a baking stone or pizza pan with parchment paper, then grease the paper. Alternatively, you can use a disposable tin pizza pan (that's what I did).
In a large bowl, cream together the butter and sugars. Add the eggs one at time, beating thoroughly after each addition.
In a separate bowl, whisk together the flour, baking soda, and salt. Add to the wet ingredients and mix until thoroughly incorporated. Mix in the vanilla. Stir or fold in the chocolate pieces.
Spoon on to/ into prepared surface/pan. Evenly distribute the batter and smooth the surface. Don't forget the cookie dough will rise; mine filled up a 13 inch pizza pan and hung a tiny bit over the side.
Bake approximately 20-25 minutes, until the edges are golden and the cookie is set, but soft. Let cool ten minutes before removing from the pan and placing on a cooling rack. If using a disposable pan, you can leave it in the pan and just place it on the rack.
Cool completely before decorating.
Icing
- 4 cups powdered sugar
- 1 cup shortening
- 1/3 cup milk
- 1 tsp vanilla extract
- food coloring, optional
Friday, July 17, 2009
Corn Pudding
YAY! We finally have awesomely fast internet! Now to start posting again.
Today, we have corn pudding, or as my sister lovingly calls it, corn cornbread. I first made this recipe a few months ago, but failed to take pictures. Bad Mama Sarah. I decided to make it again for our fourth of July BBQ after hearing my dad and brother-in-law rave over a dish they had while staying in New Orleans for my nephew's first heart surgery. It was called a corn souffle, though by their description souffle was a bit of a stretch. But they talked about it so eagerly that I really wanted to recreate that for them. Plus, I love this dish and had been craving it for quite some time.

This stuff is amazing. It's both savory and sweet, and the kernels of corn interspersed throughout the dish add a necessary little crunch to the dish's softness. It's divine; I want to eat bowlfuls.
A few things to note about the recipe: the ingredient sizes are weird - as in, can sizes I've never seen in the store. And the second time I made it, I approximately doubled everything, which made it a bit too dry. Still delicious though. So, my warning is this: be prepared to tinker around a bit.
Corn Pudding
(Adapted from Cooking Light September 2007)
Preheat oven to 350F. Spray an 8x8 pan with cooking spray.
In a large bowl, combine all ingredients. Mix until well blended. Pour/spoon into prepared pan.
Bake 45 minutes or until golden and set.
Today, we have corn pudding, or as my sister lovingly calls it, corn cornbread. I first made this recipe a few months ago, but failed to take pictures. Bad Mama Sarah. I decided to make it again for our fourth of July BBQ after hearing my dad and brother-in-law rave over a dish they had while staying in New Orleans for my nephew's first heart surgery. It was called a corn souffle, though by their description souffle was a bit of a stretch. But they talked about it so eagerly that I really wanted to recreate that for them. Plus, I love this dish and had been craving it for quite some time.

This stuff is amazing. It's both savory and sweet, and the kernels of corn interspersed throughout the dish add a necessary little crunch to the dish's softness. It's divine; I want to eat bowlfuls.
A few things to note about the recipe: the ingredient sizes are weird - as in, can sizes I've never seen in the store. And the second time I made it, I approximately doubled everything, which made it a bit too dry. Still delicious though. So, my warning is this: be prepared to tinker around a bit.
Corn Pudding
(Adapted from Cooking Light September 2007)
- 1 egg
- 1/4 cup butter, melted
- 1 can (8 3/4 oz) whole kernel corn, drained
- 1 can (8 3/4 oz) creamed corn
- 1 package (8 1/2 oz) corn muffin mix (I use honey cornbread mix. yum yum)
- 1 carton (8 oz) fat free sour cream
Preheat oven to 350F. Spray an 8x8 pan with cooking spray.
In a large bowl, combine all ingredients. Mix until well blended. Pour/spoon into prepared pan.
Bake 45 minutes or until golden and set.
Sunday, July 12, 2009
Sugar Cookies

Mmm sugar cookies. Who doesn't love them? Really, they're sweet, soft, crisp rounds from the heavens. Today, neither my sister nor I had anything to do, so I thought we could do nothing together. She mentioned having a sweet tooth, and I, of course, decided I had to make her something. Thus the sugar cookies. I had to sift through some recipes to find one that didn't require cream of tartar, which my sister didn't happen to have; luckily, I came across this one. The recipe is quite simple (as sugar cookies should be) with a delicious result.
Sugar Cookies
- 2 3/4 cups flour
- 1 tsp baking soda
- 1/2 tsp baking powder
- 1 cup butter, softened
- 1 1/2 cup sugar
- 1 egg
- 1 tsp vanilla extract
- additional sugar for rolling
Preheat oven to 375F.
In a medium bowl, whisk together flour, baking soda, and baking powder.
In a separate bowl, beat butter and sugar until light and fluffy (approximately 2 minutes). Beat in egg and vanilla until well combined. Add dry ingredients slowly, mixing well until thoroughly incorporated.
Sprinkle a small layer of sugar in the bottom of a plate. Roll approximately one tablespoon of dough into a ball, then pat onto the sugared plate. Flip, then pat more until the dough is about 1/3 inch thick and round. Place on baking sheet.
Bake approximately 10 minutes or until edges start to get golden.
Enjoy warm.

Subscribe to:
Posts (Atom)