Sunday, August 30, 2009

Chocolate Strawberry Pavlova

When making ice cream, I need 6 egg yolks, leaving 6 egg whites all alone. As luck would have it, many recipes call for 6 lonely egg whites. One such recipe is Nigella Lawson's Chocolate Raspberry Pavlova. I've come across pavlova recipes often and was always a tad intimidated by them. They're simple and delicious, both light and rich (at least this one was).

Now, the entire time this was baking (a full hour), I kept getting questions as to what exactly I was making. "A pav.. what?" .. "how about instead of telling me the name, you tell me what it is" .. and other such things. So my lovelies, this is what I learned on Wikipedia. The pavlova originated in either Australia or New Zealand in the 20s in honor of ballerina Anna Pavlova. It is a baked meringue, mainly served with a cream and fruit.


Chocolate Strawberry Pavlova
(Nigella Lawson, Forever Summer, "Chocolate Raspberry Pavlova", 189)
6 egg whites
1 cup granulated sugar
3 tbsp unsweetened cocoa powder, sifted
1 tsp balsamic or red wine vinegar
2 oz bittersweet chocolate, finely chopped
2 1/4 cup heavy cream
1 pint raspberries or cored and halved strawberries
2-3 tbsp coarsely grated bittersweet chocolate (I omitted this)

Preheat the oven to 350F and line a baking sheet with parchment paper.

Beat the egg whites until satiny (as opposed to foamy) peaks form. Gradually beat in the sugar 1 spoonful at a time until the meringue is stiff and shiny. Sprinkle the cocoa, vinegar, and chopped chocolate over the egg whites. Gently fold everything in until the cocoa is thoroughly distributed.

Mound the meringue onto the baking sheet, creating a fat circle approximately 9 inches wide. Smooth the sides and tops. Place in the oven and *immediately* reduce the oven temperature to 300F. Bake for 1 hour to 1 hour 15 minutes, until the edges and sides look crisp and the top is dry. Nigella notes that "when you prod the center you should feel the promise of squidginess beneath your fingers." Well, I must have prodded too forcefully because I just smashed a finger-sized hole in the top of mine.

Turn off the oven and leave the door ajar, letting the meringue cool completely in the oven.

When ready to serve it, invert it or slide it onto a nice big plate (or disposable pizza tin if you don't have a plate big enough...) Whisk the cream until it is thick and pile it atop the meringue. Scatter with raspberries or strawberries (though strawberries don't really scatter). Grate the chocolate atop the raspberries, if you so desire. I did not as strawberries don't usually have the tartness raspberries contain.

Smothered Sausage and Potatoes

A couple weeks ago, hubby and I had dinner his mom's house. She smothered fresh chicken sausage and potatoes together, and it. was. delicious. If you want to know Cajun cooking beyond gumbo and jamabalya, this is it. It is the ultimate comfort food. The past week or so, I've found myself craving it. The light savoriness of the chicken sausage paired with the sweet earthiness of potatoes. So so good.


Now, I realize the picture isn't pretty. It couldn't be helped; the food wasn't pretty. Sometimes it won't be. Perhaps I could have spruced it up with some parsley or taken out the sausage then repositioned it atop a layer of potatoes, but that would have been dishonest. It's a delicious jumble; let's celebrate that fact.

Smothered Sausage and Potatoes
  • 1 lb fresh chicken sausage, cut into 2 inch pieces
  • 6-8 medium sized potatoes, sliced into 1/4 inch thick rounds then cut in half
  • 1 onion, chopped
  • 4 tbsp butter, divided
  • Chacheres or seasoned salt to taste

In a large skillet (one with a lid) over medium melt 2 tbsp butter, then brown the sausage in it. If there's enough room, place the onions around the edge of the pan so they can begin to cook. The sausage only needs a few minutes on each side. Most likely, the casing will shrink, causing the meat to mushroom out the ends; it's perfectly okay.

After the sausage has browned, pour the potato slices on top and gently fold them in. Cover the skillet and reduce the temperature to medium low. Over the next 30-40 minutes, try to lift the lid as little as possible, stirring very infrequently. You'll find the potatoes release a great deal of liquid and prevent things from sticking; if you remove the lid too much, you'll lose that liquid.

Once the potatoes have cooked through, remove the lid. Cut the remaining 2 tbsp of butter into chunks and scatter across the top of the dish. Season to taste with Chacheres. Cover and cook an additional 10-15 minutes, stirring more frequently. Your potatoes should lose definition and mash up a bit, though not much. You still want chunks of potatoes.

This goes great with garlic bread, and I bet it'd be grand with a salad.

Wednesday, August 26, 2009

Honey Ice Cream

Since making my first batch of homemade ice cream, I've kept an eye out for ice cream flavor ideas. I stumbled across a recipe for honey rosemary ice cream. The recipe itself didn't thrill me, but I fell in love with the idea of honey ice cream. I love honey! It's a perfect complement to so many things.


I decided to just alter the Nigella Lawson recipe I used the first time, because I love Nigella and I dorkishly love stirring the custard for 10 minutes, watching it thicken into something beautiful.

I like this ice cream, but I don't know if it can truthfully be called honey ice cream. Most likely if I were to give this to someone to eat, then ask them what flavor it was, they'd say vanilla or sweet cream or something else. The taste of the honey is too subtle. What's amusing is that I first thought, after sampling the warm custard, that the honey would be too intense and that I had ruined the ice cream. Silly me! The cream folded in right before freezing really mellowed out the honey. I think the ice cream tastes like marshmallows; hubby thinks it tastes like sugar cones. Dad's not sure, except he picks up a bit of a honey aftertaste. But Dad and I like the ice cream. Hubby doesn't, but then again, he doesn't like a lot of what I make.


If I were attempting to get a more truly honey flavored ice cream, I'd increase the amount of honey and decrease the amount of sugar. That's a big if. Honey can get so cloyingly overpowering so quickly that I'm still not sure how well a honey ice cream would work. As it is, this sweet stuff needs a counterbalance; I shaved bittersweet chocolate over it, which worked nicely. I think it's a fair dessert.

Honey Ice Cream
(adapted from Nigella Lawson, Forever Summer, egg-custard ice cream, pg 224)
  • 2 1/4 cups whole milk
  • 1/4 cup honey
  • 6 egg yolks
  • 7 tbsp granulated sugar
  • 1/2 cup + 2 tbsp heavy cream
In a large saucepan, heat milk and honey, making sure to stir well to incorporate the honey into the milk. Heat until scalded (just before it boils). Remove from heat, cover, and let sit 20 minutes. There really isn't any steeping going on, but I kept this step for a couple reasons: 1, I felt if the honey were heated up, it would mix into the milk better (it did); and 2, I wanted the milk to cool down to the same temperature as before and I wasn't sure what that was.

In a large bowl, beat together the eggs and sugar. Slowly whisk in the warm milk and honey mixture. Rinse the saucepan, then return the mixture to the pan. Fill the bottom few inches of the sink with cold water, in case the custard begins to separate while it cooks. If it beginss to look like it's separating, plunge the pan into the water and whisk like the devil.

Over medium heat and STIRRING CONSTANTLY, cook the mixture until it thickens into a velvety, delicious custard. This should take about 10 minutes. Remove from the heat and transfer to a bowl. Place the bowl in the water and let cool, stirring occasionally.
 
Cover the bowl with plastic wrap and chill in the fridge until chilled completely. Right before you're ready to freeze the ice cream in the ice cream machine, whip the cream until it is thick (but not stiff) and fold it into the custard. Then, follow your ice cream machine's instructions.

Blackberry Peach Crostata

Oh man. This recipe took me for a ride. This is actually my second time making it; the first was a disaster. See, I was baking in an attempt to alleviate a bad mood, but being in a bad mood, I wasn't paying as much attention as was necessary. I ended up doubling the amount of sugar required and the whole things just fell apart. The second time I made the recipe, I expected things to go perfectly, but again, they didn't! I'm having some difficulty with the dough, though I'm not exactly sure what. Possibly that I'm doing by hand what calls for a food processor.

This recipe comes from a great pastry cookbook called The Pastry Queen by a bakery owner in Texas. My aunt and uncle sent it to me as they've always encouraged my culinary interests (and really any other interest I've had). There are tons of recipes I hope to try soon, especially her blackberry pie bars.. mmmm. Hopefully, I'll have better luck than I had with these crostatas!


Those peaches look awfully like nectarines don't they, with this dark purplish-pink hue? Yet they are indeed peaches. After my first attempt at crostatas, I tossed all the leftover fruit into one container and the blackberries "dyed" the peaches. I think they're pretty.

Fruit Crostatas
(Rebecca Rather, The Pastry Queen, pg 61-62)
1/2 cup granulated sugar
2 cups all purpose flour
1/4 tsp salt
1 cup chilled butter, cut intot small pieces
4 tbsp ice water
1 cup fruit (do not use strawberries or bananas!)
1/2 cup granulated sugar, for sprinkling over fruit

(These instructions are what I did since I do not have a food processor)

In a large bowl, whisk together 1/2 cup sugar, flour, and salt. Using a pastry cutter, cut in the butter until the mixture is crumbly. Add water 1 tbsp at a time, using the pastry cutter to mix it in after each addition. The dough should being to hold together; at this point, it's ready. Shape the dough into a ball and wrap in palastic wrap. Refrigerate for 1 hour. (You can refrigerate for less time, but it makes the dough more difficult to handle.)

Preheat the oven to 450F. Line a baking sheet with parchment paper or butter it generously.

Divide the dough into 4 equal pieces and roll each into a ball. use your hands to press the dough into 1/4 inch thick rounds on the prepare baking sheet. Each round should be about 6 inches in diameter.

If you are using berries, leave the fruit whole. larger fruits can be left unpeeled, but most be sliced so they can fit neatly in the center of the crostata. Spoon 1/4 cup of the fruit into the center of each round, leaving a 1 1/2 inch border all around the edge. (If using larger fruits, place 3-4 slices of fruit in the center of each crostata.)

Sprinkle the remaining 1/2 cup sugar evenly over the fruit on each crostata. Fold the dough edges toward the center, making 3 separate flaps. With your thumb and forefinger, firmly pinch together the seams between the folds.

Bake the crostatas for 12-14 minutes, until brown around the edges. Cool the crostatas on the baking sheet for no more than 10 minutes or they will be difficult to remove whole. Serve warm or at room temperature.

Slow-Cooker BBQ Pork

I will always have a special place in my heart for New Orleans, mostly because the wonderful doctors there fixed my baby nephew's tiny heart. Children's Hospital, I thank you. (Baby Dylan is doing wonderfully, by the way.) But another, much smaller and more trivial reason I love NoLa is Voodoo BBQ. Their food is exquisite and divine. I know, not words one associates with bbq, but whatever, I don't care. It is so good, hubby and I ate there two days in a row. Remember my previous post about corn pudding? Well this is the restaurant my dad and brother-in-law were talking about. And let me tell you, that corn pudding is perfection. I'm going to have to play around a bit, but I think I'll be able to get close to it... Ok, small tangent. Voodoo has GREAT bbq pulled pork. The slow roasting (for who knows how many hours) leaves the meat so fragrant and so tender and so moist. It's decadent. I dream of it. I aspire to make something half as good. (Their Jamaican jerk chicken kicks butt as well.)

Since our last trip to NoLa, I've kept an eye out for slow cooked pork done in the crock pot. I finally came across this recipe at SoupBelly which seemed super easy. All I had to do was wait until I came across a good-sized pork shoulder and remembered well enough in advance to prepare it; it takes a total of 18 hours! That is slow cooked, my dears.


The recipe is super duper simple, especially if you have a favorite BBQ sauce. Now I know there are differing opinions on what makes a tasty BBQ, but I like a smokey sweet tangy with a little kick kind of sauce myself. With as little vinegar as possible. (Have I ever mentioned that I HATE vinegar?) Perhaps foolishly, I used a BBQ sauce I'd never had before, but it was the same brand as a meat marinade I absolutely adore. Hubby and I use Stubb's for marinating steaks and kabobs, so I figured I'd like their BBQ sauce. In the end, it wasn't too far off from what I wanted, but I did doctor the dish a bit before serving it. What seemed so potent in the bottle really mellowed out. C'est la vie, no? In the end, I added brown sugar, garlic powder, onion powder, salt, black pepper, and red pepper. The end result was quite tasty.

Slow Cooker BBQ Pulled Pork
  • 4 lbs pork shoulder (or butt)
  • 2 large onions, coarsely chopped
  • 1 cup ginger ale (you'll most likely find this is the alcohol section of the grocery store)
  • 18 oz bottle of BBQ sauce

Place half of the onions on the bottom of the slow cooker. Place the meat on top (leaving the fat on as it will add juicy flavor and we'll get rid of it later). Cover with the remainder of the onions and pour ginger ale on top. Cook on low for 12 hours.

Remove meat from the slow cooker and shred with forks. It should be fairly tender and easy to shred.*

Discard any bones you might have and also discard the liquid in the cooker. Return the meat and any onion pieces back to the cooker and pour in the bottle of BBQ sauce. Stir well and cook on low for an additional 6 hours, though it can cook a bit longer. Add any additional seasonings you feel it might need.

Serve on a bun! Or by itself really.

* Note: Hubby had a hell of a time shredding the pork (a task left to him since I was babysitting baby Dylan). So if you look carefully at the picture, you'll notice cubes instead of shreds. We're not sure why it didn't shred; hubby thinks there was actually too much fat in the meat which made it rubbery (though it wasn't when we ate it.) He said it just wouldn't separate; he spent an hour dismantling the thing! After additional cooking time, the meat was more tender and fell apart more, so perhaps our heat was a bit too low. I was using a massively old slow cooker that I'd never used before, so that could have been a factor. Oh well. It all turned out fabulously!

Sunday, August 23, 2009

Samoa Bars

A fun fact: the name of your girl scout cookies depends on where you live. While living in Cedar Rapids, I had a moment of panic when I ordered some GS cookies, thinking they no longer made my absolute favorites (Tagalongs). Turns out that in Iowa (and other places) Tagalongs are called Peanut Butter Patties (boring), Samoas are called Caramel Delights, and Trefoils are just called Shortbread. It's odd; I've heard it's because there are two manufactoring places and they label the cookies differently, but I'm not sure how much I believe that. What's funniest is the boxes are identical, except the cookie name.

So what I present to you today are Samoa (or Caramel Delight) bars. I made these largely for my sister who loves Somoas and who didn't order any this year. She loved them, especially when refrigerated. My dad loved the increased proportions, the bars having more cookie than the actual cookies do. I love the simple fact that these are bars; my child had a definite absence of bars so I find them so delightful now. Weird, I know, but don't let that deter you from trying this recipe out. Even if you don't really like coconut (like me), you'll be surprised by how little that matters with these. The caramel accompanying the coconut makes it all okay.


Samoas Bars
(original recipe)

Cookie Base
  • 1/2 cup granulated sugar
  • 3/4 cup butter, softened
  • 1 large egg
  • 1/2 tsp vanilla extract
  • 2 cups all purpose flour
  • 1/4 tsp salt
Topping
  • 3 cups shredded coconut (either sweetened or unsnweetened)
  • 12 oz good-quality chewy caramels (I used Werthers)
  • 1/4 tsp salt
  • 3 tbsp milk
  • 10 oz dark or semisweet dipping chocolate

Start with the cookie base. Preheat the oven to 350F and lightly grease or line with parchment paper a 9x13 baking pan.

In a large bowl, cream together sugar and butter until fluffy. Beat in egg and vanilla extract. On low speed, gradually beat in flour and salt until the mixture is crumbly, like wet sand. Pour the dough into prepared pan and press it into an even layer.

Bake 20-25 minutes, or until base is set and the edges are lightly browned. Cool completely before topping.

For the topping: First, we'll need to toast the coconute. Preheat oven to 300F. Line a baking sheet with parchment paper, then evenly spread the coconut on it. Toast for 20 minutes, stirring every 5 minutes or so, until the coconut is golden. Cool on the baking sheet, stirring occasionally.

Unwrap the caramels and place them in a large microwave-safe bowl with milk and salt. Cook on high for 3-4 minutes, stirring every minute or so to help the caramel melt while also incorporating the milk into it. When fully melted and smooth, fold in the toasted coconut.

Using a spoon or spatula, dollop the topping across the cookie base, then smooth it into an even layer. Let it cool completely.

Once cooled, cut into 30 bars. (A pizza cutter is handy for this.)

Melt the dipping chocolate into a bowl by heating in the microwave at 30 second intervals, stirring after each. Dip the base of each bar into the chocolate and then place it on a clean sheet of parchement paper. Transfer the remaining chocolate into a piping or ziplock bag and drizzle the bars to finish.


Now, the original recipe just says any dark or semisweet chocolate will do, but I had the problem of my chocolate never setting. That made transportation really difficult and also made a mess. My sister suggested the dipping chocolate and she is absolutely right. Next time, I'll use dipping chocolate.

Thursday, August 20, 2009

Vanilla Bean Ice Cream

When I was a kid, we visited my mom's parents quite frequently, especially during the summer. They lived in central Texas which gets mighty toasty come summertime, but we still spent most evenings outside, walking around their ranch, sitting by the pond, or swinging on porch swings. Sometimes, we'd pull out the ice cream maker and whip up a batch and eating it immediately after the machine stopped, even though it was a bit slushy. Homemade vanilla ice cream eaten outside on a hot summer night; it's cliched, but it's my childhood. Years later, once we stopped visiting so much, we bought my dad an ice cream maker, but we never used it as much...

Until now. Since moving in with Dad, I've remembered the machine on and off. You know how you always remember something when you can't do anything about it, only to soon forget? That was me. Finally, I spotted the thing in the garage and asked my dad to bring it inside. Can't forget when it's right in front of you, right? Right. That very evening, I made up a batch of Nigella Lawson's egg-custard ice cream.


It was glorious. Rich, creamy texture, sweet and light vanilla taste. Definitely a keeper of a recipe. Plus, this ice cream will always hold a special place in my heart as it was the first time I used a vanilla bean. Score! Look at those lovely vanilla bean flecks!


Vanilla Bean Ice Cream
(Nigella Lawson, Forever Summer, egg-custard ice cream, pg 224)
  • 2 1/4 cups whole milk
  • 1 vanilla bean
  • 6 egg yolks
  • 7 tbsp granulated sugar
  • 1/2 cup + 2 tbsp heavy cream

Pour the milk into a sauce. Cut the vanilla bean all down it's length and, using the tip of the knife, scrape out the seeds into the milk in the pan. Add the rest of the bean and bring the milk almost to a boil. Turn off the heat, cover the pan, and leave it to steep for 20 minutes.

Whisk the yolks and sugar together. Remove the bean from the milk and pour the milk into the egg mixture, whisking as you. Wash out the milk pan and pour the custard mixture back into the pan.

Fill your sink half full with cold water. This is in case the custard looks like it might split. If so, plunge the your pan into the water and whisk like the devil until it's gone back to normal.

Over medium heat and stirring constantly, cook the custard for approximately 10 minutes, until it thickens. It should be smooth and velvety, thus the constant stirring. If at any time it appears to split (it might start to look grainy), do what I mentioned above. You'll be fine. (It happened to me.) Once the custard has thickened, transfer it to a bowl and let it sit in the cold water in the sink to cool. Stir every so often. Chill in the refrigerator.

Right before you're ready to freeze the ice cream in the ice cream machine, whip the cream until it is thick (but not stiff) and fold it into the custard. Freeze according to your ice cream maker's instructions.

Now, Nigella states that the recipe serves 6-8. BAH to that I say. I'd estimate we got 12 scoops of ice cream from this, so next time I will definitely double the recipe.

I've got a few ice cream ideas formulating, so keep an eye out for those.

Wednesday, August 19, 2009

Baked Fish

Last weekend, my brother-in-law went fishing. Usually, he gives away whatever fish he catches since my sister doesn't like fish. Hoping he'd score some redfish on his most recent trip, I asked my sister if we could possibly get some. Us being family and all, of course she said yes. Now, we didn't get any redfish but my BiL did get some croaker (which I had never heard of before that moment). It's a fairly nice fish, though I'll admit I don't know much about fish at all.

Since we were all pretty unfamiliar about preparing croaker, I did some searching online. Turns out you can prep croaker just about any which way you want. Since hubby doesn't like fried foods (egads!!) and I didn't want to try to filet fish my first time cleaning fish, I decided to bake them whole. I didn't want to overwhelm the fish's own taste, so I just used common, simple ingredients. Now, I'm not going to explain cleaning the fish. If you want or need to know, google is a great pal to have.


Baked Croaker
  • 1-2 croaker per person (depending on size), scaled, cleaned, and deheaded
  • 2 lemons, sliced into rounds
  • 2 pats of butter per fish
  • 1 1/2 cup white wine (I used chardonnay)
  • 1 bunch of parsley
  • 1 onion, cut in half then thinly sliced

Preheat oven to 350F. For each fish, place 1 pat of butter, 1 onion section, 1 lemon, and a few sprigs of parsley in the cavity (you know, the one you cleaned out). Place in a baking dish alternating head to fin to help them all fit. Place a pat of butter and an additional lemon slice on each fish. Sprinkle with left over parsley and onions. Pour wine over the fish. Bake 15-20 minutes, or until the flesh is white and flakes when touched with a fork.


I didn't want anything too overpowering as a side to the fish, so I just sauteed up some brussels sprouts and roasted a variety of potatoes in olive oil. I picked up a mix of yellow, red, and purple potatoes at the store, which I thought was fun. I absolutely adore purple potatoes! Here's a gratuitous photo:

Sunday, August 16, 2009

Lemon Meringue Tarts

As a kid, I really disliked lemon. Loved oranges, hated lemons. They were just too tart, especially for my tongue. (I have a "special" tongue that is uber-sensitive to acidic foods.) At the age of 18, I suddenly developed a liking for lemonade, then slowly I began to enjoy a few lemony things. But lemon still isn't really my thing, which is unfortunate for hubby who loves lemon. I avoid baking things that only one of us likes, so no lemon treats for him, not even his favorite lemon meringue pie! .. Until now, because we live with Mama Sarah's Papa, who LOVES lemon meringue pie. With two boys who love it and a recipe that looked fun, I decided to go for it.


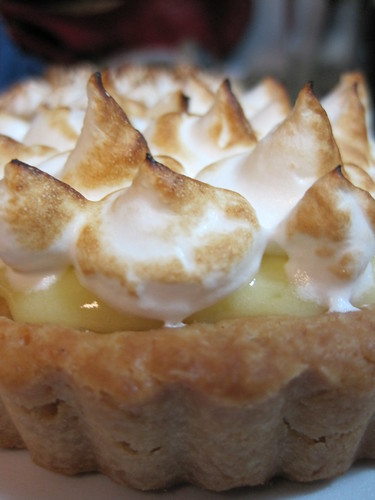
Having completed this recipe, I feel like a total badass. It's a two day project that involves three things I consider tricky: a pastry crust, a cream, and meringue. And let's not forget the most BA part; I had to buy a blowtorch (and by "had" I mean that I really wanted to). The tarts came out really well; my dad, husband, and brother-in-law all really enjoyed them, but wished they were bigger. This is definitely a classic dessert that will impress any lemon-lover. Though beware; it is tart and not for the (lemon)weak-hearted!

Lemon Meringue Tarts
(adapted from recipes by Pierre Herme and Dorie Greenspan)
(makes 1 large tart or 4 mini tarts)

Lemon Cream
  • 1 cup plus 2 tbsp sugar
  • zest of 3 lemons, finely grated (use the finest zester you can)
  • 4 large eggs
  • 130 ml freshly squeezed lemon juice (approximately 4-5 lemons)
  • 13 tbsps unsalted butter, at room temperature and cut into big chunks
Pastry
  • 1 1/2 cups all-purpose flour
  • 1/2 cup confectioner's sugar
  • 1/4 tsp salt
  • 9 tbsp very cold/frozen unsalted butter, cut into small pieces
  • 1 large egg, slightly beaten
Meringue
  • 2 egg whites
  • 2 tbsp caster sugar*
  • 1/4 cup water
  • 6 tbsps sugar
* caster sugar is more finely ground than granulated sugar, but IS NOT confectioner's sugar. You can buy it as the store, possibly marketed as "superfine" or you can just pour some granulated sugar into your blender/food processor and pulse for a few minutes. Be careful: let the sugar sit for a minute so the sugar dust settles. (This sugar is great to have around; it dissolves very well and quickly into cool liquids.)

Day One

We begin with the lemon cream as it needs to chill overnight. Fill the sink with 3-4 cm of cold water. Next, you'll need to find a big heatproof bowl (preferably the bowl of your stand mixer if you have one) and a large pot that it can sit atop; we'll be making a double boiler of sorts. Pour water in the pot, but not enough to touch the bottom of the bowl when it is on top; set the water to a simmer. In your large bowl, combine the sugar and lemon, rubbing it between your fingers until the sugar is moist and fragrant. The sugar will resemble damp sand. Whisk in the eggs then the lemon juice.

Place the bowl over the pot with simmer water, and start stirring with a wooden spoon. Stirring CONSTANTLY, cook the lemon cream until it reaches 85C (185F). It will take awhile. You'll start with a liquid that looks like :


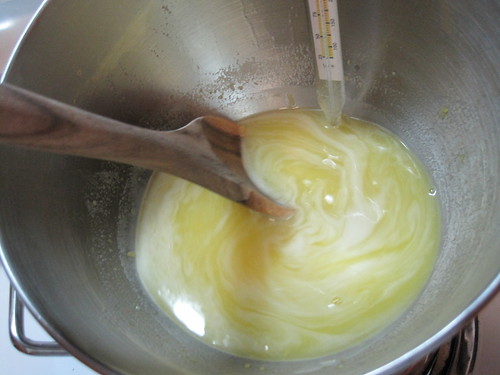
For a good portion of the time, the liquid will remain thin. Only in the last few 10 degrees or so will the cream begin to thicken and become opaque. at 85C, your cream should be thick and look like this :


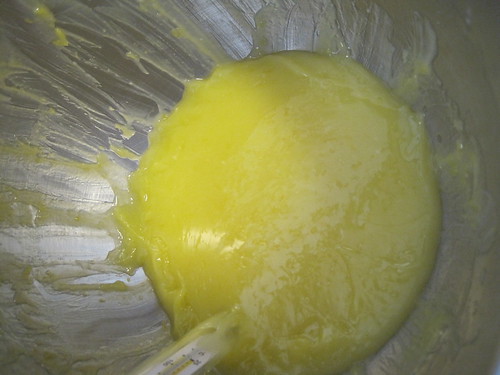
As soon as your cream reaches 85C, remove it from the heat and place it in the cool water bath. Let it cool to 60C (140F). Then, gradually inccorpated the butter chunks, whisking after each addition (and this is where the stand mixer is nice).

Once the butter is fully incorporated, switch to a hand-held mixer if you weren't using one to begin with. Blend the butter for 8 minutes, which will ensure a "too-smooth-to-be-true lemon cream." Pour the cream into a containerm, and press a piece of saran wrap against the surface of the cream. Make sure you've got an airtight seal. Refrigerate overnight. The cream can last in the fridge for up to 4 days.

Day Two

Time to begin the pastry. The original recipe assumes you're using a food processor. Since I don't have one, I couldn't. If you'd like the original food processor instructions (lucky dog), you can go to the original recipe.

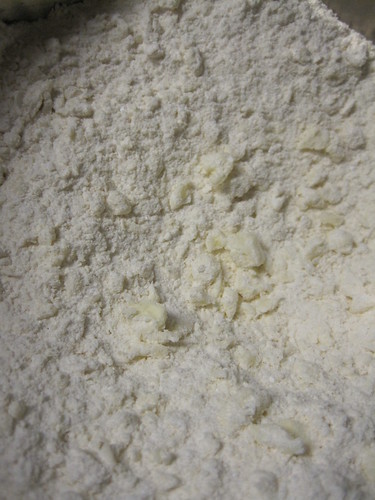
In a medium bowl, whisk together the flour, sugar, and salt. Scatter the small pieces of butter over the dry ingredients. Using a pastry cutter, cut the butter into the dry ingredients until it is coarsely cut in. You'll have pieces of butter the size of oatmeal flakes and some the size of peas. Like this :


Next, gradually add the egg, stirring well after each addition (I continued using the pastry cutter here and it worked fine). After the whole egg is added, continuing to cut/stir the dough until it begins to clump up. Turn the dough onto a lightly floured surface and lightly and sparingly knead the dough to incorporate any dry ingredients that were not mixed in. Form the dough into a ball or disk and wrap tightly in plastic wrap. Chill for at least 2 hours (I chilled mine longer and it was fine).

When your dough is chilled and you're ready to proceed, butter your pan(s) well. If you're making mini tarts, divide the dough into 4 pieces. On a lightly floured surface, roll out the dough, making sure to lift and turn the dough occasionally to prevent it from sticking. You want the dough in a roughly round shape and a few inches bigger than your pan. (If you're making 1 tart, roll the dough out to 12 inches. If you're making 4 tarts, roll each piece of dough out to about 5 1/2 inches.)

Centering the dough over the pan, place the dough in the pan. Seal together any cracks that appear. Trim overhang to 1/2 inch and fold the overhang in, making double-thick sides. Pierce crusst all over with a fork.

Freeze the crust(s) for at least 30 minutes before baking.

Preheat the oveen to 375F. Butter the shiny side of a piece of foil and fit tightly against the crust (buttered side touching the crust, of course). Place the tart pan(s) on a baking sheet and place on the center oven rack. Bake 20-25 minutes. Carefully remove the foil. If the crust has puffed, press it down gently. Bake an additional 10 minutes or until the crust is firm and golden brown. It is important that the crust browns; this adds scrumptious flavor. Transfer to a rack and cool to room temperature.

Once the crusts are cool, remove the lemon cream from the fridge and whisk it to loosen it up. It might seem to get a little lumpy, but it's okay. Pipe or spoon the meringue into the crust(s), nearly to the top. Tap the pans to smooth out the cream. Refrigerate for at least an hour before starting the meringue.

Has an hour passed? Yes? Ok. Let's start the meringue. The delicious, airy, sinful meringue. But only make it if you're just about ready to serve your tarts. Otherwise, the meringue will weep (and separate). Also, the two aspects of this part (egg whites and sugar syrup) go quickly, so call in a buddy if you can. It works best to do the two parts simultaneously.

Beat the egg whites with a pinch of salt at slow speed until it is fully frothy. Not just a little layer of froth at the top; it needs to be foam all the way through. Gradually add the caster sugar, increasing speed as you go. Beat to soft peaks and turn mixer to low while making simple syrup. In a small saucepan, combine the granulated sugar and water. Stirring constantly, bring the mixture to 115C (239F). Return the mixer to medium speed and slowly pour in the boiling syrup. Increase the speed to high and beat until th ebowl is no longer hot (it will be warm).

Pipe the meringe onto the lemon cream and caramelise using a blow torch.


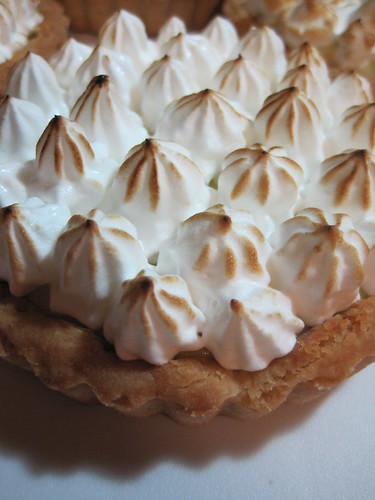
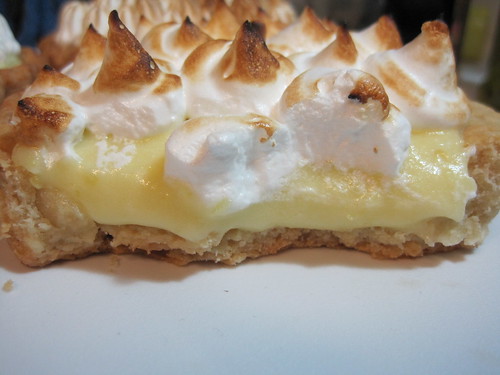
So pretty! So fun! Now, this was my first time piping meringue so I had t play around a bit. I don't think any of my tips were quite right, but that's okay. Next time, I might just spoon some meringue on top and swirl it with a spoon.

I wanted to take a pretty cut-in-half tart so you could see the gorgeously smooth cream with the beautiful crust and meringue, but I was too busy eating it to cut it. So I apologize for the teethy marks. It couldn't be helped.


Wednesday, August 12, 2009

Strawberry Muffins and a New Goal

I've discovered in this month of being unemployed that I have motivation issues when my life is so unstructured. From now on, I will attempt to blog a new recipe on Wednesday and Sundays, hopefully one sweet (baking) and one savory (cooking). I've also joined The Daring Kitchen for both baking and cooking so I'll have two monthly challenges. I'm excited! The new schedule will go into effect next week. Now onto the strawberry muffins.

Living in south Louisiana means dealing with sweltering summers. The oppressive heat/humidity double-combo frequently makes certain foods unpleasant. When you've been in and out all day, you do not want to eat something heavy. Now that's all fine and good until we reach dessert; so many treats are heavy and decadent. Luckily, there are a few light treats that satisfy the sweet tooth without overwhelming you. One such treat is strawberry shortcake.

Hubby and I seem to be developing the habit of eating dinner at his mother's every other week or so. Since she cooks dinner, I feel it's only fair to contribute a dessert. The time before last, I brought Strawberry Cheesecake Cookies, which were a hit. I thought another strawberry dessert would be a crowd-pleaser, as well as light. I had a recipe for what I thought was a strawberry shortcake-esque cupcake. Turns out, not so much. I'm not saying they weren't tasty; they just weren't what I expected. Firstly, for some reson mine fell ALOT. They were concave on top, not convex. They were also more akin to a muffin than a cupcake in my opinion, so I didn't ice them. As muffins, they're great. As strawberry cupcakes, they leave much to be desired. If you'd like to try them out, you can follow the link. You might love them. My audience was split.

Sunday, August 2, 2009

Milano Cookies

This past week, TasteSpotting.com has been flooded with Daring Bakers adventures with Milan cookies. You know the ones I'm talking about; those Pepperidge Farm cookies with the crisp buttery ovals sandwiched together with rich chocolate ganache? If you don't know the bliss of which I speak, you must follow my next instructions. Get up. Grab your keys. Head to the nearest market. Walk down the cookie aisle. Grab a package of Pepperidge Farm Milano Cookies and purchase them. Once you're in the parking lot, open the package and let the sweet cookie take your tastebuds on a ride to Delicioustown. Try not to wreck your car while stuffing your face as you drive home...

Okay. Moving on. Milan(o) cookies are some of my absolute favorite cookies. The crisp, crumbly, yet airy texture of the cookie combined with the rich chocolate ganache is just divine. They're a cookie I rarely treat myself to (mostly due to the price), so imagine my absolute delight at the idea that I could make them myself! The ingredients are simple; generally, I have them all in the kitchen (minus the cream). Really, this recipe and I are a pairing made in heaven.


Milan Cookies
(Gale Gand of the Food Network)

Cookie Batter

  • 12 tbsp unsalted butter, softened
  • 2 1/2 cups powdered sugar
  • 7/8 cup egg whites (approximately 6 eggs)
  • 2 tbsp vanilla extract
  • 2 tbsp lemon extract
Cookie Filling
  • 1/2 cup heavy cream
  • 8 oz semisweet chocolate, coarsely chopped
  • 1 orange, zested (I omitted this)

Preheat oven to 350F and line a baking sheet with parchment paper.

In a large mixing bowl, cream together butter and sugar. Gradually mix in egg whites (I added approximately 2 egg whites at a time), then mix in the extracts. Add flour and mix just until fully incorporated.

Pipe the batter onto the prepared sheet using a 1/4 inch plain piping tip. (Don't have piping tips and bags? Just put the batter in a gallon ziplock back and snip the corner off one end). Pipe 1 inch long strips of batter, making sure they are 2 inches apart from each other and the edges of the pan. The batter WILL spread quite a deal.

Bake 10 minutes or (more importantly) the edges are a light golden brown. Remove to a cooling rack and cool completely.

While the cookies cool, scald the heavy cream; in a heavy-bottomed pan over medium heat, heat the cream until it is steaming and the edges begin to bubble. Make sure to stir frequently; you do not want a skin developing atop the cream.

Place the chocolate in a glass bowl; pour the scalded cream over top. Stir constantly until all the chocolate has melted. Let it cool and thicken a bit.

While your chocolate is cooling, it's a good idea to go through your cookies and pair them up so you have similarly sized and shaped cookies.

Of each pair, spread a thin layer of chocolate across the flat side of a cookie. Gently press the flat side of the second cookie on top.

A Few Notes:
My cookies were not perfect replicas of the P.F. ones. For starters, my cookies are very soft and chewy. Perhaps (as I didn't use a piping tip) my batter was too thick and couldn't crisp up. I'm a bit skeptical of this theory though. I might fiddle with the recipe the next time I make these.
Also, hubby and I both agree that the lemon is too heavy; next time, I'd either cut the amount by half or even just omit it completely.
Thirdly, it is hella hard to make nicely shaped ovals. So don't get discouraged. I had to sift through mine to get nice ones to photograph.
Even though these aren't exactly like the P.F. ones I love, they're still pretty tasty. You should try them out; people will be impressed by their delicate nature.

Saturday, August 1, 2009

Roasted Brussels Sprouts

Oh brussels sprouts, how I love thee! So simple and delicious; three mere ingredients inspire my tastebuds to sing. I especially love the little leaves (correct word) that fall off and crisp up. Mmmmmm.


Roasted Brussels Sprouts
  • 1 lb brussels sprouts
  • olive oil
  • salt
Preheat oven to 400F. Prep a baking sheet by lightly oiling it or lining it with foil.

Clean brussels sprouts, removing any wilted or damaged leaves. Cut off the stubby end, then cut them in half, lengthwise.

Place sprouts cut side down on the baking sheet and drizzle with olive oil. Salt generously.

Bake 15 minutes. Flip brussels sprouts over, drizzle with a bit more olive oil, then bake an additional 5 minutes.

Devour. Possibly share with fellow diners; I try to.

Onion Garlic Parmesan Breadsticks/Dinner Rolls

Sometimes, I just want to impress people too much. This results in my taking on too much at once for one meal and dirtying waaay too many dishes. But I can't help myself! Case in point: the same night I made my sister chocolate angel food cake, I was also making pseudo-manicotti and decided we should have homemade breadsticks. Why homemade? Because I'm insane. But how awesome are breadsticks? Totally awesome. And how much more awesome does something become when it's homemade? Awesomeness squared. So homemade breadsticks were made.


But in addition to being insane, I'm also pretty lazy. So after dividing up the dough and making approximately a dozen breadsticks, I decided dividing and rolling out the dough was too time consuming; plus, my sister really needed to eat and then leave so she could get the cutest baby ever ready for bed. So I decided to make rolls out of the remaining dough.


And honestly, I liked them in roll form better. They were fluffy and seemed more flavorful, though I know they weren't more flavorful; there was just more fluffy bread per bite... Yeah.

Onion Garlic Parmesan Breadsticks or Dinner Rolls
(Maryellen Hays, The Taste of Home Cookboook, pg 463)
  • 3/4 cup diced onion
  • 1 tbsp vegetable oil
  • 2 1/4 tsp active dry yeast
  • 1/2 cup warm water (110F to 115F)
  • 1/2 cup warm milk (110F to 115F)
  • 1/4 cup butter, softened
  • 1 tbsp sugar
  • 1 1/2 tsp salt
  • 2 eggs
  • 3 1/2 - 4 cups flour
  • 1/4 cup butter, melted
  • garlic salt
  • grated Parmesan cheese

In a skillet, saute onion in oil until tender; cool. In a large mixing bowl, dissolve yeast in warm water. Add milk, 1 egg, butter, sugar, salt, 1 egg, and 1 cup flour. Beat on medium speed for 2 minutes. (Note, I'm not sure why it says to add the eggs separately if not beating in between additions.)

Stir in onion and enough of the remaining flour to form a soft dough. Turn onto a floured surface, knead until smooth and elastic, 6-8 minutes.

Place in a greased bowl, turning once to grease the top. Cover and let rise in a warm place until doubled, about an hour.

Punch dough down, and let stand for 10 minutes. Turn onto a lightly floured surface; divide into 32 pieces. Shape each piece into an 8 inch rope. Place 2 inches apart on greased baking sheets. Cover and let rise for 15 minutes. Alternatively, you can separate the dough into larger pieces, form into balls, and then place in a round cake pan or pie pan.

Brush with melted butter and sprinkle with garlic salt and grated Parmesan cheese.

Bake at 350F for 16-22 minutes or unti lgolden brown.

Chocolate Angel Food Cake

A couple weeks ago, my sister texted me that she was craving something sweet. A few days later, she came over for dinner, still with that craving. Texting back and forth (like we always do) before she came over, I discovered she likes chocolate cake and decided to make her a chocolate angel food cake. Partly because I simply love angel food cake. Partly because angel food cake is one of the healthier cakes out there. Mostly because I love angel food cake.

After preparing the batter, I didn't expect it to be all that chocolatey; I anticipated a hint of chocolate. Oh, but I was so deliciously incorrect. Especially for being an angel food cake, this has a robust chocolatiness perfectly complemented by the sweetness and stickiness of angel food. SO. FREAKIN'. DELICIOUS. The cake did not lost long. I sent my sister home with a chunk of it, which she then ate the next morning for breakfast. But then again, I had some for breakfast that morning too.


I served this cake with homemade whipped cream and sliced strawberries, because what goes together better than chocolate, strawberries, and cream?

Chocolate Angel Food Cake
(Better Homes and Gardens New Cook Book, pg 182)
  • 1 1/2 cups egg whites (10-12 large eggs)
  • 1 1/2 cup sifted powdered sugar
  • 1 cup sifted flour
  • 1/4 cup unsweetened coca powder
  • 1 1/2 tsp cream of tartar
  • 1 tsp vanilla extract
  • 1 cup granulated sugar

In a large bowl, allow the egg whites to sit at room temperature for 30 minutes. Meanwhile, sift together powdered sugar, flour, and cocoa three times; set aside.

Place baking rack in lowest position in the oven. Preheat to 350F.

Add cream of tartar and vanilla to egg whiles. Beat (with electric mixer) on medium until soft peaks form. Gradually add granulated sugar 2 tbsps at a time, beating until stiff peaks form.

Sift 1/4 of the flour mixture over the egg whites and fold in gently. (You may need to transfer to a larger bowl.) Repeat, folding in the remaining flour mixture by fourths.

Pour into an ungreased 10 inch tube pan. Gently cut through the batter with a butter knife or small spatule to remove any large air pockets.

Bake on the lowest rack for 40-45 mintues, or until the top springs back when lightly touched. Immediately invert the cake; cool thoroughly in the inverted pan. Using a small spatula or knife (a clean one!), loosen the sides of the cake from the pan; remove it from the pan.


To make whipped cream, simply beat heavy cream in a bowl until it thickens and stiffens. If you'd like it sweetened, add powdered sugar to taste. You may also add cocoa powder or vanilla extract or any other flavorings you'd like.