Tuesday, October 27, 2009

October 2009 Daring Bakers' Challenge: Macaroons

The 2009 October Daring Bakers’ challenge was brought to us by Ami S. She chose macarons from Claudia Fleming’s The Last Course: The Desserts of Gramercy Tavern as the challenge recipe.

Yeah. I was SUPER excited when I learned this month's  challenge were those adorable French cookies; I had decided nary a week before that I would attempt to make some.  Unfortunately, I failed horribly. Twice. I'm not sure what exactly went wrong, but I think my almond flour was too coarse. I'm super disappointed, but also super determined to get this right, so expect to see more macaroons soon!


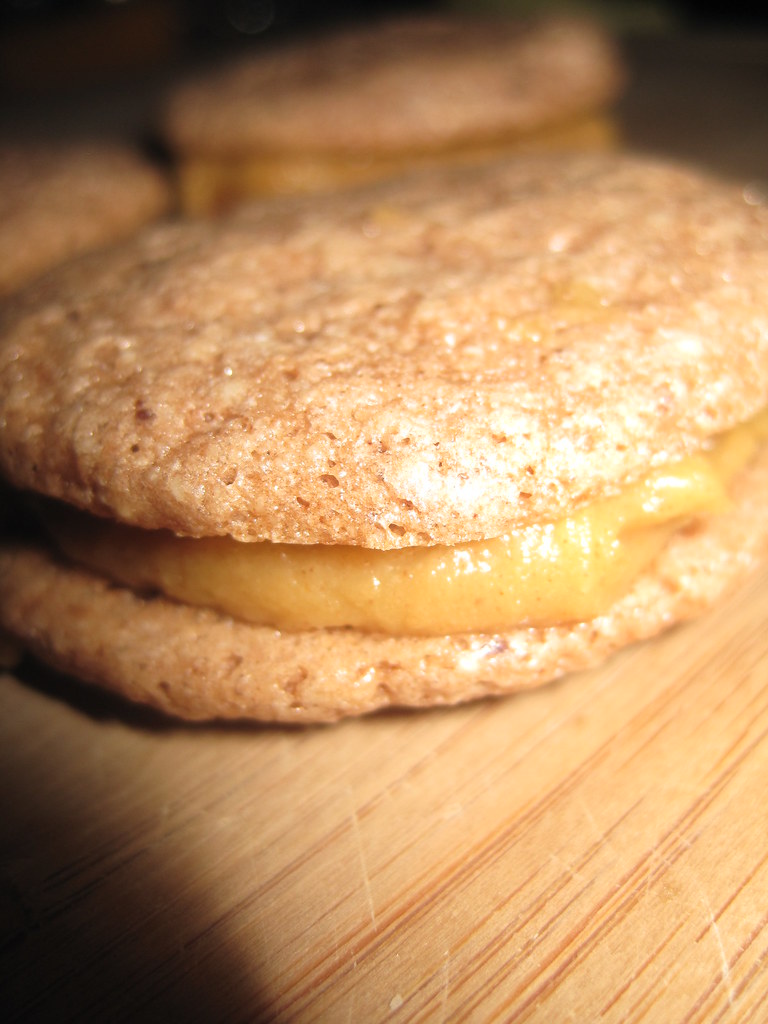
These aren't right at all (well, they are tasty). Ugh is all I have to say. I hate failure.

Sunday, October 25, 2009

Baked Ziti

Random cravings are fun to indulge, especially when they involve pasta. 


Baked Ziti
  • 1 lb ziti
  • 1 lb ground beef
  • 2 medium onions, chopped
  • 2 garlic cloves, minced
  • 2 handfuls of sliced mushrooms
  • 2 tsp basil
  • 2 tsp parlsey
  • 2 tsp oregano
  • salt and pepper
  • 1 large jar tomato sauce
  • 1 cup mozzarella 
Preheat oven to 350F.

Prepare noodles as per the package, making sure not to over cook them. 

While the noodles cook, brown the ground beef, making sure to stir often so it crumbles nicely. Add the onions and garlic, then stir in the basil, parsley, oregano, salt, and pepper (to taste). Cook over medium heat until the noodles are cooked and drained. 

Add the meat mixture to the noodles and mix well. Pour into a 13x9 inch baking dish.  Pour tomato sauce over it all, then stir it in a bit.  

Bake 15 minutes, then add the mozzarella.  Bake an additional 5-10 minutes, until the edges are bubbly.

Next time, I'll make my own tomato sauce so I have more control over such a large aspect of the dish; I wanted a more pungent tomato taste; the jarred sauce I used was pretty weak.

Slow Cooker Applesauce

Wow, so Wednesday just snuck right by me, for good reason. Firstly, I worked 8 days in a row, and some of those days were quite lengthy. Secondly (and more awesomely) I got a new job! Now, I know I just posted about becoming employed, but I received a second offer that was just too good to pass up. This is actually good news for the blog because I'll be moving from working til 7 pm (bad for cooking) to 5 pm (yay for cooking). Hopefully, I won't be missing anymore Tuesdays. 

On to the food. It's autumny good weather down here, and I'm loving these October days. Yesterday, I had the random desire to make applesauce, something about the aroma of apples, the meltingness that makes the sauce, the tart snap of apples mellowed by musky brown sugar. Mmmm. I'm also rather homesick for college, and one professor in particular who made tasty applesauce. So nostalgia meets seasonality. Here we go.


A few notes before we get started.  There are differing thoughts on whether you need to peel the apples first. Some feel it adds flavor and that it's fairly easy to pull out the peels. If you're cooking for someone who hates apple peel, they aren't going to like the few little pieces that remain behind. It's up to you. Also, this recipe makes a couple servings of applesauce. Definitely double or triple the recipe as you see fit.

Applesauce
  • 5 large apples,  cored, peeled, and quartered.
  • 1/2 cup brown sugar
  • 1/4 cup white sugar
Place the apples in a slow cooker and cook over low for 5 hours.  Mix in the sugars and stir well. Add lemon juice or cinnamon if you'd like.  As you stir the apples, they'll break up and become the mushy awesomeness that is apple sauce.  Cook an additional hour or two.

Sunday, October 18, 2009

Dulce de Leche-Arborio Rice Pudding

One last post for the night, then I'm going to bed.  I've finally made a recipe I've meant to several times in the past week. I'd decide I was going to make it, then something would come up (often, my own laziness). It's another recipe from Rebecca Rather's The Pastry Queen; it's Dulce de Leche Arborio Rice Pudding. 


I grew up eating rice pudding; it's something my dad and I always bonded over.  What we ate was a canned "creamed rice" (it sounds disgusting, I know) from Scotland that he would doctor up with his special recipe.  It was a very rare treat for me, as my dad didn't get to return to Scotland all that much. I was probably 16 before he shared the secret recipe with me (and I'll take it to my grave!)  So, going through life, that was the only rice pudding I ate.. until I visited my aunt and uncle in Austin and had Indian food for the first time.  The rice pudding (called kheer) that I had there was the opposite of what I'd always had; it was much thinner and cold, with different spices. I fell in love with it. So then I knew I loved rice pudding as a whole. 


This is my first attempt at making  homemade rice pudding, and I am quite pleased with the results.  It's perfectly sweet and creamy; the rice holds its firmness well. 


Dulce de Leche - Arborio Rice Pudding
(Rebecca Rather, The Pastry Queen, pg 106-107)
 
Rice Pudding
  • 1 14oz can sweetened condensed milk
  • 1/2 cup Arborio rice
  • 2 cups water
  • 1 1/2 cups milk
  • 4 large egg yolks
  • 1/4 cup firmly packed golden brown sugar
  • 1 1/2 cups heavy cream
  • 2 vanilla beans, split in half, seeds scraped out and reserved
  • 3 tbsp amaretto liqueur
Garnish
  • 1 cup slivered almonds
  • 1 cup chilled heavy cream
  • 1/3 cup dulce de leche (above)
 To make the pudding:


Coat a 5 or 6 cup ovenproof casserole or souffle dish with cooking spray.


Remove the paper wrapper from the can of sweetened condensed milk. Use a can opener to make two small punctures on opposite sides of the top of the can.  Set the can of milk in a medium saucepan, puncture side up. Fill the medium saucepan with water to reach two-thirds of the way up the sides of the can. Cover the saucepan and bring the water to a boil over high heat.  Lower the heat until the water simmers. 

Simmer the milk for 1 hour. Check the saucepan periodically, adding water to ensure that the water level does not drop below halfway. A bit of milk may seep out of the small holes in the can.  Cook unti lthe milk pooled on top of the can has turned a deep golden brown. 


Remove the can from the simmering water using a pot holder or tongs.  Open the can carefully and use a rubber spatula to spoon 1 cup of the cooked milk into a measuring cup (save the rest to use in the whipped cream topping).  It should have a pudding-like consistency.


Bring the rice and water to a boil in a medium saucepan and simmer for 5 minutes.  Drain the rice in a colander, pour back into the saucepan, and add milk. Cover and simmer the rice for 20-25 mintues, until the milk is absorbed. Transfer the rice to a bowl. 


Preheat the oven to 325F. In a separate bowl, whisk together the egg yolks and brown sugar until smooth. In a medium saucepan set over medium heat, bring the cream, 1 cup dulce de leche, and vanilla bean pods and their beans to a boil. Remove the vanilla bean pods. 


Whisk 2 tbsp of the hot cream mixture into the egg yolk mixture (introduce the hot mixture slowly, or the yolks may begin to curdle). Pour the rest of the cream mixture in a slow, steady stream into the egg yolk mixture, whisking constantly. Stir in the amaretto. Add the cooked rice and mix to combine. 


Pour the mixture into the prepared casserole dish. Bake for 45-50 minutes, until the top is browned and a toothpick stuck into the middle comes out almost clean. (The pudding may look a little wet on top.)


To make the garnish:


Arrange the almond slivers on a baking sheet in a single layer and toast them in the oven for 7 to 9 minutes, until golden brown and aromatic.


Using a mixer fitted with a whisk attachment, beat the cream in  a large bowl on high speed until soft peaks begin to form. Add 1/3 cup of the remaining dulce de leche, if desired, and beat until incorporated. 


Serve the pudding warm or at room temperature  wtih a dollop of dulce de leche whipped cream and a generous sprinkling of toasted almonds. 


C'est bon.

Glazed Carrots

So I don't really like cooked carrots; I never have. I've tolerated the syrupy sweet ones because I have a major sweet tooth, but I just hate the mushiness of cooked carrots. Love them raw, but I avoid them cooked.  That is, until a few days ago when I was struck with the strongest desire.. no, yearning to cook some carrots. I have no idea why, but they suddenly seemed like the most delicious idea ever. It's bizarre, and honestly sort of sounds like I'm pregnant (which I'm not), but oh well. Bizarre is my life. 


I looked at a few carrot recipes, then just decided to wing it. It's pretty basic and simple. And did i mention scrumptious?

Ever so Sweet Glazed Carrots
  • 1 bunch of carrots, peeled, trimmed, and cut into half, then quartered
  • 3 tbsp butter
  • salt
  • water
  • 2 tbsp brown sugar


Melt the butter in a medium sized skillet (one with a lid). Once it's melted, add the carrots and stir to coat. Sprinkle with salt, then add in water until it's about halfway up the carrots. 


Cover and simmer over medium low heat for 20 minutes.  Remove the lid and let the sauce cook down.  If you find the carrots to be softening too much, remove them to a bowl and cover it. 


Add the brown sugar and stir until melted.  Let the sauce cook until it has thickened slightly, then add back in the carrots and stir to coat. 


Easy peasy  deliciousness.

Beef Tips and Gravy

One of my favorite foods growing up was beef tips and gravy. (I'm sure you've noticed a lot of my favorites are southern comfort foods.) It's a dish my  mom always made really well, and I'm a sucker for white gravy. It's just so good! .. With the weather becoming chilly, it's the perfect time for all of those comfort foods to grace the table.  Thus, we have beef tips and gravy.


This dish is pretty simple to make, though the gravy may seem daunting.

Beef Tips and Gravy
  • 2 lbs stew meat
  • 3/4 cup all purpose flour
  • 1 1/2 tsp Chachere's (or season-all or whatever's your poison)
  • 3 or so tbsp of cooking oil
  • water
  • 1/2 cup milk
  • salt and pepper to taste
Heat the oil in a large skillet over medium-high heat; you want enough oil to generously cover the bottom of your pan, but you don't want it so deep that you're frying your meat. 

While the oil heats up, combine the flour and Chachere's on a large plate. Dredge each piece of meat through the flour, making sure each is well coated. 

Once the oil is sizzling hot (you can tell it's right by dropping a few droplets of water in the pan; if they dance and sizzle, you're set), add the meat, making sure it's in a single layer. You may need to do two batches, which is okay.  Let the meat brown for 2 minutes on each side, achieving a nice deep brown coloring.

Once all of the meat is browned, add enough water to come most of the way up the meat, but not covering it. Cover with a lid and cook over medium low heat, stirring occasionally, for 1 hour.

As you stir the meat, the flour and water will mix to become the basis of the gravy.  After the hour of cooking is up, slowly add the 1/2 cup of milk, stirring constantly, until you get the desired thickness (which is a personal preference).  Salt and pepper to taste.

Serve over rice or mashed potatoes.

Wednesday, October 14, 2009

October 2009 Daring Cooks' Challenge: Vietnamese Chicken Pho

The October 2009 Daring Cooks' challenge was brought to us by Jaden of the blog  Steamy Kitchen. The recipes are from her new cookbook, The Steamy Kitchen Cookbook. This month's challenge had two components: the first being Vietnamese chicken pho - a broth and noodle soup - and the second being dessert wantons.  

The soup was made from scratch, meaning I even made my own broth - a first! My dad and I actually had some bonding time as we figured out the best way to chop up the chicken. Weird,  I know.  You can find the recipe here, at Jade's blog The Steamy Kitchen.  The great thing about this soup is that it's a broth base with noodles and chicken in it, then there is a variety of add-ins at the table so each person can customize the soup to his or her own liking. Very cool.


Oh the possibilities!


The dessert wantons were a bit more fun to make, in that they required some creativity.  The given recipe uses chocolate in the wantons, so I wanted to steer clear from that. I really had a difficult time at first thinking of things that would go nicely in wantons, so I started thinking about the cream cheese wantons you get from Chinese restaurants. Thinking about the texture, a lightbulb went off. Pumpkin pie wantons! A traditional pumpkin pie filling inside the crisp wanton, with cinnamon chips thrown in for a bit of textural contrast. I finally had an idea; I just wasn't sure how well the implementation would go. Hubby was not looking forward to having to eat them. 

Even as they were frying, I was so unsure if they would even be edible. But onward I went. They cooled, I prepped a photo or ten, and then it was time.  I raised the wanton to my mouth and tentatively took a bite of the corner. Oh my. These are .. .. good. These are great! These are better than pumpkin pie (disclaimer: I don't like pumpkin pie).  I brought them back to hubby and my dad, and they both thought they were great (though hubby thinks they're a bit dry and need a dipping sauce).  I think they're fabulous. Dad's response was that I should make them more often.  I'm considering serving them for Thanksgiving dinner.


All in all, this was a pretty fun challenge.  I made my first stock and had a delicious soup to warm up a cold, dreary day. Plus I came up with this fab dessert. Good times!

Sunday, October 11, 2009

Potato Pancakes

Some people love leftovers, like hubby. Some people refuse to eat them, like my brother-in-law. If you've got a leftovers hater in the house, it's good to know ways to revamp left over food into a new, delicious dishes. Sometimes, it's difficult, if not impossible, but sometimes it's also quite easy. For example, mashed potatoes can become a variety of things after their first initial serving.  Though, how many homes actually have leftover mashed potatoes? They're so darn good they usually get gobbled up the first night. Unless you live with someone like my dad who follows the "it's better to have too much than too little" philosophy in the kitchen.  He made mashed potatoes the other night, and - I bet you've guessed it - we had about 2 cups of potatoes left. We immediately knew what must be done with them...


POTATO PANCAKES!! This was one of my absolutely favorite foods growing up. My mom didn't make them too often (again, we didn't often have left over mashed potatoes) but when she did, it was bliss at the dinner table.   

Potato Pancakes
  • 2 cups leftover mashed potatoes
  • 1 egg
  • approximately 1/2 cup all purpose flour
  • olive oil
First, you want to make sure your potatoes are well seasoned. They should be, from the night before, but perhaps you need more salt or want to add some garlic powder. 

Stir the flour into the mashed potatoes, making sure they're well combined.  Add in the egg and, again, mix until well combined. You want to make sure the potatoes aren't too wet and sticky; if they are they will fall apart. Add more flour if necessary.

In a large skillet, heat a tbsp or two of oil over medium heat. 

In your hands, roll approximately 1/3 cup of mashed potatoes into a ball, then flatten it into a 1/3 inch disk. Gently place it into the hot oil and let it fry for a couple minutes before flipping it.  If, when you try to lift the pancake with a spatula it sticks to the pan, leave it be for another minute. It should lift smoothly off the pan. Flip and fry for another 2 or 3 minutes.  Remove to a paper towel lined dish to drain. 

In a good sized skillet, you can fry 4 pancakes at a time. Don't let the pan get too crowded or it will be difficult to flip them. 

You can serve this plain, with ketchup, or with just about anything that goes nicely with potatoes.

Sweet Potato Bread

It's a cool, rainy October day today and I found myself wanting something sweet and warm and fitting for this autumn day.  I toyed with the idea of making pumpkin bread, but as I'm making another pumpkin dish soon, I thought that might be pumpkin overl0ad - though, that might be impossible. Then I remembered I had a can of pureed sweet potato languishing away in the pantry. I had bought it on a whim, seeing it in the store and knowing it would be fabulous in something. Today, I hit upon that something.  I checked a few of my cookbooks yet none had sweet potato bread recipes, so I simply adapted a pumpkin bread recipe. Easy peasy. And a darn good idea.


I didn't get too creative with this batch; I wanted to make sure the initial flavors went well together. The next time I make this - and I will make this again soon - I think I'll add a cinnamony crumble like my mom puts atop the sweet potato casserole at Thanksgiving.  You could also add pecans, but hubby doesn't like them so I won't.  Perhaps you could even incorporate marshmallows. Hmmm...

Sweet Potato Bread
(adapted from the Pumpkin Bread recipe in Better Homes and Gardens New Cookbook, pg 132)
  • 2 cups sugar
  • 1 cup packed brown sugar
  • 1 cup cooking oil [I used pecan oil to add a slight nuttiness]
  • 4 eggs
  • 1 tsp vanilla extract
  • 3 1/3  cups all purpose flour
  • 2 tsp baking soda
  • 1 1/2 tsp salt
  • 1 tsp ground cinnamon
  • 1/2 tsp ground nutmeg
  • 2/3 cup water
  • 1 - 15 oz can of pureed sweet potato 
 
Preheat oven to 350F.  Grease the bottom and a half inch up the sides of two 9x5x3 bread pans.

 In a large bowl, beat together the sugar and oil in medium speed. This will be crumbly, and that's okay.  Add the eggs and vanilla extract and beat well. Set aside. 

In a large bowl, whisk together the flour, baking soda, salt, cinnamon, and nutmeg.  Alternately add the dry ingredients and water to the wet ingredients. On low, beat after each addition just until combined, making sure the scrape the sides of the bowl every addition or so.  Beat in the sweet potatoes.  

Spoon the mixture into the prepared pans. To ensure even loaf sizes, I alternate spoonfuls between the two pans, so spoonful into pan 1, then spoonful into pan 2, spoonful into 1, spoonful into 2. You get the picture. 

Bake 55-65 minutes or until a toothpick inserted into the center comes out clean.  Cool in the pan for 10 minutes, then run a knife or spatula around the edges to loosen the loaves. Remove from the pan and cool completely.*

*Ok. I didn't let my cool completely. Or really even mostly. The bread just smelled so good and filled the house with its fragrance 30 minutes into the cooking time. We just had to eat some. 

Wednesday, October 7, 2009

Apple Pudding

Suddenly, it was Wednesday night and I needed something to post.  Having started work this week (woohoo!!), I haven't cooked much, and that which I have cooked has been repeats. I had planned to make some apple chips tomorrow, but decided those apples might go better baked into some goodie, so I sifted through recipes until I found an upside-down toffee apple cake which looked divine. I got all ready to make it, then I realized I didn't have enough apples. Sigh. I came this close [] (that tiny box is how close) to not baking anything, but then I remembered this apple pudding recipe I came across in my apple search.  


The recipe called for the use of ramekins, which I shamefully don't own, so I use a small pie pan instead. I think it worked out  well. 


The recipe is simple and the results are delicious.  Of course, it would be great with a scoop of vanilla ice cream. What apple treat isn't?

Apple Pudding
(original recipe here
  • 2 large apples: peeled, cored, and coarsely chopped
  • 1/2 lemon, it's juice and zest [no lemons here, so I just sprinkled in a tbsp or 2 of lemon juice]
  • 1/4 cup packed brown sugar
  • 1/4 tsp ground cinnamon
  • 80 grams [roughly 3/4 cup] butter, at room temperature
  • 1/4 cup packed brown sugar [yes, it is meant to be listed twice]
  • 1/4 cup self-rising flour*
  • 1 egg
  • 1 tsp vanilla extract
Preheat oven to 350F.  

In a small bowl, combine apple, lemon juice, zest, cinnamon, and 1/4 cup brown sugar.  Set aside.

In a medium bowl, beat together the butter and sugar for about 2 minutes.  Add the egg and vanilla extract and mix until just combined.  Slowly add the flour until it is just combine. 

Divide the apple mixture between 4 individual ramekins and spoon over the flour mixture. [Alternately, you could just spread the apples in the bottom of a pie pan, the dollop the flour mixture on top, spreading and smoothing it with the back of a spoon.]

Bake 40-45 minutes. [Mine only needed 35 minutes, perhaps because it was more shallow than the ramekins might be.] Let rest a moment or two before enjoying it warm.

* If you don't have self-rising flour, you can easily mix up your own substitute. For 1 cup of self-rising flour, just mix together:
1 cup all-purpose flour
1 tsp baking powder
1/2 tsp salt
1/4 tsp baking soda

Sunday, October 4, 2009

Sauteed Asparagus

A few days ago, my friend Rachel departed for Thailand where she will teach English for awhile (a year? I'm not sure). Before she left, I wanted to cook dinner for her and Courtney. Since I moved back, the three of us have reconnected, having gone to middle and high school together, then separating for college.  I made some of my favorite dishes - New Orleans Shrimp and Nigella's Hearthbread  - but I also sauteed some asparagus, which I accidentally discovered when preparing some for my savory Vols-au-Vents. Simple and delicious, it's another great way to enjoy asparagus.


Sauteed Asparagus
  • 1 bunch of asparagus, bottom 1 inch trimmed off
  • a handful of pearl onions, peeled and cut in half
  • 1 tbsp olive oil
  • 3 tbsp butter
  • salt to taste


In a large saute pan, heat the oil over medium heat.  Toss in the onions and saute for a few minutes, stirring occasionally. Add the butter and let it melt. Add in the asparagus and stir well to coat with butter and oil.  Saute over medium heat for 5-10 minutes, until the asparagus is bright green and tender. Sprinkle generously with salt.

Cherry Ice Cream

I learned not too long ago that my brother-in-law frequently checks this blog, which is both unexpected and awesome. One day while hanging out at their house with my sister, he walked in complaining about this lady on the internet with homemade ice cream, but he never gets in.  We talked a bit, and he asked for cherry ice cream. Specifically, vanilla ice cream with maraschino cherries mixed in.  I told him the next time he came to my house for dinner I'd make him some, and I did. That was a week ago. Due to a variety of things (no one eating the ice cream for awhile, blogging about the Daring Bakers Challenge, and my depressing week) I haven't posted it yet. So here we go. 


Unfortunately, the ice cream didn't freeze properly. We had some issues with our ice cream machine, so I suspect it didn't get churned properly. Whatever the reason, it was a bit dry, like when you're a kid and you freeze milk thinking it will become ice cream but you just get crumbly, crystallized milk.  So I'll need to make my brother in law another  batch. 

I followed the same Nigella Lawson recipe I always use, so I'm not going to repost it all right now. Just know that instead of a vanilla bean, I mixed vanilla extract into warm milk. Before putting the mixture into the machine, I folded in marschino cherries cut in half. That's all. 

Cinnamon Sugar Muffins

First, an apology. I suck for not updating Wednesday. I've made many excuses before, and I'm about to make another one. You see, I had a pretty down week. I moved to Louisiana three months ago and applied to many jobs since I came back. I received only 3 calls regarding resumes, and one was from a temp agency wanting me to become a part  of their temp pool while the other two were from interviews I didn't feel went well. Last week, it really hit me how horrible this recession is and how much the world mislead my peers and me as we grew up. A college degree was supposed to guarantee a good job.  But it doesn't, especially not now, when everyone is scrambling for something and a college degree can work against you. It sounds bitter, and I was. I had no motivation to do anything. 

Friday evening found me lying in bed in the dark questioning my self-worth. Pathetic, I know, but three months and scores of unanswered resumes and job applications can do that to you.  So there I was, in bed in the dark, and my phone rang. Turns out I'm not so horribly unmarketable, and someone is willing to hire me. That's right, Mama Sarah is employed. I start work tomorrow morning. I'm thankful, excited, and ready to get some work done.  The hours shouldn't interfere with my cooking/baking nor my Wednesday/Sunday update schedule. Woohoo!! Now on to the food..

My sister's company participates in the Acadiana Heart Walk to raise money for the American Heart Association.  This week, she participated in a bake sale to raise money.  Now my sister is a full-time worker and mother of a 6 month old baby, so needless to say, she doesn't have oodles of spare time. So she asked me if I'd be willing to bake something for her to bring. Heck yes I am! Most of the other people were bringing very desserty things, so my sister thought a breakfasty item would be nice. I decided on lemon poppyseed (which I made a few months ago) and cinnamon sugar muffins. Mmmmm.


Cinnamon Sugar Muffins
(original recipe found at EatingFiend)

Muffins
  • 2 cups flour
  • 1 tbsp baking powder
  • 1/2 tsp baking soda
  • 1/2 tsp salt
  • 2 large eggs
  • 1 cup plain yogurt
  • 2/3 cup packed brown sugar
  • 4-8 tbsp vegetable oil [I used 6 tbsp and found the  muffins to be a bit dry]
  • 1 tsp vanilla extract
Topping
  • 1/2 stick butter, melted
  • 1/4 cup sugar
  • 1/2 tsp cinnamon


Preheat oven to 400F. Line muffin pan with paper liners.


In a large bowl, whisk together flour, baking powder, baking soda, and salt. In a separate bowl, whisk together eggs, yogurt, sugar, oil, and vanilla extract.  Slowly add the flour mixture to the wet mixture. Do not overmix.


Fill the muffin cups 2/3 full and bake for 12-15 minutes. As soon as the muffins are done, remove from the pan and place on a wire rack with a paper towel underneath.


Mix together the melted butter, sugar, and cinnamon.  Spoon a small amount over each muffin, then spread it evenly across the top.  If desired, sprinkle additional sugar and cinnamon on the muffins.