Wednesday, December 31, 2008

Apple Chips

Alrighty. Here's my final Christmas goodies post. I love love LOVE apples. And someone on tastespotting had made homemade apple chips. The idea of slowly baking apples in the oven, letting the crisp, cinnamony sweet aroma waft through my apartment, was irresistable.


Making these apple chips is really easy. Slice an apple or two really really thinly (more proof that everyone needs a mandolin slicer). Line a baking pan with parchment paper. Sprinkle some powdered sugar and cinnamon on the parchment paper, then lay the apple slices in a single layer on top of it. Sprinkle again with powdered sugar and cinnamon. Bake at 200F for 1 1/2 hours. Delicious.

Tart Fun

At some point this summer, I bought some mini tart pans. I figured I'd need some sooner or later. I've been flirting with the idea of making tarts, especially when I have blackberries around. Well, finally, I had blackberries. And left-over pie crust. So, I decided it was time to play.

A week or so before, hubby had asked for an apple pie, which I never got around to baking, so I decided to make him a little apple tart. He enjoyed it.


Then, I got around to playing with the blackberries. I decided (for both tarts) to mix of a sort of cream based off the custard in my apple pie. It's a mix of sugar, eggs, and butter with a bit of flour. It worked well (even all by itself in my last little tart - no picture).


The blackberry tart has peach preserves brushed/dolloped on top. I figured it would add a nice sweetness with the peach complimenting the blackberry. It was supersweet, but in a delicious way.


One day, I'll be cool enough to make my own pastry. And I'll have a better, actual custard. But, this endeavor was an enjoyable way to spend a bit of the Christmas holiday.

Monday, December 29, 2008

Spanish Tortilla

Time for something savory, my friends. This past semester, I had a professor from Barcelona. One of the last days of class, she made a few traditional dishes for us. One was the tortilla, a delicious combination of eggs, potatoes, and onions. It's like a really potato-intense omelet. Oh so delicious.


Spanish Tortilla
  • 5 baking potatoes, peeled and thinly sliced
  • 1 large onion, thinly sliced
  • 9-10 eggs, well beaten
  • salt and pepper
  • olive oil

In a very large, very non-stick skillet, heat a few teaspoons of olive oil. Saute the potatoes and onions until they are thoroughly cooked and beginning to brown/golden. Salt and pepper to taste. Keep in mind that you'll be adding alot of eggs, so if your potatoes seem perfectly salted, the eggs will dilute that.

Pour the eggs into the pan and make sure it's all mixed together, with everything evenly distributed. You'll want to cook on a medium low heat so that the eggs are cooked mostly through without burning the bottom. Once the eggs seem set, you'll need to get a large plate and use this to flip the tortilla over. Cook a bit longer until the eggs are to your liking.

The Barcelonans frequently eat this as a tapas, and as such, cut it into a bunch of small squares. Hubby and I cut it up like a pizza, because we're uncultured Americans. Haha. This made a great Christmas Eve day meal.


Cardamom Cookies

I recently had a conversation with a friend about my love for the word "cardamom". It's a great word, enormously fun to say. Perhaps that's not the best reason to try out a recipe. It wasn't the only one though. Cardamom features into a few of my favorite things (namely, chai) and I'd like to work more with it. These cookies were a great start. The recipe comes from Dinner with Kirsten.


Cardamom Butter Cookies
  • 3 cups all-purpose flour
  • 1 teaspoon baking powder
  • 3/4 teaspoon salt
  • 1 1/2 teaspoons ground cardamom
  • 1/2 teaspoon ground cinnamon
  • 1/4 teaspoon ground allspice
  • 2 sticks (1 cup) unsalted butter, softened
  • 1 1/4 cups granulated sugar
  • 2 large eggs
  • 1 teaspoon vanilla
  • 3 oz fine-quality bittersweet or semi-sweet chocolate, melted (for drizzling)

Mix flour, baking powder, salt, cardamom, cinnamon and allspice in a bowl.

Beat together butter and sugar in a large bowl with an electric mixer at medium-high speed until pale and fluffy, about 2 to 4 minutes. Beat in eggs and vanilla. Reduce speed to low, then mix in flour mixture until just combined.

Form dough into 2 (12-inch) logs (1 1/2 inches in diameter), each on its own sheet of plastic wrap. Use plastic wrap and your hands to roll, press, and square off sides of logs. The dough will be very soft at this point, so let the logs chill on a baking sheet until they’re somewhat firm, about one hour. Then smooth out the edges of the logs through the plastic wrap and try to flatten the sides. Once shaped, continue to chill the logs on the baking sheet until firm, about 1 more hour.

Put oven racks in upper and lower thirds of oven and preheat oven to 350°F.

Cut enough scant 1/4-inch-thick slices from a log with a knife to fill 2 large ungreased baking sheets, arranging slices about 1 inch apart (chill remaining dough, wrapped in plastic wrap).

Bake cookies, switching position of sheets halfway through baking, until edges are golden, 10 to 12 minutes total. Cool on sheets 3 minutes, then transfer to racks to cool completely. Make more cookies with remaining dough on cooled baking sheets.

Once cookies are cooled, melt chocolate over a pan of simmering water in the stove or in the microwave (carefully!!). Spoon the chocolate into a plastic bag and snip off one of the tips. Drizzle the chocolate over the cookies and let set up for a few hours before stacking them.

Dough logs can be chilled 5 days or frozen, wrapped in a double layer of plastic wrap, 1 month (thaw in refrigerator just until they can be sliced). · Cookies (with or without icing) keep, layered between sheets of wax paper or parchment, in an airtight container at room temperature 1 week.

Cranberry-Orange Pinwheels

This is another cookie I've made two years in a row. I love the combination of the cranberry, orange, and pecan that goes into this gorgeous swirls. They also stay firm, yet soft, which is great because I hate cookies that harden.


Cranberry-Orange Pinwheels
(Better Homes and Gardens, pg 256)
1 cup cranberries
1 cup pecans
1/4 cup brown sugar, packed
1 cup butter, softened
1 1/2 cup sugar
1/2 tsp baking powder
1/2 tsp salt
2 eggs
2 tsp finely shredded orange peel
3 1/4 cup flour

For filling, in a food processor combine cranberries, pecans, and brown sugar. Cover and process until cranberries and pecans are finely chopped. Set filling aside.

In a large mixing bowl beat butter with a mixer on medium to high speed for 30 seconds. Add granulated sugar, baking powder, and salt. Beat until combined, scraping sides of bowl occasionally. Add eggs and orange peel; beat until combined. Beat in as much of the flour as you can with the mixer. Stir in the remaining flour. Divide dough in half; cover and chill about 1 hour or until easy to handle.

Between waxed paper, roll half of the dough into a 10 inch square. Spread half of the filling over dough to within ½ inch of edges; roll up dough. Moisten edges; pinch to seal. Wrap in plastic wrap. Repeat with remaining dough and filling. Chill for 4 to 24 hours.

Preheat oven to 375F. Cut rolls into ¼ inch slices. Place slices 2 inches apart on an ungreased cookie sheet. Bake for 10-12 minutes or until edges are firm and bottoms are light brown. Cool on cookie sheet for 1 minute. Transfer to a wire rack and let cook.


Fudge Drops

Oh. My. Goodness. These cookies are uh-maze-zing! AMAZING! And of course, this recipe made the fewest batches. Sadness for me. But oh so good in my tummy. They were tasty tasty like brownie heaven.

This recipe comes from the King Arthur flour site, so sshhh don't tell them I didn't use their flour. It just wasn't what I had around the house. I made the recipe plain - no chocolate chips or chunks or ganache - and they were amazing, but any of those additions would work well.


Fudge Drops
8 oz bittersweet chocolate
3 tbsp butter
1 cup sugar
3 large eggs
1 tsp espresso powder (I omitted this)
1 tsp vanilla extract
1 cup flour
1/4 tsp baking powder
1/4 tsp salt
1 cup (6 oz) chocolate chips, optional (I opted out)

In a double boiler, or in the microwave, gently melt together the chocolate and butter. To avoid heating the chocolate too much and possibly burning it, the best method is to heat till the butter is melted and the chocolate has partially melted, then remove from the heat. Stir till all the chocolate melts.

In a separate bowl, beat together the sugar and eggs till they're thoroughly combined. Add the hot melted chocolate, then stir in the remaining ingredients, including the chocolate chips, if you're using them. Refrigerate the batter-like dough for 1 hour, to make it easier to handle.

Preheat the oven to 325°F. Lightly grease (or line with parchment) two baking sheets, three if you have them.

Drop the cookie dough by tablespoonfuls (about the size of a small ping pong ball) onto the prepared baking sheets. A tablespoon cookie scoop makes this task extremely simple. Leave about 2" between the dough balls, as they'll spread as they bake.

Bake the cookies for 11 to 12 minutes, until their tops are shiny and cracked. They won't crack until the very end, so keep a close eye on them; when they're cracked all the way across the top surface, they're just about done. The point is, you want these baked all the way through, but just barely; additional baking will make them crisp rather than chewy. Remove the cookies from the oven, and top each with a kiss-shaped chocolate, a nonpareil, or a bittersweet chocolate wafer, if desired. Wait 5 minutes, then transfer them to a rack to cool.

Molasses Spice Cookies

So, there was a slight lull in the Christmas insanity updates, but that's partially because I got a new laptop!! I got an adorable little EeePC. It's a 10 incher, which makes it uberportable (what I want).

Ok, to continue to the cookies. This is the second year I've made these cookies; last year, they were my favorite. They're spicy and molassesy all at once, with a glorious sugarcrust. Yum yum.


Molasses-Spice Cookies
(Cooks' Illustrated Best Recipe Cookbook)
  • 2 1/4 cups flour
  • 2 tsp baking soda
  • 1/2 tsp salt
  • 1 1/2 tsp ground cinnamon
  • 1 tsp ground ginger
  • 3/4 tsp ground cloves
  • 1/4 tsp ground allspice
  • 12 tbsp unsalted butter, softened
  • 1/2 cup dark brown sugar, package
  • 1/2 cup sugar
  • 1/3 cup sugar for rolling cookies
  • 1 large eggs
  • 1 tsp vanilla extract
  • 1/3 cup unsulphured molasses

Preheat oven to 375F. Line a baking sheet with parchment paper.

In a medium bowl, whisk flour, baking soda, salt, and spices together. Set aside.

In another bowl, cream together butter, brown sugar, and 1/2 cup granulated sugar for about 3 minutes, until light and fluffy.

Beat in egg, vanilla extract, and molasses until well combined. Mix in dry ingredients until combined.

Roll dough into balls, 2 tbsp each. Next, roll the dough balls in the remaining 1/3 cup sugar and place on prepped baking sheet about 1 1/2 to 2 inches apart.

Bake 11-13 minutes or until the outer edges begin to set and the centers are soft and puffy. Cool on cookie sheet for a few minutes before transferring to cooking rack.


Sunday, December 28, 2008

Raspberry Split-Seconds

Last year, I made raspberry thumbprints, which hubby really enjoyed. I'll admit, the recipe I used called for a pack of sugar cookie mix. And while you added more than the required ingredients to it, I felt like a cheater. A big, fat cookie cheater. So this year I decided to find a good replacement. these caught my eye because they are a similar concept, but a much more fun shape.

After I wrapped up all the gift cookies, hubby snuck the bag of these leftovers. I found the bag with 1 sad cookie left for me. :(


Raspberry Split-Second Cookies
(The Taste of Home Cookbook, pg 560)
  • 3/4 cup butter, softened
  • 2/3 cup sugar
  • 1 3gg
  • 1 tsp vanilla extract
  • 2 cups flour
  • 1/2 tsp baking powder
  • 1/2 tsp salt
  • 1/3 cup raspberry jam

Preheat oven to 350F. Line a baking sheet with parchment paper.

In a medium bowl, whisk together flour, baking powder, and salt. Set aside.

In a large bowl, cream together butter and sugar until it is light and fluffy. Beat in egg and vanilla. Gradually mix in flour mixture until well combined.

Divide the dough into 4 equal portions. Shape each into a 12 inch long log. Place 2 each on a baking sheet, leaving 4 inches between them.

Make a 1/2 inch deep indentation down the center of the logs. (Mine weren't deep enough.) Fill the indentation with jam. The best way to do this is the put the jam into a bowl and stir it really well so it's a smooth consistency, then spoon it into a ziplock baggie. Cut the tip off the baggie and pipe the jam into the indentation. Easy and clean! Great task for children and husbands.

Bake for 15-20 minutes, or until lightly golden. Let cool. The recipe calls for 2 minutes, but I let it sit longer, giving more time for the jam to cool so it didn't stick on everything. Cut diagonally into 3/4 inch slices.

Remove to wire rack and cool completely.

Oatmeal Raisin Cookies

I've been searching for a great oatmeal raisin cookie recipe... lazy, waiting-for-them-to-come-to-me searching. What I want seems to not be the typical oatmeal cookie. I want a fluffy cookie. While I find great recipes, they are never fluffy. I guess I'll have just have to bite the bullet and start experimenting.

Anyhoo. Some of the guys at work said oatmeal cookies were their favorite, so I decided to include them in the Christmas cookie collective. I have a few recipes I've pulled off TasteSpotting, and decided to try this recipe since I've already tried, and ruled out, the Quaker Oats lid recipe. I found them enjoyable, as did hubby.


Oatmeal Raisin Cookies
  • 1 1/2 cups flour
  • 1/2 tsp salt
  • 1 tsp baking powder
  • 1 tsp baking soda
  • 2 cups light brown sugar, packed
  • 1 cup butter
  • 2 eggs, lightly beaten
  • 1 tsp vanilla
  • 3 cups old-fashioned oats
  • 1 - 1 1/2 cups raisin
  • powdered sugar for rolling
In a medium bowl, whisk together flour, salt, baking powder, and baking soda. Set aside.

In a separate bowl, cream together sugar and butter. Beat in eggs and vanilla. Stir in dry ingredients, oats, and raisins.

Chill dough. To save my sanity, I made a few of my doughs the day before; this was one of them. So you can chill it for a few hours or a couple days. Whatever works best for you and your schedule.

Once your dough has chilled and you're ready to make the cookies, preheat the oven to 350F. Line a baking sheet with parchment paper.

Roll dough into walnut-sized balls. Now, I'm not all that familiar with walnuts, so mine were probably 1 1/2 inches. They were a bit too large as the cookies will flatten and expand quite a bit. I ended up with square cookies because they all ended up smooshing into each other!

Now, roll each dough ball in the powdered sugar. To remove excess sugar, I sort of tossed the ball back and forth between my hands a few times. Worked like a charm. Place cookies 2 inches apart on baking sheet.

Butter the bottom of a drinking glass. Press it into the powdered sugar, then press down on each cookie until it's about 1/4 inch thick.

Bake 8-10 minutes.

Saturday, December 27, 2008

Peanut Brittle

Along with my fond fudge memories, I've got fond peanut brittle ones. My grandma made it frequently when I was a kid, and I seem to always associate it with Christmas. Peanut brittle is another one of those treats that intimidated me (like fudge) because of it's candy nature. Soft-ball, hard-ball.. aah!! Plus, my mom always talked about how too much humidity could prevent it from hardening.. Needless to say, it was a great act of courage for me to attempt this recipe. And you know what? Acts of courage are great, except this particular one has resulted in my eating waaaay too much peanut brittle. Seriously, I can't stop. I have a problem.

There's a good chance this is my great-grandma's recipe. I'll have to find out. It's definitely the one my mom has always used.


Note: this (or other hard candies) should not be made on really humid or rainy days (so sayeth Mama Sarah's mama.)

Peanut Brittle
  • 1 1/2 cup sugar
  • 1/2 cup light Karo syrup
  • 1/4 cup water
  • 1/2 tsp salt
  • 2 cups raw peanuts
  • 1 tsp baking soda
Line a baking sheet with foil.

Combine sugar, Karo, water, salt, and peanuts in a heavy saucepan. Bring to a boil, stirring constantly with a wooden spoon. (I finally have a wooden spoon!! Christmas present from hubby)

Cook about 10 to 15 minutes. Mom says to cook until it smells slightly scorched. I'm not quite comfortable with my familiarity with that smell, so I instead decided to do the hard-ball test. To do this, simply have a cup of really cold water nearby. Every-so-often drip a bit of the mixture into the water. You're finished when the mixture hardens into strands within the water. It's supercool.

Once you've reached this stage, remove from heat. Quickly stir in the baking soda; the mixture will bubble and thicken. It'll also look a funny, lighter color. Don't worry.

Quickly spoon the mixture into the prepared baking dish. To the best of your ability, spread the the mixture across the pan, creating an even, thin consistency.

Let cool and set. Once it's hard, break it into pieces. Be careful; hubby got stabbed by a sharp corner of candy goodness.

Consume. Apologize to your teeth. Eat another piece. Makes excellent breakfast.

Tomato Chevre Tarts

Thinking of these tarts, I just made a Homer Simpson drooling sound in my head. These went over very well (though hubby removed the tomatoes and left them on the plate!) which makes me happy because I just sort of threw them together. I've never really worked with goat cheese and thought they'd go well with tomatoes, which I wanted to use. I wanted to make a tart, single-serving size. So, voila! Tomato chevre tarts.


Tomato Chevre Tarts
  • 1 sheet puff pastry
  • 15-20 cherry tomatoes
  • 5 oz chevre, crumbled
(rough approximations)

Preheat oven to 400F. Line baking sheet with parchment paper.

Let the pastry sheet warm to room temp. Roll out to approximately 9 by 9 inches. Using a pizza cutter, cut the sheet into 16 squares (about 2 x 2 inches).

Using a knife, score about 1/4 to 1/2 an inch in from the edge, creating a square within a square. Make sure to not cut all the way through the pastry. Next, use a fork to poke a bunch of holes in the interior square. This will prevent the interior from puffing up as much as the edges.

Place squares on prepared baking sheet and bake 10ish minutes, until it has slightly puffed and is lightly golden.

Once the pastry is a bit puffed and golden, place a piece or two of chevre in the center of each square.

Next, cut a cross into the bottom of each tomato, then place a tomato on top of the chevre on each tart. Sprinkle with coarse salt and pepper.

Bake another 15-20ish minutes until pastry is puffed and richly golden.

Peanut Butter Pixies

After my successful fudge experience, I wanted to try peanut butter fudge. It was my favorite fudge variety as a kid. I happily came across this recipe for Two Toned Chocolate Peanut Butter Fudge. My friends, after sampling it, excitedly chattered about my making peanut butter pixies, which they had all had in school. I think Peanut Butter Pixie is a fun name, so I'm sticking with it.

These were a bit too creamy and soft to really be fudgy, but they are quite tasty; a great blend of peanut butter and chocolate. Definitely something I will make again.. and again.. and again.. until the end of my sugar-soaked life. (Have I mentioned yet how much sugar I've had in the past week???)


Peanut Butter Pixies
  • 1 cup peanut butter chips
  • 1 cup bittersweet chocolate chips
  • 2 1/4 cup sugar
  • 1 small jar (7 0z) marshmallow cream
  • 3/4 cup evaporated milk
  • 1/4 cup butter
  • 1 tsp vanilla extract

First - as with all fudge - line an 8x8 pan with foil. Now, my 8x8 was occupied at the time with some tasty gingerbread, so I used a slightly differently sized pan (10x7 maybe) which resulted in thinner fudge.

Place peanut butter chips in a heat-safe medium-large bowl. In a separate yet similar bowl, place the chocolate chips.

In a heavy sauce pan, combine sugar, marshmallow cream, evaporated milk, and butter. Cook over medium heat, STIRRING CONSTANTLY, until it boils. Boil for 5 minutes (continue that stirring!). Remove from the heat and quickly stir in the vanilla.

This is where I deviated from the recipe. It says to "Working safely, but quickly, stir one-half of the hot mixture into peanut butter chips and the other half into the chocolate chips. Stir the peanut butter mixture until fully melted and quickly pour into prepared pan" then to do the same with the chocolate chips. I was worried about having equal amounts in both chocolate and peanut butter, as well as the mixture cooling before I could get it all done. So instead, I called in hubby and had him assist. I alternately ladled a ladleful of hot mixture into the separate chip-filled bowls. Then hubby and I each stirred one bowl until our chips had melted. He poured his peanut butter mixture, then I poured mine on top. This worked well.

Let cool to room temp. Cut into squares.

Mini Baklava Cups

I got this recipe from a magazine at work; shame on me for not writing down which. I'll have to get it Monday. Gotta have proper citations, right?

Anyhoo, I love baklava. From the moment I tried this glorious dessert in middle school (thank you, Ms. Gutsmeidl) I have loved it, but I absolutely hate dealing with phyllo. It's a pain. We don't get along. So when I saw this recipe using preformed phyllo cups, I had to give it a try. It's single size and portability made it great for a get-together as well.

Everyone seemed to enjoy these adorable treats, but also agreed that it somewhat misses the true baklava taste. One guest likened them to health-food bars, though positively mind you.


Mini Baklava Cups
  • 2 packages mini phyllo dough shells
  • 1/3 cup honey
  • 2 tsp lemon juice
  • 1 cup shelled pistachios
  • 3 tbsp sugar
  • 1/2 tsp ground cinnamon
  • 1/4 tsp ground cloves
  • 1 tbsp butter, melted

Heat oven to 350F. Place shells on a baking sheet, preferably one that has a rim.

In a small cup or bowl, stir together the honey and lemon juice until they are well blended; set aside.

In a food processor (or stupid Magic Bullet) pulse pistachips, sugar, cinnamon, and cloves until just chopped. Add butter and pulse to distribute evenly.

Spoon a rounded teaspoonful into each shell. Bake for 8 to 10 minutes, or until they are lightly brownded.

Spoon 1 teaspoon of the honey mixture over the hot filling. (I ran out and had to mix a little bit more together) Cool on a wire rack. Make sure something is placed underneath in case of drips.

The holidays are ALMOST over and I'm giving the kitchen a rest

Weeeellllll. Naughty me, I haven't updated any of the things I've baked. I apologize. But the amount I've baked has grown larger and larger that updating has become a bigger and bigger time commitment. So, now for the sploooge of recipes. Here's a preview.

Hubby and I had a Christmas shindig, for which I got to try a bunch of new things. Menu included:
mini baklava cups
peanut butter pixies
tomato chevre tarts
peanut brittle

I also baked cookies this year for my friends and co-workers. I made a total of 24 dozen, with 6 varieties:
fudge drops
oatmeal raisin
cranberry-orange pinwheels
raspberry split-seconds
molasses spice
cardamom

AND on top of all of that, I also experimented a bit with my mini tart pans. AND I made apple chips, which are amazing.

I think that's it. I'm just about sure. I hope you enjoy the onslaught of posts. Happy holidays!

Monday, December 15, 2008

Fudge Success

Hello all,
I come bringing wonderful news!! I've made tasty fudge!! My wonderful aunt, reading about my fudge failures, told me her mom's recipe. I tried it and voila!


Preeettty smooth chocolately fudge! And it's from the recipe on the back label of the marshmallow creme jar. Delicious. It's very similar to the other fudge recipes I've tried, except at the end, marshmallow fluff is added. Boy, does it make a difference! A happy, delicious, wonderful, ego-restoring difference.

Fantasy Fudge
  • 3 cups sugar
  • 3/4 cup butter
  • 5 oz (2/3 cup) evaporated milk
  • 12 squares (12 oz) baker's semi-sweet chocolate, coarsely chopped
  • 1 7-oz jar marshmallow creme
  • 1 tsp vanilla
  • 1 cup chopped walnuts (optional)

Line an 8x8 or 9x9 pan with foil; set aside.

In a large, heavy saucepan, bring sugar, butter, and evaporated milk to a boil over medium heat. STIR CONSTANTLY. Boil for 4 minutes or until a candy thermometer registers 234F (I went by the temperature, which was much longer than 4 minutes). STIR CONSTANTLY. Once 234F has been reached, remove from heat.

Add chocolate and marshmallow creme; stir until thoroughly melted and incorporated. Add vanilla and nuts (if you chose to use them). Stir well.

Immediately pour the fudge into the prepared pan and spread evenly. Let stand at room temp for 4 hours, until completely cooled. Cut into delicious squares of fudgy goodness. Store in an air-tight container.

ENJOY FUDGY DELICIOUS.

Saturday, December 13, 2008

Eggnog Thumbprints and other musings

Hello my lovelies! I return from a hellish semester filled with reading and a 24 page paper on the racial divide in the misogyny of author Richard Wright's fiction. Wooooo! Time for some Christmas cooking!!! I know I promised Thanksgiving recipes, and I'll get around to updating those too.

Today, hubby and I decorated our (too large) Christmas tree, which is always a somewhat special time as he proposed to me as we finished decorating my family's tree. And the decorating of the tree really made me want to bake some Christmasy goodies.


First came the fudge. Two batches. And I failed at both. I first tried an Alton Brown recipe, paying strict attention to the temperature on the candy thermometer. It was a disaster. Then I decided to go with Nigella's recipe, adding chocolate. Again, disaster, but on a smaller scale. Since I've tried multiple recipes, it must be me. What am I doing wrong?? I had an aunt who made the BEST fudge ever, but I was too young to learn her ways (also, she lived multiple hours away). Now, she's no longer with the family so my one fudge link is gone! I do have another aunt who has suggested another recipe, which I will try tomorrow. I will persevere until I have some creamy, chocolatey fudge awesomeness. It's my mission.

So the fudge failed. Being a trooper, I moved on. I'd come across this recipe for rum-eggnog thumbprints. I thought I'd audition them for a spot in my Christmas cookie line-up as them seem like such a festive embodiment of Christmas cheer.

Eggnog Thumbprints

Cookie

  • 3/4 cup unsalted butter, softened
  • 1/2 cup white sugar
  • 1/4 cup brown sugar
  • 1 egg
  • 1/2 tsp vanilla extract
  • 2 cups flour
  • 1/4 tsp salt

Preheat oven to 350F. Line cookie sheet with parchment paper.

Cream together buter, white sugar, and brown sugar. Beat in egg and vanilla.

In a separate bowl, whisk together flour and salt. Add to butter/sugar mixture.

Drop 1 inch balls of cookie dough onto baking sheet. Make deep depression in the middle of each cookie. Bake for 10-12 minutes.

Cool completely. While the cookies are cooling, prepare frosting.

Frosting
  • 1/4 cup butter, softened
  • 1 cup powdered sugar
  • 1 tbsp rum
  • nutmeg, to garnish

In a small bowl, mix together the butter, powdered sugar, and rum. Make sure to eliminate any lumps the powdered sugar might form.

Spoon mixture into a ziplock baggie and cut the edge off one tip. Squeeze the icing into the depressions in each cookies.

Sprinkle with nutmeg.


Alright. So, I was a bit disappointed with these, though the idea is awesome. I felt something of the eggnog taste was missing; I'm thinking of trying to make a more involved icing, involving cream and eggyolk. Hubby enjoyed the cookies. I suppose I'm just looking for things to knock my socks off.

*ed. note .. A day later, these cookies seem to have a bit more eggnogy flavor, and unlike many sugar cookies, have not hardened. Points for this!

Thursday, November 27, 2008

Happy Thanksgiving!!

Happy turkey day everybody; I hope yours has gone well. Hubby and I enjoyed a nice, quiet day at home with me tinkering in the kitchen. I successfully had dinner ready at the exact time we planned to eat, so congrats for me. Everything was made from scratch (including that gorgeous roll and cranberry sauce) so I'm feeling pretty great this year. I'm also feeling pretty tired, so expect recipes within the next few days.

Wednesday, November 26, 2008

Some disappointments

Since I have some time off from class, I thought I'd bake some goodies and eagerly post them. Alas, that plan was thwarted. I did bake, fear not. I just didn't bake anything I want to post. Now, I know I should post everything, good and bad, but I've got a kitchen to clean, papers to write, and a thanksgiving feast to prepare for. So, short descriptions will do.

~

I've gone a bit crazy while shopping this past month or so and ended up with 6 cans of pumpkin! It's crazy, I know, but I've discovered I LOVE pumpkiny goodness. I've been making alot of the cookies I usually do (with the delicious cinnamon chips, of which I currently have 5 bags), so I decided to try another pumpkin bread recipe. I got UBERexcited because I was going to give a loaf to my friend as a house-warming gift, then I had another loaf I planned to bring to work, and then for hubby and me I made little mini-muffins, because they are adorable.

At this point in the story, I'd like to say that you should always trust your intuition. Bakers are not demigods, especially those who blog. Accidents/typos/mistakes occur. So when you think it calls for too much baking soda, listen to yourself. Otherwise, you'll end up with 2 loaves and 24 mini muffins of inedible pumpkin bread. I was so disappointed; I kept trying bites hoping that perhaps I'd just gotten a not-well-mixed area... Alas, it was all ruined. The day when you throw away that many freshly baked goodies is a sad, sad day indeed.

~

BUT I decided to keep going. One little mess won't ruin my spirit! I recently bought a bunch of apples, as it is that season and there are a million and one apple things I want to try. I recently discovered that hubby is a huge fan of coffee cake, so I went for this recipe. Apples, streusel, coffee cake.. how could it not be delicious?

Well, my oven has decided the heating element should be way off and way uneven. As in, 1 bottom half burns black while the other side is still only partially cooked. Great, right? Now, disregarding that, there's nothing particularly wrong with this recipe; it just doesn't wow me. And what I'm going for is a reportoire of recipes that WOW me and hopefully you (the eater) too. I think the shortening makes it funny. It's not light and fluffy enough. It needs WAAAY more appley goodness. And much less streusel.

~

Thanksgiving tomorrow. YAAY!

Thursday, November 13, 2008

Squash Hearthbread

So, remember that time I posted about spaghetti squash? (Pssst, it was only 20 minutes ago!) Anyhoo, I had tons of squash left over from when I made it yesterday, and I really didn't want to throw it out. I wanted to give the squash a chance to shine and make itself beloved in my eyes. At first I thought savory muffins might be nice. Then I remembered the tasty, tasty bread at Biaggi's and thought perhaps I could mimic that.


So basically, I used Nigella's hearthbread recipe that I adore, and modified it a bit. I prepared the dough as usual and let it rise. Then, when it came time to halve it and roll it out, I stretched it a bit then put about 1/2 a cup of squash on each half. Then I pulled the edges together, sealing the squash inside. I rolled the dough and had a few bits where the squash exploded through, but it's okay. I then brushed the tops with olive oil, sprinkled them with salt and pepper, then baked as per the recipe.

It's pretty tasty, though I don't think this is the best way to do spaghetti squash either. My friend Amanda, who loves squash, seemed to enjoy the bread. Even hubby thought it wasn't too bad (he's not a gourd fan). It's tasty. I plan on eating some and then bringing some to work. This seems to be a good way to get rid of leftover veggies.

Spaghetti Squash


What is this, a sea anemone?? No my friends, it is the spaghetti squash, of which I have just recently become aware. My friend at work had recently made some, so I talked with him a bit, got some ideas, and decided to try it.

I'd seen a recipe online and decided to try that idea. Basically, you bake the squash, remove the "noodles" and toss it with whatever you want.

I'm not sure how I feel about it. It's sweet and crisp. I think I didn't have enough savory to balance the sweet, but it's not a gourd I'm giving up on easily (you'll hear more about that soon).


Spaghetti Squash
  • 1 spaghetti squash, halved lengthwise
  • 1 onion, diced
  • a couple garlic cloves, minced
  • a few tbsp butter

I used a few different sources to bake the squash. I halved it, then placed it face down on a baking sheet. I baked it at 350F for about 20 minutes, then flipped the halves over and brushed them with olive oil. I let those bake until the squash was soft.

While that's going, saute the onion and garlic in the butter.

Once the squash is baked, use a fork to scrape the strands out. You'll easily be able to tell which way to go. It's super fun.

Toss the squash in with the onions and garlic. Saute for a few minutes.

Serve sprinkled generously with parmesan.

Tuesday, November 11, 2008

Bread Pudding wtih Amaretto Sauce

So today I went all out homestyle. By that I mean Cajun/Creole food. The best Louisiana dessert is by far bread pudding. Its something everyone seems to know how to make. I mean, I got this recipe in 5th grade from my best friend at the time. So perhaps - since it was a 10 year old recipe trade off - it might be a dumbed-down version of bread pudding, but it's so tasty I can't bring myself to find a new recipe. I found the recipe for the Amaretto sauce years after that initial recipe swap. I had one for brandy too, but I didn't really like that one. Amaretto all the way!


Do you see that delicious puddle of sauce? Here's a close up for ya!


So good. I actually had to eat that piece of bread pudding before updating this. It was irresistable!

Bread Pudding
  • 1 loaf white bread, broken into bitesize pieces (somewhat old bread is best)
  • 14 oz sweetened condensed milk
  • 4 eggs
  • 3/4 cup sugar
  • 1 tsp cinnamon
  • 2 tsp vanilla extract

Preheat the oven to 350F. Grease an 8x8 or 9x13 baking dish. It's your choice whether you want thicker or thinner.

Place the bread bits into a superlarge bowl.

In a medium bowl, beat the eggs. Add the milk, then the sugar, vanilla, and cinnamon (in that order). Mix well.

Pour the mixture over the bread and mix well. You have to do this with your hands. It involves lots of mashing and mixing. Fun times.

Put the bread into your prepared dish.

Bake for 35 minutes.

Amaretto Sauce
  • 1/2 cup butter
  • 1 cup powdered sugar
  • 1 egg yolk
  • 1/4 cup Amaretto

In a saucepan, melt the butter. Mix in the sugar until they are well combined.

Separate the yolk into a large bowl. Have your whisk handy. Pour the butter/sugar mixture into the yolk, whisking furiously the entire time. You don't want little baked yolk strands in your amaretto sauce.

Return the sauce to the saucepan. Set to a low heat. Stir in the amaretto.

Spoon over bread pudding and enjoy!

Baked Sweet Potatoes

I have been craving sweet potatoes like crazy lately. I was going to make my traditional Thanksgiving sweet potato casserole a few weeks early, but decided instead of bake some. My family never did the whole baked sweet potato thing, but my mother-in-law did time or two when I ate over there. It's super easy.


Baked Sweet Potatoes
  • sweet potatoes
  • foil
  • brown sugar
  • butter

Wash and pat dry the potatoes. Poke it all over with a fork, then wrap it in foil.

Bake at 425F for 40-60 minutes. You can tell it's finished by putting on an oven mitt and squeezing the potatoes to see if they are soft.

Cut open and add as much butter and sugar as you please. I'm sure marshmallows would work nicely as well!

Crawfish Etouffee

So it's getting cold outside, which means the menu changes quite a bit to stews and chili and such things. On top of the cold weather, my sister called me while she was at the grocery store shopping for crawfish etouffee ingredients and got both hubby and I craving some. Since today is Veterans' Day and hubby is a veteran, I decided to go all out. That means crawfish etouffee, french bread (storebought), baked sweet potatoes, and bread pudding. Yum yum. I don't miss home so badly (for the moment).

For those of you who don't know anything about Cajun cooking, an etouffee is a form of the French word for "smothered." You can have a variety of different etouffees, but I've only ever had crawfish. Some are more of a tomato base as opposed to the creamy base I've got. The recipe I use comes from a family friend. We usually have this on Christmas eve, and I like to make it for my friends to give them a sample of Cajun food. It's yummy and warm and filling. I love it.


Crawfish Etouffee
(this is a recipe that goes off of ratios. Expect a pound of crawfish to feed 1.5 - 2 people)
  • 1 pound crawfish tails, thawed if from a frozen pack
  • 1 green bell pepper, chopped
  • 1 onion, chopped
  • 1 can cream of mushroom soup
  • 1/4 cup butter
  • Tony Chacheres

Melt the butter in a large pot. Add in the bellpepper and saute for a few minutes. Add the onions and saute until they are soft.

Stir in the cream of mushroom soup. Mix well and bring to a boil.

Season with Chacheres (a few teaspoons perhaps, I do it to taste). Bring to a low simmer and cover.

This is a dish that works well if it just simmers for a bit. Add the crawfish tails 20 minutes before serving.

Serve atop rice. Try not to overstuff yourself. It will be difficult, but I have faith in you!

Apple Pie

Have you figured out that I LOVE apples? Well I do, especially in baked goods. One of the best things about Thanksgiving is that I get to make apple pie. But, I usually find other excuses to make apple pie.. Most recently, I made one for my friend David's birthday. And before that, I made one for my friends at work.
The thing I love about this pie is its custardy base. Everyone is so surprised and delighted when they bite into it and feel the rich smoothness. The custard and the paper-thin apple slices make this pie unique in the world of chunky apples and goo pies. Not to rag on those pies; they're good and have a rightful place in the pie world. But this pie, MY pie, is better. I promise.


Apple Pie
(from Bell's Best, pg 433)
1/2 cup butter, melted
1 cup sugar
1 1/2 tsp flour
2 eggs, beaten
1 tsp cinnamon
2 cups Granny Smith apples, peeled and sliced very thin
1 uncooked pie shell (I use Pillsbury because I'm not that hardcore yet)

Preheat the oven to 350F.

Whisk together the sugar, flour, and cinnamon. Add the melted butter and mix well. Beat in the eggs until well combined.

Toss the apples in the custard mixture until they are well coated.

Pour into the pie crust. Make sure the apples and custard are evenly distributed.

Bake 30-45 minutes, until edges look a bit crisp and the middle doesn't jiggle very much. I usually stick a knife in the middle to make sure it isn't too runny.

Apple Pie Cookies

I first made these cookies awhile ago for some kids I help out at school. They are super delicious, and I absolutely love the itty-bitty chunks of apple in them. I mix in cinnamon chips as well, and they're just super moist and soft and amazing and soft and delicious. I heart them. These are probably in my top 5 favorite cookies.

Apple Pie Cookies
(originally Apple Jacks by BakingBlonde)
  • 1/2 cup butter, softened
  • 1 cup brown sugar, packed
  • 1/2 tsp vanilla
  • 1 large egg
  • 1 1/2 cups flour
  • 1/2 tsp salt
  • 1/2 tsp baking soda
  • 1 tsp ground cinnamon
  • 1 cup apple, diced
  • 1/2 cup to 3/4 cup Hershey's cinnamon chips
Preheat oven to 350F. Prepare baking sheets by lining them with parchment paper.

In a large bowl, beat the butter. Beat in the brown sugar, vanilla, and egg until fluffy.

In a separate bowl, whisk together the flour, salt, baking soda, and cinnamon. Add to the butter mixture. Combine well.

Stir in the apple and cinnamon chips.

Using a cookie scoop (these things are amazing), drop onto the baking sheet. Make sure these are well spaced, because the cookies will expand a bit.

Bake 9-12 minutes until the cookies are a light/golden brown and the edges are set. Let cool a bit before removing them to a wrack.

IF you have leftovers (which I've yet to experience) BakingBlonde advises against covering them tightly. Instead, loosing wrap them and keep them in the fridge. Otherwise, all the moisture from the apples will make them soften too much.

Saturday, October 11, 2008

Ferrero Rocher Cupcakes

So I found this recipe for cupcakes that taste "exactly" like the Ferrero Rocher candies. I have yearned and yearned to try this recipe, but could not find hazelnut extract in any local stores and just couldn't stomach the cost of shipping some here. But a recent trip to the New Pioneer Co-op in Coralville contained a delightful surprise. At the last moment, already standing in the checkout line, I noticed a small baking section. "Hold on a sec" I told my dear hubby and excitedly beelined to the bestest section of any store. Lo and behold, what do I triumphantly return to the checkout line with? Why yes, it was a bottle of hazelnut extract. Woohoo!! So I finally got to try the recipe... once I had the time and cash for the other ingredients.


So here they are. I tried one of my overbaked leftover cupcakes (you know, when you have enough batter you can't just throw it away, so you use the remainder to make 4 little cupcakes.. and then promptly forget about them while you mix up a ganache? Oh, you don't do that?..Silly me) So I'm bringing these to work tonight, I'll update once I know how the masses feel.

And I won't be immediately posting up the recipe here. I've got about 6 hours til I've got to get up for work and I really need to get some sleep after this crazy week I've had.

Wednesday, October 8, 2008

She lives!

Wow. Shame on me. It has been quite awhile since I've updated. I've got a bunch of recipes, just not alot of time. So. A new promise. I'll get some posted this weekend, once this crazycrazybusy week is over.
Things to look forward to:
Banana Bread
Apple Pie Cookies
Hershey's Brownies

And sooooon, I shall be attempting Ferrero Rocher cupcakes. That'll make up for my absence, right? Right??

Monday, September 22, 2008

Pumpkin Bread

Last week, we had a dip in the temperature which left me craving autumny goodness. It wasn't until after the weather warmed a bit that I've gotten a chance to actually bake something. I decided to make pumpkin bread - which I've never made before - so I started looking around for recipes. So often, I go straight to the internet, ignoring the great cookbooks I've got here at home. I found multiple recipes and decided to go with one from The Taste of Home Cookbook because I found it intriguing. It calls for the use of vanilla cook and serve pudding. As it's using something common in a not-so-common way, I really wanted to try it.


Pumpkin Bread
(from Linda Burnett, pg 432-433, The Taste of Home Cookbook)
  • 5 eggs
  • 1 1/4 cup vegetable oil
  • 1 can (15 oz) pumpkin
  • 2 cups all purpose flour
  • 2 cups sugar
  • 2 packages (total 6 oz) cook and serve vanilla pudding mix
  • 1 tsp baking soda
  • 1 tsp ground cinnamon
  • 1/2 tsp salt

Preheat oven to 325. Grease/butter/spray 2 standard loaf pans.

In a large mixing bowl, beat the eggs, then add the oil and pumpkin. Beat until smooth.

In a separate bowl, combine the rest of the ingredients. Add slowly to pumpkin mix. Pour into the greased pans.

Bake 50-55 minutes, or until a toothpick inserted near the center comes out clean. Cool for 10 minutes, then remove to a cooling rack to .. cool it completely.


So.. after 55 minutes, I did the whole skewer thing and it came out clean. Good thing because one loaf's edges were browning! BUT when I went to slice it up (at work no less) The middle of the loaf was supermoist. It's edible, but a weird texture.

Saturday, September 20, 2008

Biscuits and Gravy

Today, my friends, I share with you the best breakfast ever. The best part of going to my grandma's house was that she always made me biscuits and gravy. (Really, she made it for my family, but my childish heart was convinced she made it just for me). Is everyone familiar with ,bisuits and gravy? Fluffy biscuits of deliciousness drenched (never drizzled) with creamy flour gravy, so simple yet so divine? B&G doesn't have to be homemade; some of the best comes from run-down truck stops along the interstate. Small, hometown diners usually have some mean B&G. In a fix, even i-hop will do!


My grandma taught my mom how to make gravy, and she in turn taught me. You won't find any (white) gravy from a packet in Mama Sarah's Kitchen. Nuh uh! This recipe is more of a guideline, and I'm afraid a bare one at that. But so much of the gravy-making process is done by sight and taste and feel.

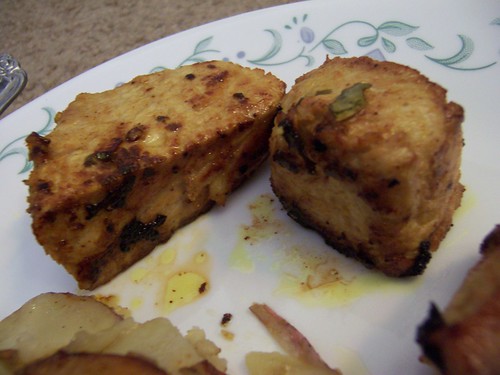
My grandma always made homemade bisuits, and one day I aspire to that. For now, I find frozen ones work well, definitely better than the pillsbury canned kind. Use whichever biscuits you love the most. Or have in the kitchen.

White Gravy:
fat (bacon or sausage fat, or you can use vegetable oil, though it's not gonna be nearly as tasty)
flour
milk
salt
pepper
water

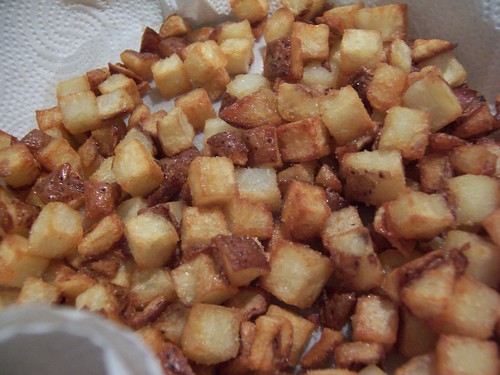
So, I started out frying some bacon on a low-medium heat. I had about 7 pieces of bacon and used the fat rendered from those. A couple days ago, I planned on making b&g, but ran out of time, so I saved the fat from that as well. In all, you'll need about a 1/4 of cup warmed fat. When you cook the bacon (or sausage) you'll end up with little bits of meat in the bottom; these are GOOD. Keep them! They add flavor.

Next your going to add the flour to the fat. You need to have equal parts of each, so about 1/4 cup flour to match your 1/4 cup fat. When stirring, USE A SLOTTED SPOON! As you add the flour, stir like a fiend. Now at this point, the flour is going to absorb the fat and you're going to think holymoly how am I going to get a good amount of gravy out of that?? Have no fear! Just keep it moving and try to get it all in the same place in your skillet (middle works well).

Once your gravy is starting to brown a bit (light brown, not dark; we aren't making a roux here), you're going to stir in milk. I added a bit at a time, starting with 1/4 to 1/2 cup additions, then adding slowly from there. As you add the milk, STIR LIKE CRAZY, or, like my mama says "it will be lumpy and there isn't a cure for that." How much milk you add decides how much gravy you end up with. I'd say all in all, I added about 1 1/2 to 1 3/4 cups milk.

The gravy will be a bit too thick at this point. You have to add water to thin it some. But before I do that, I like to season it with salt and pepper. I have no idea as to these amounts as it's all to taste. Start small, then make little additions until it's where you like.

Add water, again stirring like crazy. I'd say I added about 1/4 cup water until it reached the right consistency. Again, personal preference. Taste it again and add salt and pepper as needed.

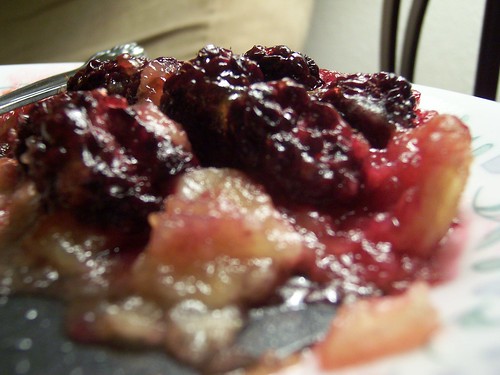
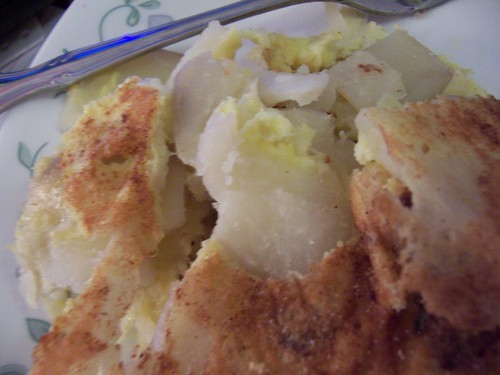
TADA! You've got gravy!

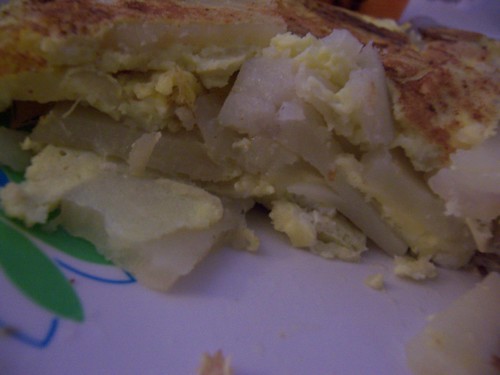
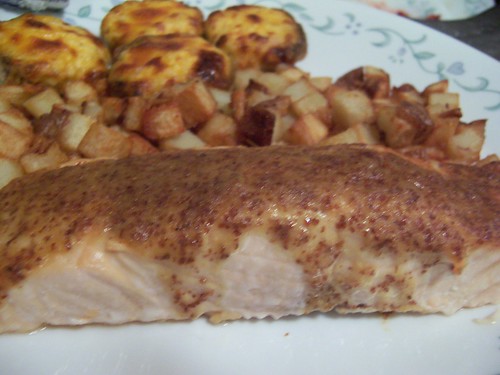
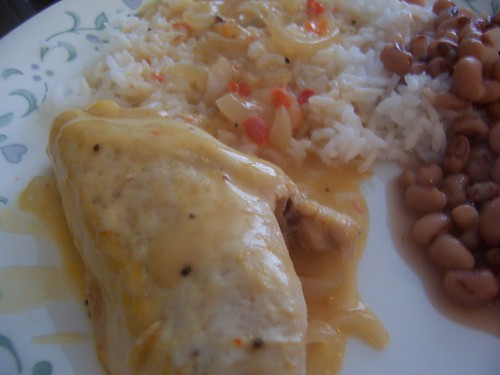
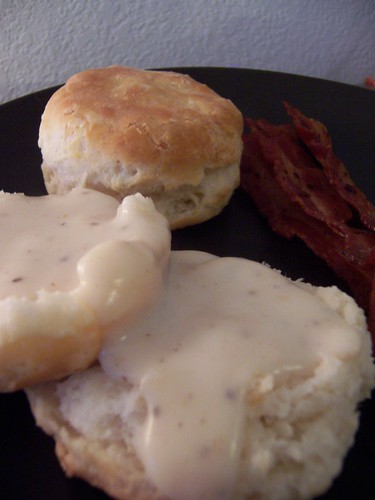
Spoon liberally over biscuits.


(Disclaimer: the picture above is a false representation of the manner in which Mama Sarah eats her b&g. She first tears apart her biscuits into bite size bits, then pours the gravy on top. It just isn't nearly as presentable)

(Disclaimer 2: gravy is difficult and it is very likely you'll mess up your first time.. or your second.. or your third. It's okay to screw up; just don't let that prevent you from trying again!)

Tuesday, September 16, 2008

Duck Fat Potatoes

So in my researching of roasting duck, I came across this one site that swore by duck fat potatoes. I did save the duck fat, because I want to try doing a duck confit, but that takes quite a few fat renderings. In the meanwhile, I decided to try these potatoes, regardless of the blatant unhealthiness. And I don't regret it.


There isn't really much of a recipe for this; cube some potatoes, melt some duck fat in a skillet, dump the potatoes into oil and let 'em fry. Woohoo. Once they're crispy golden, remove them to a paper towel lined plate to let them drain a bit and sprinkle generously with salt.

Now, without doing a side by side comparison, I can't really tell that much of a different between these potatoes and ones that are made with butter or olive oil. Shame on me, I guess. Don't get me wrong; they were delish, but they weren't the best potatoey goodness that I've had.

Mustard Salmon

At the store yesterday, I noticed the meat counter had salmon. Yum yum. It has been quite some time since we've had any. I've been dying to try duck fat potatoes (more on that later) and I thought salmon might be a nice companion. I also picked up some pre-made stuffed mushrooms that I adore. All in all, a tasty meal.

At first, I wasn't sure what exactly to do with the salmon. I came across this recipe for a simple mustard sauce and decided to give it a try. (By the way, I hate! when a blog only has the recipe on a video. I don't want to watch a video if it's a super simple technique).


Mustard Salmon:
  • 1 1/2 tbsp dijon mustard
  • 2 tsp rice vinegar
  • 2 tsp loose brown sugar (I added this to sweeten it up)
  • salmon (I had 3 small fillets)

Turn your oven on to broil. Place a piece of foil over a baking sheet. Place fillets on the sheet.

In a small bowl, combine mustard, sugar, and vinegar. Brush or pour the sauce over the fillets, spreading evenly.

Broil 6-10 minutes or until meat is flaky.

Thursday, September 11, 2008

Duck with cranberry sauce


Monday was hubby's birthday (as previously mentioned), and Tuesday we had his birthday dinner of duck with cranberry sauce and sweet potato casserole. Yum yum. I have VERY little experiencing roasting things; hubby always takes care of the Thanksgiving turkey. But roasting is easy enough. Salt and pepper, tuck in the legs and wings, and pop in the oven. Oh yes, and there's the wonderful removal of the gizzards, which in our duck weren't enclosed in a package. FUN times, I tell ya. One thing to remember with a duck: you need to poke it alot with a knife or fork so the fat can release during the cooking process.

Roast Duck
  • a duck
  • salt and pepper
  • 1 onion, quartered
  • garlic cloves

Remove gizzards and whatever else they've decided to put in your duck's cavity. Rinse well (including the cavity) and pat dry. With a knife or fork, poke the bird.

Sprinkle with salt and pepper. Stuff onions and garlic (and anything else you might like) in the cavity.

Tuck the legs into the skin around the tail. Tuck the wings close to the body. Place breast up in a roasting pan.

Cook at 350F for 1 1/2 - 2 hours.


With the duck, we had a cranberry sauce, which hubby picked out from a selection I presented to him. We had a mixed reaction to this East-West described sauce, and I doubt I will ever make it again. When it first touches the tongue, it is sour, but sweetens. Honestly, the best way to eat it is to get a bite of meat and one of the cranberries. Together, it's ok. I definitely wouldn't bast a meat with this sauce and most most definitely wouldn't serve it alone.

East-West Cranberry Sauce
  • 1/4 cup dried, sweetened cranberries
  • 1/4 dry oloroso sherry (I could not find a sherry that was both dry and oloroso; I went with dry)
  • 2 tbsp balsamic vinegar
  • 2 tbsp soy sauce
  • 2 tbsp cranberry juice (I added another 2 tbsp to sweeten it up)
  • 2 tbsp orange juice
  • 1/4 tsp orange zest
  • 1 1/2 tsp brown sugar (forgot this, and honestly I don't think it would help that much)

Soak the cranberries in the sherry for awhile. Once they've plumped a bit, combine all of the ingredients in a saucepan and heat over low heat.


The perfect bite.

Monday, September 8, 2008

Custard

Today is hubby's birthday; HAPPY BIRTHDAY, HUBBY! Because I had an 8:30 meeting and then class from noon until 3, we decided it'd be better to have the duck tomorrow so I have more time and less stress. I'm glad we made that decision, because if I had tried to do it today, I would have lost my marbles. Instead, I made his cake today (a simple Angel Food cake), some apple bars for the meeting (which did not bake thoroughly!!), and modified Marlboro Man sandwiches. Oh yes, and the custard since I had so many egg yolks left over after making the cake.

I used a recipe from Nigella's How to Be a Domestic Goddess, because honestly, where better to find an authentic custard recipe? I was a little anxious at first, due to the hot liquid that must be poured onto egg yolks, but things went well.


Custard:
How to Be a Domestic Goddess, p 134
1 tsp vanilla extract or 1 vanilla bean, split lengthwise
2 1/4 cups light cream (I used whipping cream because light doesn't equate to any american cream... that I know of. Please correct me if you can)
5 large egg yolks
1 tbsp sugar (I added an additional 1/2 tbsp)

If you're using the vanilla bean, heat it in a pan with the cream until almost boiling. Remove from heat, cover, and let seep for 20 minutes, then heat until warm. If you're using vanilla extract, combine the cream and vanilla extract in a pan and heat.

In a large bowl, beat together the yolks and sugar. Slowly pour the vanilla cream into the sweet yolks, beating the ENTIRE time.

Wash and dry your pan, then pour the mixture back into it. Cook over medium heat until it has thickened (about 10 minutes). Stir constantly!

Once the custard has thickened, plunge it into cold water and whisk for an additional minute or two. Eat then or store for a later time.

To reheat, pour it into a bowl placed over a pan of simmering water.

Delicious.

Saturday, September 6, 2008

Moroccan Pork Chop Marinade

We have a special post today, as dearest hubby is the one who cooked. Last week when I managed to drag him to the grocery store with me, he spied some pork chops that he had to have. He got them on the condition that HE would cook them. Today he did. We were trying to figure out something new to do with pork chops, so I of course searched online for pork marinades. Peering over my shoulder, hubby saw one he liked and tada, moroccan marinade. Now I'm not sure how legitimately Moroccan this marinade is, but we both enjoyed its tastiness. Though lately, I've been craving lots of veggies and not so much meat. But that's neither here nor there.


Moroccan Marinade:
  • 1/2 cup olive oil
  • 1/2 cup finely diced onion
  • juice of 2 lemons (approximately 6 tbsp of lemon juice)
  • 5 cloves garlic, minced
  • 1 tbsp chopped fresh cilantro (hubby used dried parsley instead because that's what we had)
  • 3 tsp ground cumin
  • 2 tsp crumbled bay leaves
  • 2 tsp paprika (didn't have it, so hubby used about 1 tsp red pepper)
  • 1/2 tsp ground turmeric

Combine. Pour over pork chops and let marinate. The suggested time was 6 hours.. we only did for about 2 hours. Oh well.

Hubby also made cottage fried potatoes. Instead of our usual way, he diced up the onion and used Chacheres instead of salt and pepper. He also used new potatoes, and they were some of the best new potatoes ever. So, I'll admit, I had a bit of pork chop and ALOT of potatoes for dinner.

So glad I have a hubby who can cook!

Tuesday, September 2, 2008

Smothered Chicken

Today we had my mom's smothered chicken. I loved this as a kid, though I generally ignored the chicken and just ate the rice drenched in sauce. What can I say? I wasn't fond of meat as a child. All that changed with a steak... but that's a story for another time.

I debated putting up the picture; it isn't all that appealing. But, 1) it's a chicken breast and how attractive can it really be, and 2) sometimes there just isn't time for snazzing up a meal. We know this; let's embrace it.

I've decided from here on out, I'm going to use chicken tenders more than chicken breasts, or I'm going to stab the bejesus out of the breasts before cooking. The ones I get here are so HUGE that it's just about impossible to get tasty flavorfulness into the entirety of the meat. They are just too large. Grr.


Smothered Chicken:

3-5 boneless, skinless chicken breasts
oil
1 onion, chopped
1 can soup (Mom uses cream of chicken; I decided to spice it up with some Nacho Cheese soup I accidentally bought eons ago)
Salt & Pepper

Heat a small amount of olive oil in a skillet (one with a lid). Saute the onions until clear. Remove from the pan.

Season the chicken with salt and pepper. Add a bit more oil to the skillet, then brown the chicken. Remove the chicken from the pan.

Stir up the soup a bit, then add it to the pan. Pour in some water; I used about 1/2 a cans worth. Stir until well combined and return the chicken and onions to the pan. You want enough liquid to come up around the meat, but don't dilute the soup too much.

Let simmer for at least an hour.

Best served with rice.

Monday, September 1, 2008

Soon Soon

Alright folks, cooking rut is over. It has to be, or I'll start going crazy. The only thing is balancing it with my work and school schedules. Because of the new schedule, hubby will be taking up some of the cooking responsibilities and some meals will just have to be quick and easy. As you might have discovered, I generally don't go for too quick and easy, so my stockpile of recipes is a bit less helpful. So recipe hunting is in order; also, I'll soon be using some of my mom's recipes from when I was growing up - smothered chicken breasts tomorrow.
I've also got a good little group of coworkers who I would really like to bake for; we're a group of 6 working our midnight shift (plus a supervisor or two), so we all work to keep each other awake. My contribution shall be sugar! I made smores bars for Sunday morning, which went over VERY well.
AND hubby's birthday is on the 8th, and he has requested duck. DUCK! I've never prepared a duck and I've only eaten it once before at a restaurant. So there's that to look forward to, and I'm excited. A duck! This all came about as we were grocery shopping and he happened to notice frozen game birds in the freezer section. And thus, he wants duck for his birthday. Perhaps we'll have goose for christmas? Anyhoo, a birthday meal is in order.
Today, for labor day, we had tasty tasty sirloin prepared by dearest hubby as he is our steak man. Mmmm steak.

Tuesday, August 26, 2008

Smashed Potatoes

Ok guys, no new recipe or anything - I'm in a bit of a cooking rut - but I just want to urge all of you to make some smashed potatoes. We had them for supper yesterday and they were so super-duper amazing, I'm making them again today.

Friday, August 22, 2008

Three Cheese Pasta Bake

Hello, hello. Good news and more excuses: I did get one of the shift bids, so I'm now working full time from midnight to 8:30 am. Yay health insurance and savings for a house! Due to the schedule change, I spent last week preparing for the switch (being awake when I usually sleep and sleeping when the sun's still out!) and this week actually adjusting to it. As hubby has been getting home this week about an hour before my bedtime, I haven't cooked much. BUT, I did make a delicious pasta dish: three cheese baked pasta. I don't have a picture because, hey it's white pasta with white cheese. It isn't all that pretty, but it is tasty! (Also, i was too tired to take a picture.)

Wednesday, August 13, 2008

Pizza

I'm a believer in cosmic balance. For every good thing, there is a bad thing and vice versa. Today was fabulous; it was the first day in a long time that I had all to myself without any obligations. No work. No market. No appointments. I slept until I was ready to arise. I had a great lunch with Amanda at Croissant du Jour. I went to the store and had a nice time looking at things. I decided to make pizza for dinner; fun right?

Right before starting to make the hearthbread that I planned to use as crust, I realized I forgot to buy 2 things and had to go back to the store. Prepared the dough, using my new/old stand mixer (!!!!!). An hour after rising, it hadn't really risen. I figured it was user error; I used my mixer to knead the bread. I tried to call hubby on his way home, but he didn't answer, so once he got home he had to go back out and get store made (meh) pizza crust. And I used too much cheese.

Since I had started making the hearthbread, I had already baked the 4 cloves of garlic, so I decided to go ahead and make the garlic/olive oil/parsley sauce. But some of my garlic burned, so I added tomatoes to increase the volume. It was an off shade of orange.

After spreading the sauce, I laid down a layer of spinach leaves and some roma tomato slices. Heaped on the mozzarella (too much heaping action), then laid down baby bella mushrooms, artichoke hearts, and crumbled bacon.

Even though there was too much cheese, it was tasty.


Oh, and my hearthbread has finally risen enough!

Croissant du Jour


There's an amazing little place here in town called Croissant du Jour. It's owned by a wonderful French lady. They serve lunch and pastries. So tasty. Amanda and I went there today (nicoise sandwiches and lobster bisque!!), and I decided to bring home some treats. I bought a Napoleon (above), croissant, and chocolate brioche. All tasty.

I don't usually update food I didn't make (and I don't plan to start), but I thought it was tres cool and want Cedar Rapidians to check this place out. It's on Mount Vernon. GO!

Figs!

So my hometown has experienced quite a development boom. This includes a "high end" market that my sister and I checked out. And then I dragged hubby there because I loved it! For the past year, I've been seeing all these recipes using fresh figs that looked amazing, but I can never find it. Finally, at The Fresh Market, I found some! I decided I was going to make a sauce to drizzle on top of them, using a sweet red wine, caramelized sugar, and perhaps honey, then serve them with unsweetened whipped cream.

Sadly, figs don't stay fresh very long, and by the time I had the time to prepare the sauce, only 2 of the figs were still good. Oh well. I still got my first taste of fresh figs - so yummy! I just decided to halve them and drizzle them with honey. Yum. I wish I had some now.

Banana Pudding

We're going to get back into the swing of things slowly. While staying at my dad's house, I saw he had alot of bananas, and knowing that my dad likes banana pudding, I decided I'd make him some. It's an easy, simple thing to make, but can be oh so good.

Banana Pudding:
  • 1 box banana pudding mix, prepared
  • 1 box Nilla Wafers
  • A couple bananas

..Prepare your pudding mix.


Lay down a layer of Nilla wafers on the bottom of your nice dish... or tupperware container.. whatever you want to use. I prefer things with lids, and this lovely dish has one!


Slice the bananas and layer them on top of the wafers.


Pour your pudding on top.


Layer the rest of the bananas and Nilla wafers on top. Be decorative; be greedy. Be whatever you want. I figured I'd try to make it look decent.

Place in the fridge and let set for an hour or two. Dad likes it all. Hubby likes just the pudding. I personally LOVE the slightly soggy Nilla wafers. I'm weird, what can I say. All I know is that I am 100% willing to dig through the pudding to find them.

um... Hi

Bad, bad me. It has been quite awhile since I last posted. Between working 40 hours a week, then baking for hours for the farmers' market, I just didn't have time to try out any new recipes. Then, I spent a marvelous week in Louisiana visiting my family and eating tasty tasty good. And now, I'm just a week and a half from classes beginning. AND hubby got a "promotion" (new position, more money) that will have him working 2:00-10:30 AM! Yowza!! So that I can actually see and speak to said darling hubby, I've put myself up for a shift bid - going full time, working 12:00-8:30 AM. So, upheaval? Check. But have no fear (well maybe a scoosh); I will maintain this blog! I will do it!! A girl's gotta eat, right? Yes.

Rant of excuses over. I thought I'd let you know some of the glorious foods I ate while in Louisiana:
bbq: brisket, chicken, Richards sausage (BEST EVER)
cheeseball (I'll make this one day, I promise)
squash casserole (Thanksgiving, hopefully)
Mom's amazing guacamole (not brave enough to attempt by myself)
fried shrimp poboy & string onion rings (Julien's Poboys)
delicious turkey breast - slow cooked
boudin
chicken and sausage gumbo
shrimp etouffee
eggplant casserole
muffelata
tamales
chicken ranch pizza
stuffed crab
corn and crab bisque
pan-broiled shrimp
chocolate covered sunflower seeds (YUM)

Mmmmmm tasty foods.

Thursday, July 24, 2008

Quick Fix : Scrambled Eggs Taco

Yesterday's farmers' market was AMAZING! The weather was great; the crowd was much bigger and nicer. I spiffed up my packaging and changed my menu a bit, added a sign and business perked up quite a bit! Amanda and I had a great time sitting next to a family selling hand-picked blackberries. We gave each other some good business. Overall, we had a great time and the response was much better. I can't wait to go back next Wednesday! Then the next week I'll be visiting family, so I'll miss the market, but I'll be back once I've returned to the area.

The one downside to having a table at the market is I don't get to go to the other tables and buy things! Next week I WILL get some zucchini and onions!


After the market I'm always super-tired, so I didn't really feel like cooking a big dinner last night. So instead, I scrambled up some eggs, then quickly heated up some tortillas in a skillet with some butter. Pop the eggs into the tortillas and ta-da! delicious egg tacos!