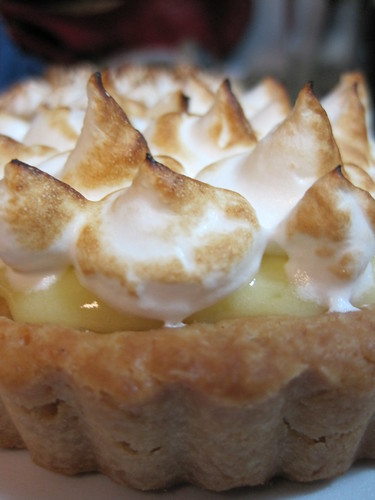
Having completed this recipe, I feel like a total badass. It's a two day project that involves three things I consider tricky: a pastry crust, a cream, and meringue. And let's not forget the most BA part; I had to buy a blowtorch (and by "had" I mean that I really wanted to). The tarts came out really well; my dad, husband, and brother-in-law all really enjoyed them, but wished they were bigger. This is definitely a classic dessert that will impress any lemon-lover. Though beware; it is tart and not for the (lemon)weak-hearted!
Lemon Meringue Tarts
(adapted from recipes by Pierre Herme and Dorie Greenspan)
(makes 1 large tart or 4 mini tarts)
Lemon Cream
- 1 cup plus 2 tbsp sugar
- zest of 3 lemons, finely grated (use the finest zester you can)
- 4 large eggs
- 130 ml freshly squeezed lemon juice (approximately 4-5 lemons)
- 13 tbsps unsalted butter, at room temperature and cut into big chunks
- 1 1/2 cups all-purpose flour
- 1/2 cup confectioner's sugar
- 1/4 tsp salt
- 9 tbsp very cold/frozen unsalted butter, cut into small pieces
- 1 large egg, slightly beaten
- 2 egg whites
- 2 tbsp caster sugar*
- 1/4 cup water
- 6 tbsps sugar
Day One
We begin with the lemon cream as it needs to chill overnight. Fill the sink with 3-4 cm of cold water. Next, you'll need to find a big heatproof bowl (preferably the bowl of your stand mixer if you have one) and a large pot that it can sit atop; we'll be making a double boiler of sorts. Pour water in the pot, but not enough to touch the bottom of the bowl when it is on top; set the water to a simmer. In your large bowl, combine the sugar and lemon, rubbing it between your fingers until the sugar is moist and fragrant. The sugar will resemble damp sand. Whisk in the eggs then the lemon juice.
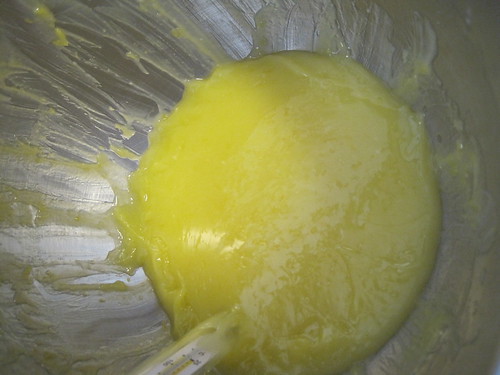
Place the bowl over the pot with simmer water, and start stirring with a wooden spoon. Stirring CONSTANTLY, cook the lemon cream until it reaches 85C (185F). It will take awhile. You'll start with a liquid that looks like :

For a good portion of the time, the liquid will remain thin. Only in the last few 10 degrees or so will the cream begin to thicken and become opaque. at 85C, your cream should be thick and look like this :

As soon as your cream reaches 85C, remove it from the heat and place it in the cool water bath. Let it cool to 60C (140F). Then, gradually inccorpated the butter chunks, whisking after each addition (and this is where the stand mixer is nice).
Once the butter is fully incorporated, switch to a hand-held mixer if you weren't using one to begin with. Blend the butter for 8 minutes, which will ensure a "too-smooth-to-be-true lemon cream." Pour the cream into a containerm, and press a piece of saran wrap against the surface of the cream. Make sure you've got an airtight seal. Refrigerate overnight. The cream can last in the fridge for up to 4 days.
Day Two
Time to begin the pastry. The original recipe assumes you're using a food processor. Since I don't have one, I couldn't. If you'd like the original food processor instructions (lucky dog), you can go to the original recipe.
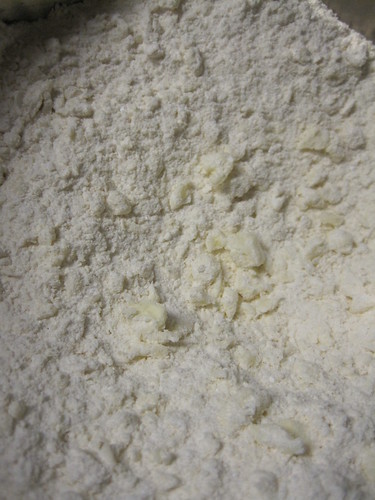
In a medium bowl, whisk together the flour, sugar, and salt. Scatter the small pieces of butter over the dry ingredients. Using a pastry cutter, cut the butter into the dry ingredients until it is coarsely cut in. You'll have pieces of butter the size of oatmeal flakes and some the size of peas. Like this :

Next, gradually add the egg, stirring well after each addition (I continued using the pastry cutter here and it worked fine). After the whole egg is added, continuing to cut/stir the dough until it begins to clump up. Turn the dough onto a lightly floured surface and lightly and sparingly knead the dough to incorporate any dry ingredients that were not mixed in. Form the dough into a ball or disk and wrap tightly in plastic wrap. Chill for at least 2 hours (I chilled mine longer and it was fine).
When your dough is chilled and you're ready to proceed, butter your pan(s) well. If you're making mini tarts, divide the dough into 4 pieces. On a lightly floured surface, roll out the dough, making sure to lift and turn the dough occasionally to prevent it from sticking. You want the dough in a roughly round shape and a few inches bigger than your pan. (If you're making 1 tart, roll the dough out to 12 inches. If you're making 4 tarts, roll each piece of dough out to about 5 1/2 inches.)
Centering the dough over the pan, place the dough in the pan. Seal together any cracks that appear. Trim overhang to 1/2 inch and fold the overhang in, making double-thick sides. Pierce crusst all over with a fork.
Freeze the crust(s) for at least 30 minutes before baking.
Preheat the oveen to 375F. Butter the shiny side of a piece of foil and fit tightly against the crust (buttered side touching the crust, of course). Place the tart pan(s) on a baking sheet and place on the center oven rack. Bake 20-25 minutes. Carefully remove the foil. If the crust has puffed, press it down gently. Bake an additional 10 minutes or until the crust is firm and golden brown. It is important that the crust browns; this adds scrumptious flavor. Transfer to a rack and cool to room temperature.
Once the crusts are cool, remove the lemon cream from the fridge and whisk it to loosen it up. It might seem to get a little lumpy, but it's okay. Pipe or spoon the meringue into the crust(s), nearly to the top. Tap the pans to smooth out the cream. Refrigerate for at least an hour before starting the meringue.
Has an hour passed? Yes? Ok. Let's start the meringue. The delicious, airy, sinful meringue. But only make it if you're just about ready to serve your tarts. Otherwise, the meringue will weep (and separate). Also, the two aspects of this part (egg whites and sugar syrup) go quickly, so call in a buddy if you can. It works best to do the two parts simultaneously.
Beat the egg whites with a pinch of salt at slow speed until it is fully frothy. Not just a little layer of froth at the top; it needs to be foam all the way through. Gradually add the caster sugar, increasing speed as you go. Beat to soft peaks and turn mixer to low while making simple syrup. In a small saucepan, combine the granulated sugar and water. Stirring constantly, bring the mixture to 115C (239F). Return the mixer to medium speed and slowly pour in the boiling syrup. Increase the speed to high and beat until th ebowl is no longer hot (it will be warm).
Pipe the meringe onto the lemon cream and caramelise using a blow torch.

So pretty! So fun! Now, this was my first time piping meringue so I had t play around a bit. I don't think any of my tips were quite right, but that's okay. Next time, I might just spoon some meringue on top and swirl it with a spoon.
I wanted to take a pretty cut-in-half tart so you could see the gorgeously smooth cream with the beautiful crust and meringue, but I was too busy eating it to cut it. So I apologize for the teethy marks. It couldn't be helped.

No comments:
Post a Comment